
The use of a modern laser cutter requires not only craftsmanship but responsibility and a will to put in the extra work to ensure that things go smoothly. Like many complex machines, a laser cutter requires a fair bit of maintenance from time to time.
If you operate a laser cutter that uses a honeycomb table, you will find cleaning the table a bit problematic with regard to the supplies you need, the preparation, and of course, the cleaning effort. In that regard, it pays to be well-prepared before you actually need to do it.
Table of Contents
Over the next few minutes, we’ll talk you through how to clean a laser with a honeycomb bed including the preparation process, the supplies you need, and what exactly you should expect when cleaning a laser cutter with a honeycomb bed. Believe it or not but the process is actually a lot easier than people imagine.

Why You Need to Clean a Laser with a Honeycomb Bed
- Better airflow – A clogged honeycomb restricts ventilation, leading to more smoke and uneven cuts.
- Improved cut quality – Resin and debris buildup can cause burning, discoloration, and even unwanted marks on the underside of your material.
- Longer equipment life – Regular cleaning prevents corrosive buildup and keeps your laser system operating efficiently.
- Fire safety – Loose debris or resin can catch fire if not removed regularly.
Cleaning Methods for a Laser Honeycomb Bed
Method | How It Works | Pros | Cons |
|---|---|---|---|
Vacuuming / Brushing | Use a shop vac, small brush, or compressed air to remove dust and light debris. | – Quick and easy – No water or chemicals needed – Low risk of damage | – Doesn’t remove resin buildup – Needs frequent repetition |
Wiping with Cleaner | Spray with a mild cleaner (e.g., Simple Green) and wipe with a cloth or sponge. | – Good for light soot and resin – Low cost – Can be done inside the machine | – Time-consuming – Hard to reach inside honeycomb cells |
Soaking in Cleaner | Remove honeycomb, soak in warm water + Simple Green or degreaser, then rinse. | – Loosens stubborn resin – Even cleaning coverage – Minimal scrubbing needed | – Requires removal of honeycomb – Long drying time – May leave residue if not rinsed well |
Pressure Washing | Medium-pressure washer (1200–1500 PSI) flushes out resin and debris. | – Deep cleans resin buildup – Restores honeycomb like new – Fast once set up | – Must remove honeycomb – Risk of bending if pressure too high – Requires outdoor space & drying time |
How to clean a laser with a honeycomb bed
Supplies
Having the right cleaning supplies makes the job much easier.
Recommended tools:
Tool | Purpose |
|---|---|
Lint-free cloths | General cleaning |
Isopropyl alcohol | Removing residue |
Soft nylon brush | Scrubbing cells |
Plastic scraper | Removing stuck debris |
Vacuum or compressed air | Dust removal |
Simple Green All Purpose Cleaner | Heavy buildup |
Rubber gloves | Hand protection |
Warm soapy water | Deep cleaning |
Avoid steel brushes or abrasive metal tools that can damage coatings or bend the honeycomb structure.
Assessment
The next thing you want to do is to inspect the honeycomb bed and figure out exactly how much cleaning it requires. Needless to say, the cutting process can get quite messy, and so does the cleaning effort afterward.
Even if you use the laser cutter sparingly, the machine will still accumulate a lot of soot, smoke, grime, and everything else that might gradually build up over time. As such, you want to closely inspect the laser cutter bed to figure out how to proceed.
How To Clean a Laser with a Honeycomb Bed: Cleaning Process
Step 1: Remove Loose Debris
Start by removing large debris from the honeycomb surface.
Use:
- A handheld vacuum
- Compressed air
- Soft brush
Pay attention to corners where dust tends to collect.
If using compressed air, use moderate pressure to avoid forcing debris deeper into the machine.
Step 2: Remove the Honeycomb Bed
Most honeycomb beds are removable.
Take the bed out carefully and place it on a protected work surface.
Removing it makes deep cleaning much easier and prevents residue from spreading inside your machine.
Step 3: Scrape Off Heavy Residue
Laser cutting resin-heavy materials like MDF or acrylic often leaves hardened buildup.
Use a:
- Plastic scraper
- Old credit card
- Nylon scraper
Avoid metal putty knives unless absolutely necessary.
Be gentle to avoid bending the honeycomb cells. We recommend using these plastic scraper tools, which make the job so much easier.
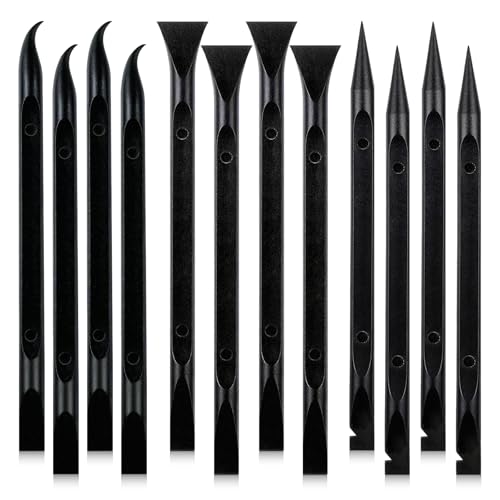
- ❤️ Compact, Portable & Always Handy - At just 5.8 inches (14.6 cm) long, this tool is lightweight and easy to carry. Keep one in your kitchen drawer, car glove box, office desk, or toolbox—it’s always ready whenever a sticky situation arises at home, on the road, or outdoors.
Step 4: Apply Cleaning Solution
For moderate to heavy buildup, spray the honeycomb bed with:
- Diluted Simple Green All Purpose Cleaner
Allow the cleaner to soak for several minutes before scrubbing.
This softens resin and soot buildup.

- All-purpose concentrated cleaner removes dirt, grease, and stains - perfect for busy parents tackling kitchen spills, mechanics cleaning shop floors, or office staff maintaining breakrooms.

Step 5: Scrub the Honeycomb
Use a soft nylon brush to clean between the honeycomb cells.
Work slowly and methodically.
The dirtiest areas are usually:
- Near frequent cutting zones
- Around the center of the bed
- Areas with poor airflow
For stubborn spots, repeat the soak-and-scrub process.

- MULTIFUNCTIONAL CLEANING BRUSH: High-quality soft household cleaning brush bristles can easily clean dirty parts of clothes, such as collars and cuffs without damaging the fabrics, and can also be used to clean stains on tiles and countertops, making home cleaning easy.
Step 6: Rinse and Dry Thoroughly
Rinse the honeycomb carefully and allow it to dry completely before reinstalling.
Moisture left behind can:
- Cause rust
- Damage electronics
- Affect airflow
- Lead to corrosion
Air drying or compressed air can help speed up the process.
Step 7: Use a Pressure Washer If Required (For Stubborn Residue)
- Use a medium-pressure setting (around 1,200–1,500 PSI) — strong enough to clean but not so powerful that it bends the honeycomb grid.
- A wide-angle spray nozzle (25°–40°) is best for even cleaning.

- [1600 PSI @ 1.2 GPM] - Great for light-duty, residential cleaning. Clean cars, trucks, motorcycles, boats, RVs, outdoor patio furniture, windows, decks, etc
Pressure Wash the Honeycomb Bed

- Hold the spray wand at a distance of 12–18 inches from the surface.
- Work in smooth passes across the honeycomb to flush out resin, soot, and trapped debris.
- Flip the honeycomb over and repeat on the other side for a deep clean.
Rinse & Inspect
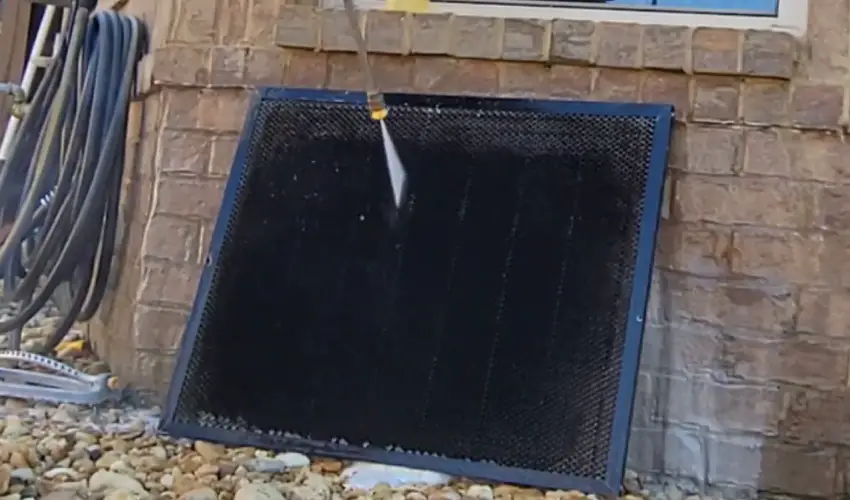
- Rinse thoroughly with clean water to remove any cleaner residue.
- Check for areas with persistent buildup and repeat if needed.
Dry Completely
- Shake off excess water and let the honeycomb air dry fully before reinstalling.
- To speed things up, use compressed air or leave the honeycomb in the sun for a few hours.
Pro Tips:
- Never use a high-pressure, narrow jet nozzle too close to the honeycomb — it can warp the thin metal cells.
- Always dry the honeycomb thoroughly to prevent rust or corrosion.
- Regular light cleanings (vacuum + wipe down) will reduce the need for frequent pressure washing.
Why Having a Clean Laser Cutter Bed is Important

For a laser cutter to operate at optimal parameters, the machine needs proper cleaning and maintenance on a regular basis. Anything short of that would render the processing of the flat material largely ineffective by most standards.
Those of you who have used laser cutting machines in the past would know that these devices are very accurate and that the carving/cutting process causes the build-up of a lot of grime and soot.
Failure to properly care for the machine will render the cutting process ineffective and even hazardous, especially if you’re cutting wood. Affected by the heat, any soot present on the bed will cause you to get an unclear engraving or damage the whole piece altogether.
Not just that but proper maintenance also reduces the risk of damage to the machine and/or health hazards to the operator. If you find that even after a thorough cleaning the honeycomb still contains ingrained grime then it may be time to consider purchasing a new honeycomb table.
Pro Tips for Maintaining a Clean Honeycomb Bed
- Use masking tape or transfer tape on materials to minimize resin deposits.
- Add sacrificial layers (MDF, cardboard, or acrylic sheets) under projects to catch excess soot and resin.
- Vacuum after every session to prevent buildup from hardening.
- Rotate your honeycomb if possible, to extend its lifespan.
What to Avoid When Cleaning a Laser with a Honeycomb Bed
It is important to see the laser cutting machine as a manufacturing tool first and foremost. In that regard, you shouldn’t employ any tools or supplies that might interfere with the machine’s capacity to perform its task in the long run.
We mainly advise you here to avoid scrubbing any of the components that interact with the material and the laser beam, but you should keep this in mind when dealing with the bed as well. Know that simple scratches to the honeycomb bed will negatively affect the machine’s overall effectiveness.
At the same time, some cleaning agents may also damage the bed of the machine, especially those that are too oily or greasy. Instead, you should look into using diluted cleaning solutions like Simple Green along with water and nothing else.
Also, try to remember that the material construction of the bed itself determines which type of cleaning supplies you may or may not use. While hard beds may allow for harsher scrubbing, a soft aluminum bed will definitely get damaged by hard brushes and persistent scraping.
How Often Should I Clean A Laser With a Honeycomb Bed?
- Light users (occasional engraving): Once every 1–2 months.
- Frequent users (daily cutting): Every 1–2 weeks.
- Business use (production): Weekly or even daily, depending on workload.
Conclusion
A clean honeycomb bed makes a big difference in cut quality, airflow, and overall machine performance. By following simple cleaning routines, you’ll prevent buildup, extend the life of your bed, and ensure every project comes out sharp and professional.
Frequently Asked Questions
Can I use strong chemicals to clean resin off the honeycomb bed?
It’s best to avoid harsh chemicals that can corrode or discolor the honeycomb. Instead, use a diluted degreaser like Simple Green for stubborn resin. Always test a small section first to ensure it doesn’t damage the surface.
How do I remove resin buildup that won’t come off with soap and water?
For tough resin, apply diluted simple green all purpose cleaner, let it sit for 5 – 10 minutes, then scrub with a nylon brush. You can also use compressed air to dislodge fine debris stuck inside the cells. Avoid abrasive wire brushes that can damage the honeycomb.
What happens if I don’t clean my honeycomb bed regularly?
Neglecting to clean your honeycomb bed can reduce airflow, cause scorch marks or uneven cuts, increase fire hazards from flammable debris, and shorten the lifespan of your laser system. Regular cleaning ensures consistent performance and safer operation.