Laser engraving on glass opens up endless possibilities for creating intricate designs, custom artwork, and personalized items. However, due to the delicate and brittle nature of glass, improper techniques can lead to cracks, chips, or unsightly damage.
Whether you’re a seasoned professional or a beginner exploring glass engraving, knowing the right tools, methods, and precautions is crucial.
Table of Contents
In this complete guide, you’ll learn how to laser engrave glass without damaging it, the best laser types, recommended settings, common mistakes to avoid, and pro tips to achieve clean, frosted results every time.
Can You Laser Engrave Glass?
Yes, glass can be laser engraved—but not cut. Instead of vaporizing material like wood or acrylic, lasers micro-fracture the surface of the glass, creating a frosted or etched appearance. The key to success is controlling heat and stress to prevent cracking.
Best Laser Types To Laser Engrave Glass
UV Lasers (Best Overall for Glass Engraving)

UV lasers are the best laser type for engraving glass, especially for high-detail, professional, and crack-free results. Their ultra-short wavelength allows them to engrave glass through photochemical ablation rather than heat, dramatically reducing thermal stress.
Why UV lasers are the top choice:
- Minimal heat-affected zone (near cold processing)
- Extremely low risk of cracking or chipping
- Ultra-fine detail and high contrast
- Ideal for crystal, optical glass, mirrors, and coated glass
- Perfect for precision and 3D-style glass engraving
UV lasers are widely used in glassware, industrial, jewelry, and crystal engraving applications where surface quality is critical.
CO₂ Lasers (Best Value & Most Common Option)
CO₂ lasers remain the most popular and affordable choice for glass engraving. Glass absorbs the CO₂ wavelength efficiently, producing a classic frosted look when proper settings are used.
Why CO₂ lasers work well:
- Clean, consistent surface frosting
- Excellent for glassware, mirrors, and flat glass
- Lower cost than UV systems
- Easy to dial in with proven techniques (wet paper towel, defocus)
While CO₂ lasers rely on controlled micro-fracturing, correct settings make them safe and effective for most glass projects.
Diode Lasers (Limited but Possible)
Diode lasers are not ideal for direct glass engraving but can work with surface treatments.
Limitations of diode lasers:
- Require coatings (paint, tempera, laser marking spray)
- Less consistent engraving quality
- Higher risk of uneven results
Diode lasers are best used for occasional or hobby glass engraving, not professional production.
How To Laser Engrave Glass
When a laser beam hits a glass surface, the moisture and air trapped between the silica elements react by expanding.
Since the glass is rigid, this expansion causes microscopic fractures on the glass surfaces which is what we see as fracturing and chipping or simply engravings.
The basic steps for laser engraving are quite easy to follow.

Step 1: Choose the Right Glass
Not all glass is created equal when it comes to laser engraving. Here’s what works best:
- Soda-Lime Glass: Common in most glassware, suitable for laser engraving.
- Borosilicate Glass: Resistant to heat and ideal for engraving.
- Crystal Glass: Engravable but may require more precision due to its composition.
- Tempered Glass: Not recommended due to its tendency to shatter under heat.
Recommended Glass Materials For Laser Engraving

As mentioned before, the glass type used to laser engrave on makes all the difference. As a rule of thumb, avoid glass with higher lead content. You are better off with cheap glass found at most retail shops. Soda-ash glass is particularly great and common in most consumer products.
Leaded crystal glass or any other glass with heavy metal components poses a great challenge when engraving. This is because it makes the laser beam skip over some sections and hence leaves some spots unmarked. Additionally, these glass types may easily break under heat stress.
If you have to work with high-end glass types such as crystal glass, exercise extreme caution. Lead, especially, expands at a varied rate in comparison to the rest of the crystal. This can cause fracturing and breaking.
To know if your glass can handle the engraving, you may want to test it beforehand. In addition, adjust the speed and power settings on the machine, until you determine the perfect settings that will produce the look you desire.
Remember that the higher the number of times required to run the same design on the glass surface, the blurrier it will look. Therefore, you might want to know the right setting before starting your engraving project.
Pro Tip: Test on a sample piece of your chosen glass type to avoid costly errors
Step 2: Clean the Glass
A clean surface ensures smooth engraving and reduces the chances of unwanted marks.
Let the glass dry completely before engraving.
Use a lint-free cloth and glass cleaner to remove dirt, oil, or fingerprints.
Step 3: Mask the Surface (For CO₂ Lasers – Not Required For UV Lasers)
Applying a masking material helps protect the glass and ensures a more even engraving. This layer acts as a heat buffer and reduces chipping.
Recommended Masking Material:
Wet Paper Towels:
- Why Use It?: Creates a barrier that dissipates heat and reduces chipping.
- Best Type: Any standard white paper towel works. Avoid those with patterns or dyes that could transfer during engraving.
- How to Use: Moisten the towel and lay it flat on the glass before engraving. Ensure the towel is damp, not soaking, to avoid water interference with the laser.
Tips for Best Results:
- Ensure the masking material adheres smoothly without wrinkles or bubbles.
- Adjust laser power and speed settings appropriately for glass to avoid overheating.
- Test on a small area or scrap piece of glass before starting your main project.
For Diode Lasers and Optional for CO₂ Lasers — Apply a Surface Coating
Clear glass does not naturally absorb diode laser energy, so a temporary surface coating is required to achieve visible engraving results.
How the coating works:
Think of sunlight passing through a window—it doesn’t heat the glass. Add a sheet of black paper, and the surface heats up quickly. A laser coating works the same way.
The coating absorbs the diode laser’s energy and converts it into heat, which causes controlled surface stress and micro-marking on the glass. The laser marks the coating first, and that heat transfer creates the engraving effect on the glass underneath.
Effective coating options include:
- Black tempera paint (water-soluble and easy to clean)
- Commercial laser marking sprays (xTool Black Laser Marking Spray is an excellent and affordable option)
- Specialized nanoparticle coatings with metal oxides
- A thin, even layer of matte black spray paint
Apply the coating evenly and allow it to dry before engraving to ensure consistent, clean results. We recommend using the xTool Black Laser Marking Spray 2.0.
Using xTool Black Laser Marking Spray with a CO₂ laser may help in these cases:
- Reducing chipping on thin or delicate glass
- Creating slightly darker, more uniform frost
- Improving consistency on curved glass (e.g., wine glasses, tumblers)
- Adding a small thermal buffer to reduce surface shock
The spray absorbs some laser energy and spreads heat more evenly, which can marginally reduce microfractures.
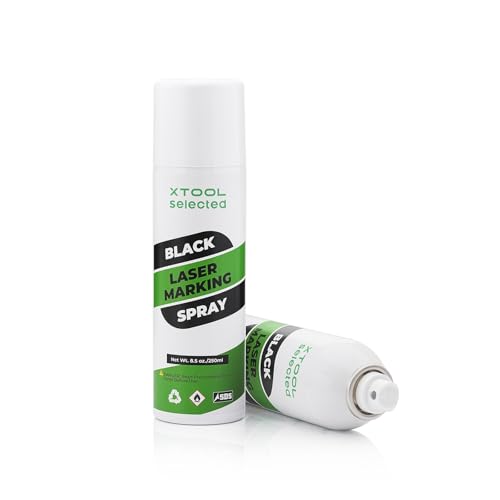
xTool Black Laser Marking Spray is an excellent option for glass engraving with a diode laser because it solves the core limitation of diode lasers on transparent materials: poor laser absorption.
Here’s why it works so well:
Maximizes Laser Energy Absorption
Clear glass doesn’t absorb diode laser wavelengths. xTool’s black marking spray creates a high-contrast, laser-absorbent surface that efficiently converts diode laser energy into heat, allowing the laser to mark the glass reliably and consistently.
Produces Cleaner, More Defined Engravings
Compared to DIY coatings like paint or tempera, the spray applies evenly and thinly, which results in sharper lines, better edge definition, and fewer blotchy or uneven marks on the glass.
Designed Specifically for Laser Engraving
Unlike general-purpose paints, xTool’s marking spray is engineered for laser use. It reacts predictably to diode laser output, reducing guesswork and minimizing the risk of inconsistent engraving depth or overheating.
Easy Cleanup with No Permanent Residue
After engraving, the coating can be easily removed, leaving behind a clean, frosted or darkened engraving without staining the surrounding glass.
Saves Time and Reduces Trial-and-Error
Because the spray is optimized for diode lasers, users spend less time testing settings and more time producing usable results—especially important for beginners or small-batch production.
Safer and More Controlled Than Improvised Coatings
DIY solutions can vary in thickness and composition. xTool Black Laser Marking Spray provides controlled, repeatable performance, reducing the chance of cracks or uneven heat buildup.
Step 4: Prepare Your Design
Glass engraving doesn’t handle shading or smooth gradients the way other materials do, so design preparation is critical for clean results.
For best outcomes:
- Convert images to pure black and white
- Keep designs simple, bold, and uncluttered
- Use strong contrast to ensure visibility after engraving
Choose the right image orientation:
- Standard mode: Engraves exactly as designed
- Negative mode: Reverses contrast for a frosted look many users prefer on glass
- Custom inversion: If you want the higher contrast of painted or backfilled glass without a full negative effect, invert the image directly in software like LightBurn before engraving
Proper design setup makes the difference between a dull mark and a crisp, professional glass engraving.
Step 5: Adjust Laser Settings
The key to engraving glass without damage is using the correct laser settings:
UV Laser Starting Settings (Best for Glass Engraving)
UV lasers engrave glass using photochemical ablation, requiring far less heat than CO₂ lasers. This results in cleaner detail and minimal cracking.
Starting settings:
- Power: 10–30%
- Speed: 800–2000 mm/s
- Frequency: 20–40 kHz (machine dependent)
- Passes: 1
- Line Interval: 0.01–0.03 mm
- Air Assist: OFF or very low
- Focus: Precise focus (no defocus needed)
Best for: Crystal, optical glass, fine text, detailed logos, and high-end glass engraving.
CO₂ Laser Starting Settings
CO₂ lasers engrave glass by controlled surface fracturing. Heat management is critical.
Starting settings:
- Power: 10–25%
- Speed: 300–500 mm/s
- DPI: 300–500
- Passes: 1 (avoid multiple passes)
- Air Assist: ON, low pressure
- Focus: Slight defocus (+1 to +2 mm)
Best for: Glassware, mirrors, flat glass panels, awards.
Diode Laser Starting Settings (With xTool Black Laser Marking Spray Coating)
Diode lasers require a surface coating to engrave glass effectively.
Starting settings:
- Power: 80–100%
- Speed: 2000–4000 mm/min
- Passes: 1
- Coating: xTool Black Marking Spray
- Air Assist: OFF or very low
- Focus: Standard focus
Best for: Hobby projects and occasional glass marking.
Key Glass Engraving Rule
Less heat = better results
High speed, low power, and single-pass engraving dramatically reduce cracking and chipping.
Pro Tip: Always perform a test run on scrap glass to fine-tune your settings
Step 6: Secure the Glass
Ensure the glass is stable during engraving to prevent shifting:
- Use a jig or clamps to hold the glass in place.
- If engraving cylindrical objects like glasses or bottles, use a rotary attachment for consistent results.
Step 7: Engrave Your Design
Load your design into the laser software and align it on the glass. Double-check settings and alignment before starting.
Step 8: Post-Engraving Cleanup
After engraving, carefully remove the masking material. Clean the glass with a lint-free cloth and glass cleaner to remove residue or soot. If necessary use a nail brush to remove shards and rubbing alcohol to clean off any oil residue.
If you need some color on your engraving, add a pinch of Rub-n-Buff in your preferred color choice. Follow the instructions on the tube to avoid creating a mess on your glass surfaces.

Tips for Avoiding Damage
- Avoid overheating: Use lower power and higher speeds to reduce heat concentration.
- Do not engrave near edges: Engraving too close to the edge can cause cracks.
- Work in a ventilated area: Laser engraving produces fine particles that should be extracted.
Tips and Tricks To Laser Engrave Glass without Damaging It
- Use a damp paper towel
Too much heat is the number one reason for fracturing and breaking of glass during laser engraving. This is particularly common in glass objects with high lead content. To avoid this, place a moist paper towel over the engraving area before starting the project.
This helps dissipate heat better and ultimately protects the glass from breaking. The wet paper towel also leads to a white, clear engraving result. Ensure that the paper doesn’t have wrinkles or air bubbles as these may show on the end product. Any standard white paper towel works. Avoid those with patterns or dyes that could transfer during engraving.
If you don’t have a wet paper towel, use a damp sheet of newspaper instead. Some people also make use of dish soap to coat the surface prior to engraving. This works just as well. The only thing with moistening agents like dish soap is that they dry out eventually. For the best results, remember to reapply repeatedly.
- Utilize a lower DPI
A lower resolution or DPI (dots per inch) is bound to produce a better frosting effect because it engraves dots away from each other. When all is said and done, you won’t easily tell the image was engraved with a lower resolution as the product will look fantastic in the end. This also prevents rough etched glass. The recommended DPI value for laser engraving on glass is 300DPI.
- Keep Air Assist Gentle
Strong air assist can cool the surface unevenly, leading to fractures. Use low airflow for glass engraving.
- Defocus Slightly
Defocusing the laser by +1 to +2 mm softens the beam, reducing stress and producing a smoother etch.
- The right grayscale
To get the best photo effect on a laser, use grayscale rasterization of 80% black. This reduces the heat applied to the glass and ultimately leads to a better result. This genius trick is guaranteed to create a smoother result as well since the engraving will not be black.
- Jarvis Dithering
Jarvis dithering is a method used to scramble the dots engraved on the glass. It is employed to shorten the time of engraving and effortlessly create a high-resolution image. When you use Jarvis dithering, you will have a smooth image and lower your chances of chipping and rough edges.
- Reduce the engraving speeds
If you are working with bottles and other curved surfaces, you will encounter both soft and hard spots. Without the proper engraving parameters, you may end up with light and heavy frosted surfaces in different areas of your item. To counter these discrepancies, engrave with high power and minimum speeds.
- Let the Glass Cool Naturally
Never rinse or cool engraved glass immediately after engraving. Sudden temperature changes can cause cracking.
How To Laser Engrave Glass with a Diode Laser Engraver
Laser engraving glass can be challenging, especially with a diode laser, which lacks the power and wavelength efficiency of CO2 lasers for this purpose.
However, using xTool Black Laser Marking Spray can help you achieve clear, professional results with your diode laser.
This guide explains the step-by-step process of using a diode laser and the xTool Black Laser Marking Spray to engrave glass effectively.
Find Amazon Price Below:
What You’ll Need
- Diode laser engraver (xTool S1, or similar)
- xTool Black Laser Marking Spray
- Clean glass item (flat glass, glassware, mirror)
- Isopropyl alcohol or glass cleaner
- Lint-free cloth
- Laser safety glasses
- Well-ventilated workspace

Step 1: Clean the Glass Thoroughly
Clean the glass with isopropyl alcohol or glass cleaner to remove dust, oils, or fingerprints. Any residue can cause uneven engraving or poor adhesion of the spray.
Step 2: Apply xTool Black Laser Marking Spray
Shake the spray can well, side to side, and not up and down. Apply a thin, even coat to the engraving area.
Best practices:
- Spray from 6–8 inches away
- Avoid heavy or dripping layers
- Let the coating dry completely (5–10 minutes)
A smooth, matte black finish ensures consistent laser absorption.
Step 3: Prepare Your Design
- Convert artwork to black and white
- Avoid gradients and fine shading
- Use bold lines and high contrast
- Choose negative engraving if you want stronger contrast
Mirror the design if engraving from the back of flat glass.
Step 4: Recommended Diode Laser Starting Settings
These are safe starting points—always test first.
- Power: 80–100%
- Speed: 2000–4000 mm/min
- Passes: 1
- Line Interval: 0.1–0.15 mm
- Air Assist: OFF or very low
- Focus: Standard focus (on coated surface)
Higher speed helps reduce heat buildup and minimizes the risk of cracking.
Step 5: Run a Small Test Engrave
Before committing to the final piece:
- Test in a corner or scrap glass
- Adjust speed slightly before increasing power
- Avoid multiple passes (they increase heat stress)
Step 6: Engrave the Design
Start the engraving and monitor the process. You should see the coating reacting to the laser without popping, chipping, or excessive smoke.
Step 7: Remove the Coating
Once engraving is complete:
- Rinse with warm water
- Wipe with a microfiber cloth
- Use mild dish soap if needed
The black coating will wash away, revealing the engraved glass beneath.
Step 8: Optional Contrast Enhancement
For brighter visibility:
- Use Rub-n-Buff in your preferred color choice and rub it into the engraving
- Wipe excess from the surface
- Let it cure for a polished, professional finish
Common Mistakes to Avoid
- Applying the spray too thick
- Running multiple engraving passes
- Using air assist at high pressure
- Engraving without proper ventilation
Using xTool Black Laser Marking Spray transforms a diode laser into a reliable glass engraving tool.
While it doesn’t replace CO₂ or UV lasers for glass, it’s a cost-effective, beginner-friendly solution for personalized glass projects, gifts, and small-batch production.
Final Thoughts
Laser engraving glass can produce stunning results when done correctly. By choosing the right glass, preparing the surface, and using proper laser settings, you can avoid damage and achieve high-quality designs.
With a little practice and attention to detail, you’ll master the art of glass engraving and unlock endless creative possibilities.
Frequently Asked Questions
Why does glass crack when laser engraved?
Glass cracks due to rapid heat buildup and thermal shock. Using too much power, engraving too slowly, or making multiple passes concentrates heat in one area, causing microfractures that turn into visible cracks.
What is the safest laser type for engraving glass?
UV lasers are the safest and most precise option because they engrave glass through a cold, photochemical process with minimal heat. CO₂ lasers are also commonly used, while diode lasers require surface coatings to work effectively.
Can a diode laser engrave glass without cracking it?
Yes, but only with proper technique. You must use a laser marking spray or paint coating, run high speed with moderate power, and avoid multiple passes to minimize heat stress.
Should air assist be on or off when engraving glass?
For most glass engraving:
Diode lasers: Air assist should be off or very low
CO₂ lasers: Light air assist can help remove debris
Too much air can cool the surface unevenly, increasing the risk of cracking.
Do I need to wet the glass before engraving?
Wetting the glass is an optional technique used mainly with CO₂ lasers. A thin layer of water can help distribute heat more evenly, but it’s not necessary when using UV lasers or laser marking sprays with diode lasers.