Wood is one of the most popular materials for laser engraving because it is affordable, easy to work with, and creates beautiful natural results.
From personalized signs and cutting boards to gifts, home décor, and custom products, laser engraved wood projects are everywhere.
One question many laser users ask is:
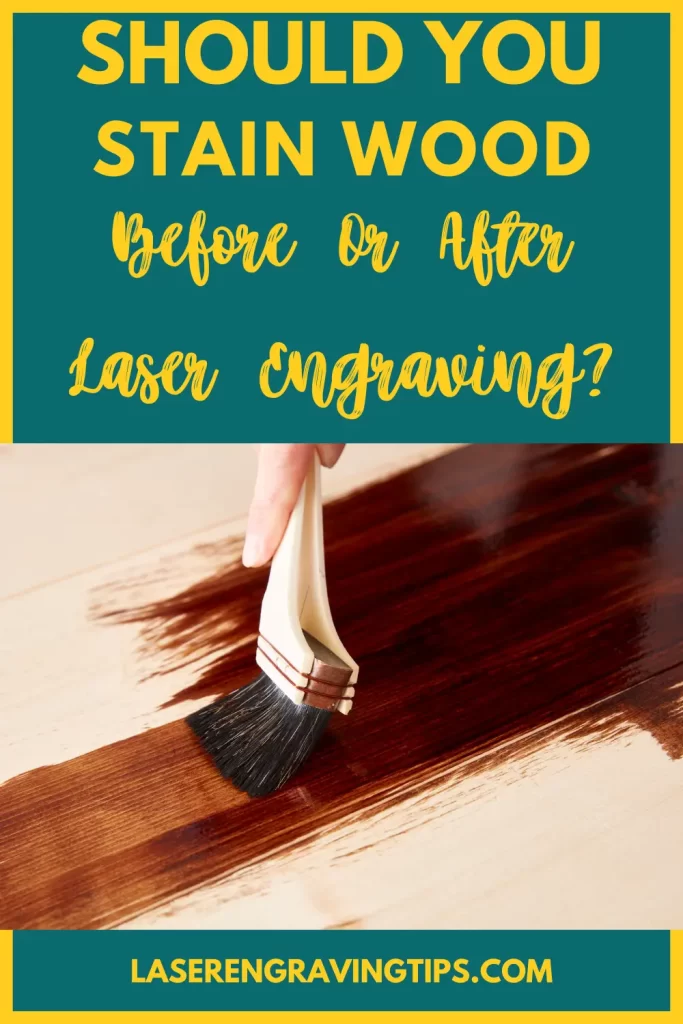
When to stain wood for laser engraving?
The answer depends on the look you want, the type of wood you are using, and the laser process. Staining at the right time can dramatically improve contrast, enhance the grain, and make your engraving stand out. However, staining at the wrong stage can create uneven results, blurry details, or make your engraving less visible.
Table of Contents
In this complete guide, we’ll cover when to stain wood for laser engraving, the pros and cons of staining before vs. after, and expert tips for flawless results every time.
Understanding How Stain Affects Laser Engraving
Wood stain changes the color, texture, and density of the surface — all of which affect how the laser reacts.
Different stains (oil-based, water-based, or gel) penetrate and darken wood fibers differently, influencing the engraving contrast and burn depth.
Should You Stain Wood Before or After Engraving?
If you want a bold design with a dark background and lighter engraving, stain the wood before engraving. Staining after engraving gives you more control over the final appearance.
Both methods can create professional results. The best approach depends on your material, laser settings, and the style you want to achieve.
Here’s a quick breakdown to help you decide:
Approach | Best For | Pros | Cons |
|---|---|---|---|
Staining Before Engraving | High-contrast designs | – Deep, rich background color – Clean, dark engravings | – Risk of smoke marks on stained areas – Some stains may reflect the laser, reducing engraving clarity |
Staining After Engraving | Crisp, detailed engravings | – Cleaner, more defined designs – Easier cleanup of smoke residue | – Stain may seep into engraved areas, making the design appear blurry or less defined – Longer finishing time |
Staining Both Before & After (Hybrid Method) | Premium finishes | – Controlled contrast – Polished final appearance | – More time-consuming – Requires precision masking and sealing |
Option 1: Stain Wood Before Laser Engraving
Staining before engraving means you apply your stain, allow it to dry completely, and then engrave your design into the finished surface.
This method is popular for creating a dark background with a natural wood engraving effect.
When the laser removes the stained surface layer, the lighter wood underneath is revealed, creating a high-contrast design.
Benefits of Staining Before Engraving
Creates Strong Contrast
Dark stains work especially well because the laser removes the stained layer and exposes the lighter wood below.
For example:
- Dark walnut stain + maple wood
- Espresso stain + birch plywood
- Black stain + basswood
can create a dramatic engraved appearance.
Easier Cleanup
Because the stain is applied first, there is no need to worry about stain filling into tiny engraved details afterward.
Great for Detailed Designs
Fine text, logos, and intricate patterns can remain sharp because you are not brushing stain into small engraved areas.
Downsides of Staining Before Engraving
While this method works well, there are a few things to consider.
Laser Settings May Change
Stained wood absorbs laser energy differently than raw wood.
A darker surface may require:
- Lower power
- Faster speed
- Fewer passes
Always run a test piece before engraving your final project.
Some Stains Produce More Smoke
Certain stains, finishes, or oil-based products can create stronger fumes when burned.
Always make sure your laser has proper ventilation and avoid engraving materials with unknown coatings.
The Engraving May Be Less Deep
Because you are removing a stained surface layer, your engraving depth depends on how aggressively you run your laser.
Option 2: Stain Wood After Laser Engraving
The process is simple:
- Laser engrave your design
- Remove smoke residue
- Apply stain
- Wipe away excess stain
- Allow it to dry
The engraved areas absorb more stain than the surrounding wood, naturally highlighting the design.
Benefits of Staining After Engraving
Enhances the Engraved Details
The recessed engraved areas soak up stain, making the design darker and easier to see.
This works especially well for:
- Signs
- Quotes
- Logos
- Artwork
- Personalized gifts
More Control Over the Final Look
You can adjust the appearance after engraving by choosing:
- Light stain for a subtle look
- Dark stain for high contrast
- Colored stain for unique designs
Works Great With Natural Wood Grain
Staining after engraving allows the natural wood texture to remain visible while adding depth to the design.
Downsides of Staining After Engraving
The main challenge is keeping the surrounding wood clean.
Because laser engraving creates small burned areas, soot and residue can mix with the stain.
To avoid this:
- Clean the wood before staining
- Sand lightly if needed
- Apply stain carefully
- Test on scrap wood first
Choose The Best Wood For Staining
When it comes to staining wood for laser engraving, selecting the right type of wood is paramount to achieving the desired results.

Here’s our guide to help you choose the best wood for staining when laser engraving:
Wood Type | Best for Staining Before Laser Engraving | Best for Staining After Laser Engraving | Why It Works Well | Tips |
|---|---|---|---|---|
Birch Plywood | Excellent choice | Excellent choice | Light surface creates strong contrast with stains, and the smooth grain gives clean engraving results | Use a lighter stain before engraving for a natural look, or dark stain after engraving to highlight details |
Maple | Good choice | Excellent choice | Fine, even grain produces sharp engraving details and absorbs stain consistently | Best for detailed artwork, logos, and photo engraving |
Cherry | Good choice | Excellent choice | Naturally rich color develops beautifully with stains and creates premium-looking projects | Engraving tends to darken naturally, so test stain colors first |
Walnut | Limited before staining | Excellent choice | Dark wood already has a premium appearance; post-engraving staining enhances contrast | Use lighter stains after engraving to make designs stand out |
Oak | Good choice | Good choice | Open grain accepts stain well and gives a rustic engraved appearance | Grain patterns can affect fine engraving details |
Alder | Excellent choice | Excellent choice | Soft, uniform grain makes it easy to engrave and stain evenly | Great for signs, plaques, and personalized gifts |
Pine | Possible but requires testing | Good choice | Affordable and widely available, but softer grain can absorb stain unevenly | Use wood conditioner before staining to prevent blotchy results |
Poplar | Good choice | Good choice | Smooth surface and affordable price make it popular for laser projects | Often looks better with darker stains because natural color is pale |
Bamboo | Not ideal before staining | Good choice | Dense surface engraves well and develops contrast after staining | Sand lightly before staining for better absorption |
MDF / Veneered MDF | Depends on veneer | Good choice | Smooth surface engraves easily and accepts paint/stain well | Avoid over-burning because exposed MDF edges can become rough |
Basswood | Excellent choice | Excellent choice | One of the most popular laser woods due to smooth texture and consistent engraving | Great beginner material for testing stains and settings |
Hardwood vs. Softwood:
Hardwoods, such as maple, cherry, walnut, and oak, are generally preferred for laser engraving and staining due to their dense and even grain structure.
These woods offer excellent engraving clarity and hold stains well, resulting in vibrant and defined designs.
Softwoods, like pine or cedar, tend to have more pronounced grain patterns and may yield less consistent engraving results.
Maple:
Maple is a popular choice for laser engraving and staining due to its smooth texture and light color. It engraves cleanly and evenly, allowing for crisp and detailed designs.
Maple readily accepts a variety of stains, from light tones to darker shades, providing versatility in design options.
Cherry:
Cherry wood boasts a rich reddish-brown hue that deepens over time, making it a sought-after choice for laser engraving projects.
Its fine grain and smooth surface lend themselves well to intricate engraving details, while the natural color variation adds character to the finished piece.
Cherry wood stains beautifully, enhancing its warm tones and highlighting the engraved design.
Walnut:
Walnut is prized for its dark chocolate-brown color and distinctive grain patterns, making it an excellent choice for laser engraving and staining.
The deep coloration of walnut provides a striking contrast with light-colored stains, creating visually stunning results. Its moderate hardness allows for precise engraving without sacrificing durability.
Oak:
Oak is revered for its durability and pronounced grain texture, making it a classic choice for laser engraving and staining.
While its open pores can present challenges for fine engraving details, oak’s natural beauty shines through when stained, with the grain patterns adding depth and character to the finished piece.
Birch:
Birch wood offers a pale, uniform color and a fine, even grain structure, making it an ideal canvas for laser engraving and staining.
Its smooth surface engraves crisply, allowing for intricate designs, while the light coloration provides a neutral backdrop for various stain hues.
Find The Best Wood For Laser Engraving Here: The best materials for laser engraving: Complete Guide
Recommended Stains for Laser Engraving Projects
Stain Type | Recommended Product | Best Used On | Notes |
|---|---|---|---|
Water-Based | Varathane Water-Based Wood Stain | Birch, Maple, Basswood | Dries quickly, low odor, ideal for staining before engraving |
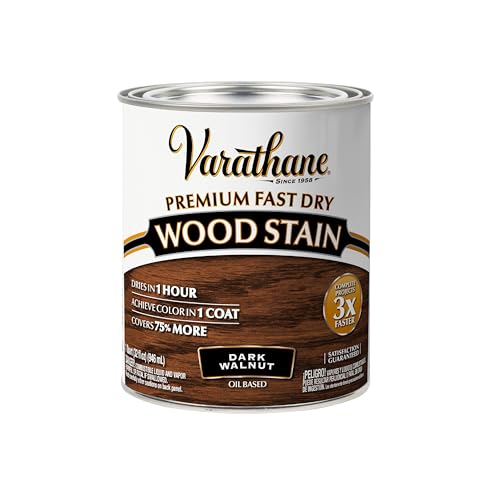
Oil-Based | Varathane Premium Wood Stain | Walnut, Cherry, Oak | Enhances grain, great for natural contrast |
Water-based Sealer | Minwax Clear Polycrylic Water-based Protective Finish | MDF, plywood, Birch, Maple, Walnut, Cherry, Oak | Must-have for sealing and preserving laser-engraved designs on wood |
How to Stain Wood Before Laser Engraving: Step By Step Guide

Step 1: Select the Right Stain
Selecting the right stain is crucial when preparing wood for laser engraving. The perfect stain not only enhances the beauty of the wood but also ensures optimal engraving results.
We will explore the factors to consider when choosing the best stain for laser engraving and highlight some top options. Not all stains are suitable for laser engraving.
Choose a stain that is specifically formulated for use with laser-engraved wood to ensure compatibility and minimize any potential adverse effects on the engraving process.
Consider the level of translucency or opacity of the stain, as this will impact the visibility of the engraved design.
Transparent or semi-transparent stains allow the wood grain to show through, while opaque stains provide more uniform color coverage.
Pro Tip: If you’re using oil-based or petroleum-based stain, make sure to give the wood plenty of time to dry. If it doesn’t dry well, the stain can become flammable, which might cause burns and leave smoky marks on your wood
The color of the stain will significantly influence the appearance of the engraved wood. Choose a stain color that complements the wood species and aligns with your desired aesthetic.
Popular options include natural wood tones, rich earthy hues, and vibrant accent colors.
Both water-based and oil-based stains are commonly used for laser engraving on wood. Water-based stains dry faster, emit fewer fumes, and are easier to clean up, making them a popular choice for indoor use.
Oil-based stains typically provide deeper color penetration and longer-lasting results but may require more drying time and ventilation.
Go for a stain with a fast drying time to minimize waiting between staining and engraving.
Look for stains that dry within a few hours, allowing you to proceed with the engraving process promptly without compromising the quality of the finish.
Choose a stain with low odor and volatile organic compound (VOC) content to ensure a safe and comfortable working environment, particularly if you’re working indoors or in a confined space.
Low-VOC stains are eco-friendly and contribute to better air quality.
Consider the type of wood you’ll be engraving when selecting a stain. Some stains may perform better on certain wood species due to variations in grain density, porosity, and natural coloration.
Test the stain on a small, inconspicuous area of the wood to ensure compatibility and desired results.
Look for stains that are easy to apply and provide consistent coverage with minimal effort. Stains that penetrate the wood evenly and smoothly without streaking or blotching are ideal for achieving professional-looking results.
We recommend using Varathane Water-Based Wood Stain for achieving a rich, even wood finish.
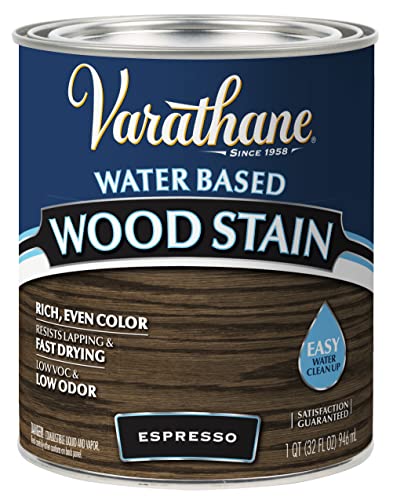
- Water-based wood stain creates rich, even color in 1 coat on most surfaces
Its water-based formula ensures quick drying, making it ideal for projects requiring multiple steps. The espresso shade provides a deep, consistent color that contrasts beautifully with engraved details, enhancing the design’s visibility.
One of its best features is the minimal odor, making it user-friendly for indoor use. Additionally, its low-VOC composition is safer for the environment than traditional oil-based stains.
The stain penetrates the wood effectively, offering durability without masking the wood grain, which is essential for maintaining a natural aesthetic.
Users will appreciate how easy it is to apply with a brush or cloth, with smooth, streak-free results. It also sands well, ensuring the engraved surface is prepared to perfection.
Whether for artistic projects or professional laser engraving, this stain complements detailed work, making it a reliable and versatile choice.
Pros:
- Quick-drying water-based formula.
- Minimal odor and low VOCs.
- Provides rich, even color and highlights wood grain.
- Easy to apply and sands smoothly for engraving prep.
Cons:
- May require multiple coats for darker shades.
- Not ideal for highly porous woods without pre-treatment.
The Varathane stain is an excellent option for creating an elegant finish that accentuates laser-engraved designs, earning its spot as the best water-based wood stain for engraving projects.
Step 2: Preparing The Wood Surface:
Inspect the wood surface for any imperfections, such as knots, rough patches, or blemishes. Use sandpaper of progressively finer grits to smooth out the surface and remove any flaws.
Start with coarse-grit sandpaper (around 80-100 grit) and gradually work your way up to finer grits (200-400 grit) for a smooth finish.
Once the surface is smooth, thoroughly clean the wood to remove any dust, dirt, or debris.
Use a tack cloth or a damp microfiber cloth to wipe down the entire surface, ensuring it is free from any particles that could interfere with the engraving or staining process.
Step 3: Testing The Stain:
Before applying the stain to your project piece, conduct a test on a scrap piece of the same wood to ensure you achieve the desired color and effect. Adjust the application method or number of coats as needed.
Step 4: Applying the Stain:
Using a brush, cloth, or sponge applicator, apply the stain evenly to the wood surface, following the grain. Work in small sections and wipe off any excess stain with a clean cloth to prevent streaking or blotching.
Step 5: Allowing The Stain To Dry:
Let the stain dry completely according to the manufacturer’s instructions. Ensure the wood is thoroughly dry before proceeding to the laser engraving step.
- Oil-based stains typically require 24 to 48 hours to fully dry and cure before laser engraving.
- Water-based stains tend to dry faster, usually within 2 to 4 hours, but may still benefit from additional curing time.
It’s essential to allow the stain to fully dry and cure to prevent any interference with the laser engraving process and ensure optimal results.
Step 6: Preparing For Laser Engraving:
Once the stain has dried, ensure the wood surface is clean and free from any residue. If necessary, lightly sand the surface to remove any raised grain or rough spots that may affect the engraving quality.
Step 7: Laser Engraving the Stained Wood:
Set up your laser engraving machine according to the specifications of your design. Carefully position the stained wood piece on the engraving bed and adjust the laser settings for depth and clarity.
Before engraving on stained wood, it’s advisable to perform a test engraving on a small, inconspicuous area to assess the compatibility of the stain with the laser settings.
Adjust the laser power and speed as needed to achieve the desired engraving depth and clarity.
Step 8: Post-Engraving Finishing
After completing the engraving process, inspect the wood surface for any residual debris. Clean the surface gently with a soft brush or cloth to remove any remaining particles.
To protect the engraved design and enhance its longevity, consider applying a clear sealant or finish to the stained wood surface.
Choose a finish that is compatible with both the stain and the engraving, such as a polyurethane varnish or lacquer.
Apply the finish evenly using a brush, foam applicator, or spray gun, following the manufacturer’s instructions for application and drying times.
- Multiple Coats for Durability: For optimal protection and durability, apply multiple coats of sealant or finish to the engraved wood surface. Allow each coat to dry completely before applying the next coat, and lightly sand between coats to achieve a smooth and uniform finish. Adding multiple coats helps build up a protective barrier against moisture, UV rays, and everyday wear and tear.
- Final Inspection and Touch-Ups: Once the finishing coats have dried, inspect the engraved wood surface for any unevenness, drips, or imperfections in the finish. Sand any rough spots or drips lightly with fine-grit sandpaper and wipe away any dust with a clean cloth. Take this opportunity to ensure that the engraved design is beautifully showcased and protected by the finish.
- Cure and Enjoy: Allow the final coat of finish to cure fully according to the manufacturer’s instructions before handling or displaying the finished piece. Once cured, your laser engraved wood creation is ready to be showcased and enjoyed for years to come, with its beauty preserved and protected by the post-engraving finishing.
We recommend using Minwax Clear Polycrylic Water-based Protective Finish. The Minwax Clear Polycrylic Water-Based Protective Finish in satin is a must-have for sealing and preserving laser-engraved designs on wood.
This protective finish creates a durable, clear coat that enhances the natural beauty of stained wood while safeguarding it against scratches, moisture, and general wear.
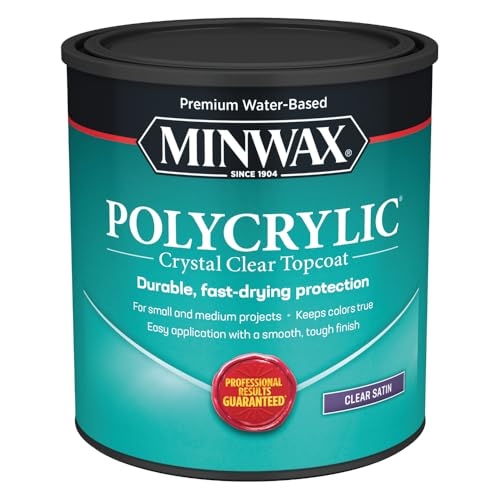
- PROTECT WOOD SURFACES – Minwax Polycrylic Protective Finish protects and adds beauty to your interior wood projects, including woodwork, furniture, doors and cabinets. The clear top coat protects against scratches, spills, dirt and more.
Its water-based formula makes it easy to apply and quick to dry, allowing you to complete projects efficiently.
The satin sheen provides a subtle, elegant finish that doesn’t overpower the wood’s grain or the engraved design, making it an excellent choice for maintaining a professional aesthetic.
Minwax Polycrylic is low in odor and non-yellowing, ensuring long-lasting clarity and preserving the original colors of your stained wood and engravings.
It’s compatible with various wood stains and surfaces, making it a versatile option for both DIYers and professionals.
How to Use: Apply the finish with a high-quality synthetic brush or foam applicator. Allow adequate drying time between coats and lightly sand between applications for the smoothest finish.
Pros:
- Protects wood and engraved designs against wear and moisture.
- Quick-drying and easy to apply.
- Non-yellowing formula preserves the original colors.
- Low odor and water-based for easy cleanup.
Cons:
- Requires multiple coats for maximum durability.
- Not suitable for high-heat applications.
Minwax is an ideal choice to ensure your laser-engraved projects maintain their beauty and integrity over time, offering both protection and a polished appearance.
Common Mistakes to Avoid
- Engraving over wet or tacky stain — can cause smudges or sticky residue.
- Using high-gloss or polyurethane finishes before engraving.
- Forgetting to test settings on stained scrap wood.
Conclusion
Staining wood before laser engraving offers numerous benefits, including enhanced aesthetics and contrast. However, both before-and-after methods can deliver excellent, professional-looking results.
The right choice comes down to the type of wood you are using, your laser settings, and the final appearance you want your project to have.
Experiment with different stain colors and techniques to achieve unique effects and make your creations truly one-of-a-kind.
Frequently Asked Questions
How to treat wood before laser engraving?
To treat wood before laser engraving, sand the surface to remove imperfections, clean it with a lint-free cloth, and optionally apply a light coat of wood stain or finish to enhance contrast. If you want precise results, consider using a masking tape to protect surrounding areas from smoke residue or burn marks.
Is it safe to laser engrave stained wood?
Yes, it is safe to laser engrave stained wood as long as the stain is dry and non-toxic. Ensure proper ventilation during the process to avoid inhaling any fumes that might be released.
Can I apply a wood sealer or clear coat after engraving and staining?
Absolutely! Applying a clear sealer or polyurethane finish after engraving and staining protects your project from moisture, UV light, and wear. Use a matte or satin finish for a natural look, or gloss for extra shine. Ensure the engraved area is dust-free before sealing, and apply 2–3 thin coats, allowing each to dry fully for the best results.