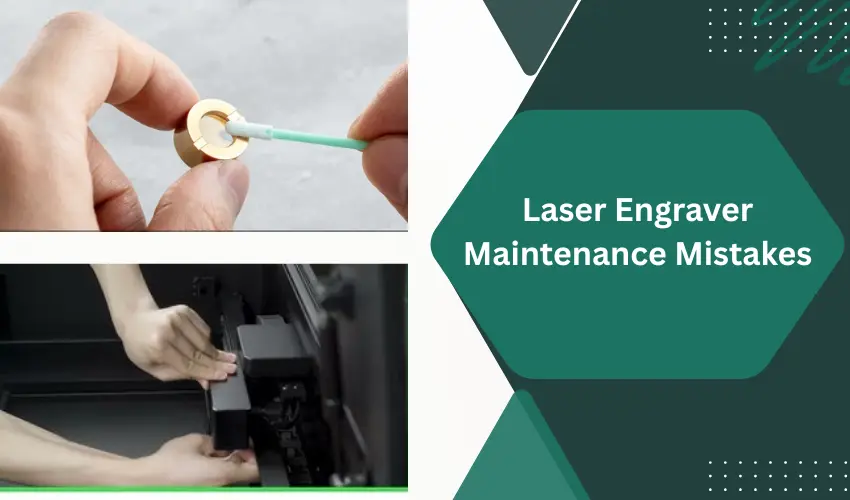
Proper maintenance is essential for keeping your laser engraver running safely, efficiently, and with consistently high-quality results. Yet many users—especially beginners—accidentally shorten the life of their machine by making common maintenance mistakes.
In this guide, we’ll break down the top laser engraver maintenance mistakes, how to avoid them, and simple habits that keep your laser cutter performing like new.
Table of Contents
Whether you own a diode, CO₂, or fiber laser, these tips apply to nearly every machine, including xTool, Glowforge, OMTech, Thunder Laser, Epilog, and more.
Why Laser Engraver Maintenance Matters
Neglecting maintenance can lead to:
- Weak cutting power
- Dirty or cracked lenses
- Poor engraving quality
- Overheating
- Belt wear and motor strain
- Shortened machine lifespan
- Safety hazards, including fire risk
The good news? Most issues are preventable with proper care.
Top Laser Engraver Maintenance Mistakes (And How To Avoid Them)
1. Not Cleaning Lenses and Mirrors Regularly
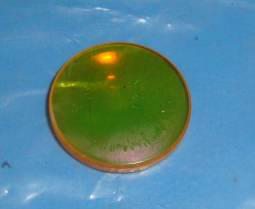
Dirty optics drastically weaken your laser’s output. Dust, resin, smoke, and debris accumulate fast—especially when cutting wood or acrylic.
Mistake: Cleaning optics only when performance drops.
Fix:
- Clean lens and mirrors every 1–3 hours of cutting (or after each project for beginners).
- Use proper lens wipes, ethanol or isopropyl alcohol, and avoid paper towels that scratch surfaces.
Clean optics = stronger, faster cuts.
We recommend using the laser lens cleaning kit from xTool:
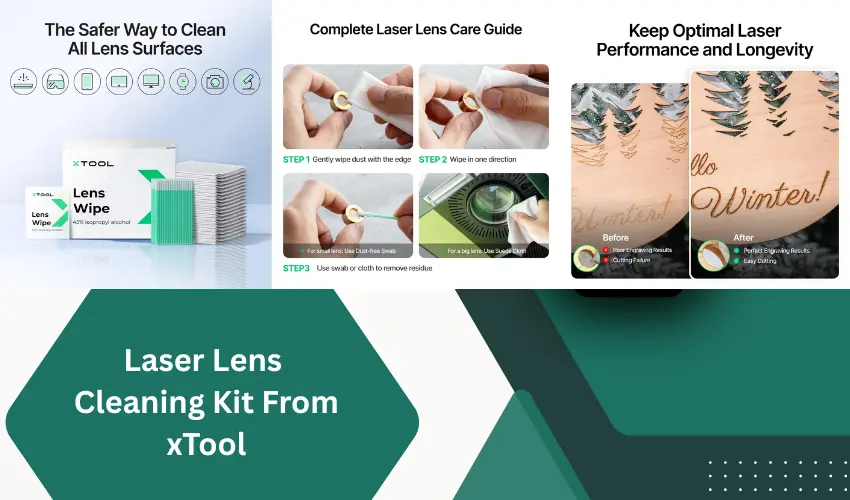
The xTool Laser Lens Cleaning Kit is a must-have accessory for anyone who wants to maintain clean optics and consistent engraving quality. Designed specifically for diode and CO₂ laser machines, this kit includes everything needed to safely remove dust, smoke residue, and debris from lenses, mirrors, and protective windows.
The cleaning solution is gentle yet effective, breaking down grime without damaging coatings or scratching delicate surfaces. The included swabs and wipes are lint-free and sized perfectly for precision cleaning, making it easy to reach tight areas around laser heads and mirrors.
What stands out is how much this kit improves beam clarity and prevents power loss—a clean lens can make a surprising difference in engraving sharpness and cutting performance. Regular use helps extend the life of optical components and keeps your machine operating at peak efficiency.
2. Ignoring Air Assist Maintenance
Air assist is essential for preventing flare-ups and keeping cuts clean.
Mistake: Running air assist without checking the nozzle or pump.
Fix:
- Clean the air assist nozzle weekly.
- Check for hose kinks or loose fittings.
- Replace clogged inline air filters every 3–6 months.
A clogged nozzle leads to smoky cuts and increases fire risk.
3. Forgetting About Exhaust and Ventilation
Smoke buildup is damaging to optics, motors, and electronics.
Mistake: Running the laser with a clogged exhaust fan or dirty filters.
Fix:
- Clean your exhaust fan blades monthly.
- Replace HEPA and carbon filters as recommended.
- Check ducting for leaks or obstructions.
Good ventilation protects both you and your machine.
4. Not Checking Belts and Wheels
Loose belts or worn-out V-wheels cause wobbling, shifting, and inaccurate cuts.
Mistake: Assuming belts never need adjustment.
Fix:
- Inspect belts monthly for fraying or slack.
- Tighten belts when cuts start to misalign or corners look rounded.
- Clean rails and V-wheels to remove debris.
Smooth mechanical motion = clean, precise engraving.
5. Using Incorrect Lubricants (or None at All)
Moving parts, especially rails and lead screws, need periodic lubrication.
Mistake: Using WD-40 or oil-based lubricants. These attract dust.
Fix:
- Use light machine oil, silicone grease, or manufacturer-approved lubricants.
- Move the gantry by hand to distribute lubrication evenly.
Proper lubrication reduces wear and strain on the motors.
We recommend using Creality Lubricant Grease:

The Creality Official Lubricant Grease is an excellent all-around maintenance option—not just for 3D printers but also for laser engravers, especially those that use linear rods, lead screws, or rail systems. This grease is designed to reduce friction and noise, and it delivers exactly that. Motion becomes smoother, vibrations decrease, and machines run noticeably quieter, whether you’re printing, engraving, or cutting.
Its thick paste formula adheres well to mechanical surfaces, meaning it won’t drip or dry out quickly. This makes it ideal for long-term lubrication and reduces the need for frequent reapplication—especially helpful for laser engravers used in dusty environments.
The product is also non-toxic, odorless, and corrosion-resistant, making it safe for home studios and hobby shops. It’s compatible with a wide range of components, including Z-axis lead screws, linear rods, guide rails, bearings, and pulleys, so it can easily serve as a single go-to lubricant for both 3D printers and laser engravers.
Overall, Creality’s lubricant grease is a reliable, clean, and long-lasting maintenance solution that helps keep equipment running smoothly and accurately. A great value for creators who want to extend the lifespan of their machines and reduce mechanical noise.
6. Running the Laser at 100% Power Too Often
Running at max output accelerates wear—especially for diodes and CO₂ tubes.
Mistake: Cutting everything at 100% power.
Fix:
- Use 65–85% power for most cuts to extend diode or CO₂ tube lifespan.
- Reduce speeds instead of maxing out power.
A slightly slower cut often produces cleaner results.
7. Forgetting to Clean Honeycomb Beds and Slats
Sticky resin builds up quickly and becomes a fire hazard.
Mistake: Letting debris accumulate under the material.
Fix:
- Clean the bed after heavy cutting sessions.
- Remove stuck resin with gentle scrapers or approved cleaners.
- Vacuum debris from below the bed.
Clean beds also reduce scorch marks and improve back-side cut quality.
8. Not Keeping the Machine Level and Stable
A wobbly machine causes misalignment, skipped steps, and noisy operation.
Mistake: Using the machine on a soft or uneven surface.
Fix:
- Place your laser engraver on a solid, level table.
- Check feet or stands regularly for stability.
Vibration affects precision—especially on detailed engravings.
9. Ignoring Firmware and Software Updates
Manufacturers frequently release performance and safety improvements.
Mistake: Avoiding updates out of fear they’ll “break something.”
Fix:
- Check for updates monthly.
- Read release notes for bug fixes and improvements.
Updates can improve speed, precision, and material compatibility.
10. Cutting Hazardous Materials
Some materials produce corrosive or toxic fumes that damage lasers—and can harm you.
Mistake: Cutting PVC, vinyl, polycarbonate, ABS, or unknown plastics.
Fix:
- Always check safe-to-cut material lists.
- If unsure, do a flame test or consult manufacturer guidelines.
Avoiding unsafe materials protects your equipment and your health.
Best Practices for Long-Term Laser Engraver Health
✔ Clean optics regularly
✔ Lubricate rails when needed
✔ Keep belts tensioned properly
✔ Maintain proper airflow and ventilation
✔ Use high-quality materials
✔ Run power settings conservatively
✔ Keep the machine dust-free
✔ Perform routine inspections
Small habits lead to big performance improvements.
Common Signs Your Laser Needs Maintenance
If you notice any of these, maintenance is overdue:
- Cuts no longer go through materials
- Engravings look fuzzy or uneven
- Increased smoke buildup inside the chamber
- Loud or grinding noises from motors
- Flame-ups when cutting wood or acrylic
- Lens appears hazy or yellow
- Beam alignment is off-center
Address issues early to avoid costly repairs.
Laser Engraver Maintenance Checklist
Daily:
- Clean lens
- Check material and bed for debris
- Ensure proper exhaust flow
Weekly:
- Wipe rails and wheels
- Inspect belts
- Clean air assist nozzle
Monthly:
- Deep clean optics
- Vacuum interior
- Clean exhaust fan
- Lubricate moving parts
Frequently Asked Questions
How often should I clean my laser engraver’s lens?
Clean your lens before or after every cutting/engraving session—especially when working with wood, leather, acrylic, MDF, or rubber.
These materials produce heavy smoke and resin that quickly coat the lens, reducing cutting power and increasing fire risk.
A good rule:
If your machine loses cutting strength or edges look burned → clean the lens immediately.
What lubricant should I use on laser engraver rails?
Use a light machine oil or silicone lubricant approved for linear rails. Avoid WD-40 and grease-based products—they attract dust and cause sticking.
Lubricate:
X/Y rails (diode lasers & some CO₂ machines)
Lead screws
Gantry wheels (D1 Pro, S1, other diode lasers)
Apply every 1–2 months, depending on use.
How do I know when belts or wheels need adjustment or replacement?
Signs your belts or wheels need attention:
Wavy engraving lines
Skipping or grinding noises
Inaccurate alignment
Gaps or overlaps in vector cuts
Carriage feels uneven when moved by hand
Belts should feel firm—not loose, not guitar-string tight.
Replace wheels if you see cracks, flat spots, or heavy dust buildup that won’t clean off.
How do I keep smoke and debris from building up inside the machine?
Most buildup is caused by:
Poor ventilation
Dirty exhaust fan
Weak air assist flow
To reduce smoke and tar:
Clean the exhaust fan monthly
Ensure the duct is properly sealed and unobstructed
Use air assist and clean the nozzle weekly
Avoid cutting resin-heavy woods (like pine) without proper airflow
Good ventilation dramatically reduces cleaning time.
Do CO₂ lasers require different maintenance than diode lasers?
Yes. CO₂ lasers (like xTool P2/P2S, Glowforge, OMTech) require additional care, including:
Checking water cooling levels and cleanliness
Keeping mirrors and the focusing lens spotless
Avoiding 100% power to extend CO₂ tube life
Performing optics alignment as needed
Ensuring cooling temperatures stay in a safe range
Diode lasers mainly require:
Lens cleaning
Belt/wheel maintenance
Rail lubrication
Air assist and fan cleaning
CO₂ laser engraver maintenance is more involved, but when done properly, the machine stays far more powerful and consistent.
Conclusion
Avoiding common laser engraver maintenance mistakes will help you get cleaner cuts, longer machine life, and safer operation. Whether you’re cutting wood signs, engraving leather patches, or running a full business, proper care ensures your laser engraver performs at its best every day.