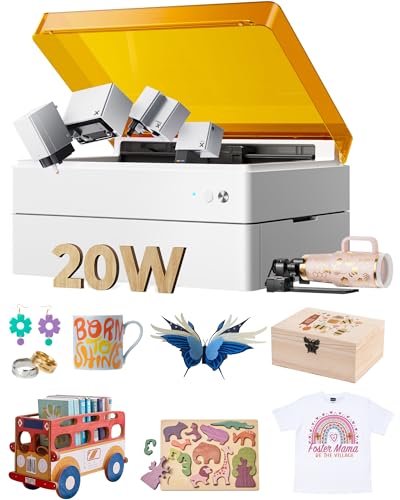
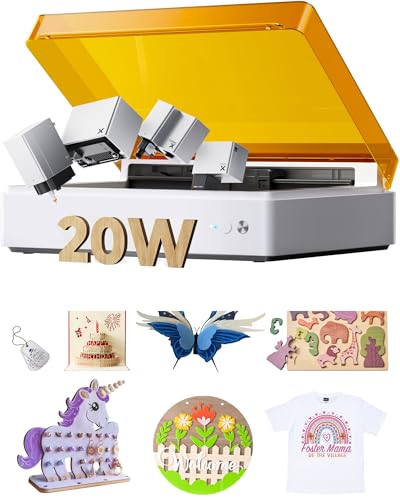
The xTool M1 Ultra is a game-changing 4-in-1 hybrid crafting machine designed for makers who want versatility, power, and ease of use in a compact machine. Whether you’re engraving, cutting, printing, or drawing on various materials, this guide will help you understand and master all the capabilities of the M1 Ultra.
Table of Contents
What Is the xTool M1 Ultra?
The xTool M1 Ultra is a 4-in-1 hybrid crafting machine. It combines:
- Laser cutting & engraving
- Blade cutting (with fine-point and rotary blades)
- Inkjet color printing
- Pen drawing and writing
You can switch tools quickly thanks to the Easy Swap Design, making it simple to jump between functions. This machine handles wood, acrylic, vinyl, cardstock, fabric, leather, and more—all from one compact unit.

Check Amazon Price Below

What’s in the Box?
When you buy the xTool M1 Ultra Ultimate Craft Bundle, you get everything you need to hit the ground running:
- xTool M1 Ultra Laser Module (10W or 20W Power Options)
- Inkjet Module
- Rotary Blade
- Foil Transfer Tip
- Fine-Point Blade
- Pen Tool
- Air Assist (in select bundles)
- Riser Base & Honeycomb Panel
- RA2 Pro Rotary Attachment
- xTool Smart Heat Press & Mini Press
- Power Cords, USB, Manuals
Setup takes about 15 minutes. Everything clicks into place and the system walks you through the initial setup.
Features That Make the xTool M1 Ultra Special
Laser Cutting & Engraving
The diode laser cuts wood, leather, and select acrylics. It’s accurate, powerful, and includes safety features like a lid interlock and emergency stop. Great for intricate designs, custom signs, and engraving.
Blade Cutting
Use the fine-point blade for thin materials (like vinyl or paper), and the standard blade for thicker ones (like faux leather or chipboard). It also supports a rotary blade for fabric.
Inkjet Printing + Pen Tool
Print in color on porous materials like paper and wood using the CMYK inkjet module. It’s perfect for logos, cards, or decorative signs. Use the pen tool to draw or write custom messages.
How to Set Up the xTool M1 Ultra Laser
Getting started with your xTool M1 Ultra is fast and beginner-friendly—you can be ready to craft your first project in about 15 minutes!
Step 1: Unbox and Remove Packaging
Start by carefully unpacking your machine. Be sure to remove all protective packaging, including the three twist-lock screws used to secure components during shipping.
Step 2: Install Quick-Swap Modules
The quick-swap modules are designed for easy installation. Align the module with the guide rails at the back of the machine and press down until you hear a click.
Once the module is in place, flip the locking lever (located on the top or back of the machine) to secure it. If you forget this step, xTool Creative Space will prompt you to lock the module before proceeding.
Step 3: Attach the Smoke Exhaust Filter
Insert the included filter into the smoke exhaust module. Then snap it onto the back of the machine—built-in magnets will help it align and click into place effortlessly.
Step 4: Connect Power and Insert Safety Key
Plug in the power cord and insert the xTool Key into its designated port. This safety key must be in place for the machine to operate. Without it, the laser will not turn on.
Step 5: Connect to Your Computer
Use the included USB cable to connect your xTool M1 Ultra to your computer. While you can switch to Wi-Fi later, the initial setup requires a USB connection to complete the pairing process.
Once these steps are done, you’re ready to launch xTool Creative Space and start your first project!
xTool M1 Ultra Must-Have Accessories
Accessory | Purpose | Why It’s Essential |
|---|---|---|
Filters fumes and odors during laser operation | Keeps your workspace safe and odor-free | |
Assortment of wood, acrylic, leather, and metal blanks | Lets you test settings and practice engraving without wasting premium materials | |
Applied to material surface before engraving | Prevents scorch marks and improves engraving contrast | |
Measures material thickness accurately | Helps set focus height and plan cuts more precisely |
xTool M1 Ultra Cutting Blade Beginner’s Guide
This beginner’s guide focuses on using the blade tools effectively for crafting with materials like vinyl, cardstock, faux leather, and chipboard.
Blade Overview:
- Fine-Point Blade: Ideal for thin, delicate materials (up to 1.5mm), like vinyl and paper.
- Standard Cutting Blade: Designed for thicker materials (up to 2.5mm), such as matboard, faux leather, and balsa wood.
- Rotary Blade: (Mentioned briefly) Best for soft, fray-prone materials like fabric.
Getting Started:
- Ensure the blade housing is installed properly.
- Use the blue light grip mat on the baseplate, not the honeycomb panel.
- Place the blade in the correct module: fine-point on the left, standard on the right.

Cutting Workflow:
- Load your material.
- Use XCS software to position and design.
- Select the appropriate blade.
- Choose settings using the EasySet material library or manually input.
- Frame and preview the design.
- Start cutting and finish your project.
Key Features:
- 300mm x 300mm working area for fine-point blade; 295mm x 295mm for standard.
- Safety features include key-lock access and automatic stop when the lid opens.
- Compatible with a wide range of materials and supports other tools like pens, laser, and printer.
How To Print & Laser Cut With The xTool M1 Ultra

Supplies:
- xTool M1 Ultra (Laser + Inkjet modules)
- 3mm Basswood sheet
- PNG logo
- Triangular Prism Holder
- xTool Creative Space (XCS) Software
Steps:
- Design in XCS: Import your PNG logo and place it inside an oval shape.
- Print with the Inkjet Module (set intensity around 80).
- Swap to the Laser Module.
- Cut printed design.
- Finish by lightly sanding and sealing if desired.
Result? A clean, professional sign made in one machine!
How to Print on Wood with the xTool M1 Ultra

The xTool M1 Ultra features an inkjet printing module that enables direct printing onto porous materials, such as wood. In this guide, we’ll walk you through how to print on wood using the xTool M1 Ultra.
Supplies You’ll Need:
- xTool M1 Ultra
- xTool Inkjet Printing Module
- Various wood blanks (plain, pre-cut, painted)
- xTool Creative Space software
- Triangular Prism Holder (for flat materials)
Project: Print & Cut Wood Tags
Step 1: Set Up Your Design in xTool Creative Space
- Import your image (e.g., PNG logo).
- Add a shape (like a rounded square) to frame your image.
- Enable Multi-Module Processing so you can print and cut in one project.
- Assign the image layer to the Inkjet Module and the shape layer to the Laser Module.
- Adjust intensity and power settings for both modules as needed.
Step 2: Print the Design
- Install the inkjet module and ink plate in the machine.
- Place your wood blank on the base plate.
- Click Process, then Start.
- The printer will test the ink flow—watch for solid lines in cyan, magenta, and yellow.
- If ink isn’t flowing well (especially magenta), try troubleshooting with xTool’s cleaning tips.
Step 3: Cut the Shape
- Swap the ink module for the laser module when prompted.
- Set your material (e.g., 3mm basswood) and confirm the cutting settings.
- Click Start to cut out the printed tag.
Troubleshooting Ink Flow
If one of the ink colors (like magenta) isn’t printing correctly:
- Try restarting the print process several times.
- Use a damp tissue or soak the printhead briefly in water to unclog dried ink.
- If the problem persists, refer to the ink troubleshooting guide on xTool’s website.
Even with imperfect ink flow, the prints still turned out reasonably well—but better ink flow = better results.
Pro Tips
- The xTool M1 Ultra’s inkjet module can print on many types of wood blanks, but the surface type and color will affect the final result.
- Use lighter wood for better contrast.
- For shaped pieces, keep the thickness low to prevent interference with the printhead.
- Always test on scrap materials to dial in your settings.
With a bit of practice and patience, you can create beautiful custom tags, signs, and decor by printing directly onto wood!
How to Use the xTool M1 Ultra Pen Tool

Ready to add custom text or doodles to your projects using the xTool M1 Ultra? In this guide, you’ll learn how to use the Pen Drawing Tool in the Basic Module to draw or write directly on your materials—perfect for labeling, tags, and personalized messages.
Step 1: Install the Pen in the Basic Module
- Open the Basic Module cover on your xTool M1 Ultra.
- Place the pen inside the adapter and insert it into the module.
- Make sure the adapter is seated properly at the base.
- Close the clamp and put the module cover back on.
Tip: Ensure the pen is snug and not wobbly for clean, even lines
Step 2: Create Your Text Design in Creative Space
- Open xTool Creative Space and use the Text Tool to add your message.
- Click anywhere outside your design to access tool settings.
- Set the text to Pen Drawing mode.
You’ll have two drawing options:
- Line Drawing – Outlines the letters only.
- Color Fill – Fills in the letters completely for a bold, handwritten look.
Step 3: Mark the Drawing Area and Resize
- In Creative Space, mark the processing area by selecting two corners—this defines where the text will go.
- Resize and position your text to fit neatly inside the marked zone.
- For example, position names side by side or stack them based on your design layout.
Step 4: Start the Drawing Process
- With your design ready and the pen installed, click Process.
- Then click Start to begin the drawing.
Note: If you selected the Color Fill option, the machine will take longer to complete the job since it fills in every letter
- Once the drawing is finished, you can remove your project—or, if you plan to cut it next, leave it in place to maintain alignment.
Final Tip
Using the pen tool on the xTool M1 Ultra is a great way to add a handwritten or artistic touch to your projects without needing another machine. Whether you’re making name tags, cards, or personalized crafts, this tool makes it easy and precise!
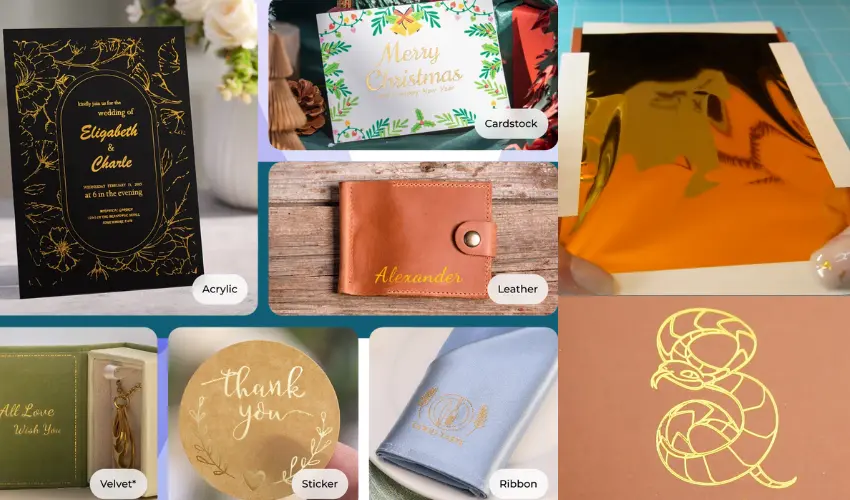
Hot Foil Pen For xTool M1 Ultra
Bring brilliance and personality to your projects with the xTool M1 Ultra Hot Foil Pen, designed to give your creations a stunning metallic finish. This innovative heat-activated tool delivers precise, professional-grade results on a wide variety of materials — not just paper.
Compatible with More Than Just Paper
The M1 Ultra Hot Foil Pen works beautifully on paper, cardstock, leather, acrylic, wood, and even boxes up to 139 mm thick. Whether you’re personalizing invitations, adding shimmer to handmade cards, or designing custom gifts, your projects will truly shine.
Why Choose Heat Foiling?
Unlike traditional pressure-based foiling, heat foiling produces a cleaner, brighter, and more durable finish. Within minutes, you can achieve consistent, professional results that won’t smudge, fade, or peel over time.
- Crisp Edges, Brilliant Shine – Heat fuses foil directly to the surface, leaving sharp, detailed lines.
- Long-Lasting Vibrance – Enjoy colors that stay bold and glossy, project after project.
- Consistent Results – Achieve even coverage with no gaps or cracking.
Compatible Foils
Use any heat-activated foils (response temperature ≤ 90°C) to achieve eye-catching metallic patterns. Choose from gold, silver, rose gold, or red foil to match your creative style and project theme.
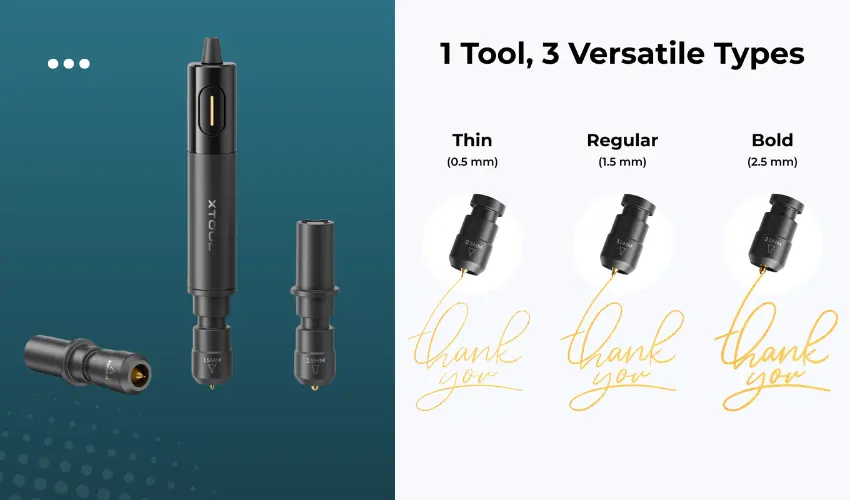
Precision Tips for Every Project
The xTool Hot Foil Pen comes with three interchangeable tips (0.5 mm, 1.5 mm, 2.5 mm) for complete creative control:
- 0.5 mm Fine Tip: Perfect for intricate details and delicate lettering.
- 1.5 mm Standard Tip: Great for medium lines and patterns.
- 2.5 mm Bold Tip: Ideal for solid fills and large designs.
xTool M1 Ultra Maintenance Tips
Here are xTool M1 Ultra Maintenance Tips to keep your machine running smoothly and extend its life:
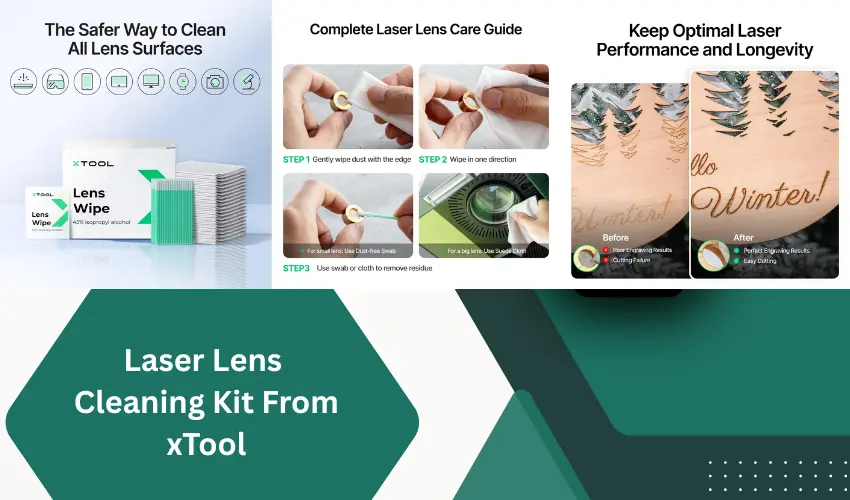
Clean the Laser Lens Regularly
- Use a lens wipe or microfiber cloth to gently clean the laser lens.
- Do this weekly or after several intense sessions.
- Avoid touching the lens with bare hands to prevent oil smudges.
Wipe Down the Interior
- Use isopropyl alcohol (at least 70%) and a soft cloth to clean:
- Base plate
- Cutting mats
- Honeycomb panel
- Remove any soot, residue, or sticky tape marks after each project.
Check & Clean the Air Assist and Fans
- If your unit has an Air Assist, ensure the nozzle is free of debris.
- Clean intake and exhaust fans monthly using compressed air or a small brush.
- Dust buildup reduces performance and airflow.
Tighten Screws and Check Modules
- Inspect moving parts like blade holders and module mounts every few weeks.
- Use the included hex wrench to tighten any loose screws or fittings.
Lubricate the Guide Rails
- Apply light machine oil or silicone lubricant to the guide rails every 2–3 months.
- Wipe off excess oil to avoid residue on your materials.
Replace Cutting Mats and Blades
- Cutting mats wear out over time—replace when the surface becomes too worn or warped.
- Keep spare 45° blades, fine-point blades, and blade housings on hand.
Maintain Ventilation and Filters
- If using the desktop air purifier, replace or clean filters as recommended by xTool.
- Ensure the exhaust hose is securely connected and venting properly.
Update Firmware & Software
- Regularly check the xTool Creative Space (XCS) app for firmware updates.
- Updated software ensures better performance and bug fixes.
Use the Safety Key
- When not in use, remove the safety key to prevent accidental operation—especially important if children have access to your workspace.
Create a Monthly Maintenance Routine
- Keep a simple checklist for cleaning, inspecting, and updating your machine.
- Consistent care = fewer errors and better project results.
xTool M1 Ultra Pro Tips

Here are some xTool M1 Ultra Pro Tips to help you get the most out of your machine—whether you’re a beginner or an experienced maker:
Use the Framing Feature Before Every Job
Before you hit “Start,” always use the Framing button in xTool Creative Space (XCS) to preview your job placement. It helps avoid wasted material and misaligned cuts—especially important for multi-layer or printed designs.
Use AI Design Tools in XCS
Take advantage of the Artimind AI tools built into XCS:
- Type a word or phrase and instantly turn it into stylized artwork.
- Perfect for quick text-based gifts like name signs or keychains.
Save Custom Material Settings
For materials not listed in the EasySet library, dial in your ideal power/speed/pass settings through test grids and save them as custom profiles in XCS for faster workflows later.
Quick-Swap Modules = Speed & Flexibility
Change from blade to pen to laser to printer in just 3 seconds with the EasySwap system. Plan combo projects (like print then cut or draw then engrave) to fully utilize the machine’s capabilities.
Keep Blades & Lenses Clean
A dirty lens = weak cuts. Dirty blades = bad weeding. Wipe lenses and blades regularly, especially if cutting adhesive-backed materials, which can gum things up fast.
Use Inkjet Mode with Light Woods for Best Results
The M1 Ultra’s inkjet printing works best on light-colored, porous materials like basswood or paper. It won’t work well on glossy, non-porous surfaces or dark backgrounds.
Maximize Cutting Space
- Fine-point blade: 300mm x 300mm
- Standard cutting blade: 295mm x 295mm
Plan your designs to fit this workspace. If you need larger projects, split your file into sections and tile them.
Lock Your Project Settings
Once you dial in the settings for a specific material, lock the processing parameters so you don’t accidentally change them mid-project.
Use the Riser Base for Tall or Rotary Items
When engraving tumblers or curved surfaces, install the Riser Base + RA2 Pro rotary module to lift the machine and rotate the object smoothly during laser processing.
Explore the xTool Project Library
Tap into 6,000+ free and paid project files inside XCS. Great for inspiration or time-saving ready-to-go templates.
Is the xTool M1 Ultra Right for You?
If you’re looking for one machine that can cut, engrave, print, and draw, the xTool M1 Ultra is hard to beat. It’s perfect for:
- Home crafters
- Etsy sellers
- Teachers and DIY fans
- Anyone wanting to personalize gifts or decor
You’ll save time, space, and energy by keeping your projects in one place with a single machine.
Check Amazon Price Below
Frequently Asked Questions
What makes the xTool M1 Ultra different from other craft machines?
The xTool M1 Ultra is a 4-in-1 hybrid machine that combines diode laser engraving, blade cutting, inkjet color printing, and pen drawing—all in one device. Unlike other machines that require multiple tools for each function (e.g., a Cricut for cutting and a separate laser for engraving), the M1 Ultra allows for multi-module processing in a single workflow. It’s ideal for crafters who want to save space while expanding creative capabilities.
What materials can the xTool M1 Ultra cut and engrave?
The xTool M1 Ultra supports a wide range of materials, including:
Laser Engraving/Cutting: Wood, acrylic (not clear), leather, paper, anodized aluminum, cardboard, cork
Blade Cutting: Vinyl, HTV, cardstock, paper, sticker paper, faux leather
Inkjet Printing: Porous materials like light wood, uncoated cardstock, and cotton
Pen Drawing: Paper, wood, cardstock, tags
Note: For fabric, use the rotary blade instead of the standard drag blade.
Can I engrave tumblers or curved objects with the xTool M1 Ultra?
Yes! The xTool M1 Ultra is compatible with the RA2 Pro Rotary Tool, which allows for 360° engraving on cylindrical objects like tumblers, mugs, pens, and glassware.
Is the xTool M1 Ultra beginner-friendly?
Absolutely. The M1 Ultra comes pre-assembled, with easy-to-follow tutorials, a simple swap-in tool system, and the XCS (xTool Creative Space) software that includes auto-settings, previews, and even AI-powered design tools. Its safety features—like automatic pause when the lid is opened—make it safe and approachable for new users.