Laser engraving is a powerful tool for makers, hobbyists, and business owners alike—but it comes with a learning curve. Whether you’re just starting out or looking to improve your results, understanding the most common mistakes can save you time, material, and frustration.

Here are the top 7 laser engraving mistakes and the best ways to avoid or fix them.
Table of Contents
1. Incorrect Focus

The Mistake:
Failing to properly focus the laser on the surface of your material can result in weak, blurry, or inconsistent engravings.
The Fix:
Always use a focus tool or autofocus feature provided with your machine. If your laser doesn’t have autofocus, use a manual focus guide or spacer based on your lens type. Double-check the focus before every job, especially when switching material thicknesses.
Focusing your laser engraver correctly is essential for achieving sharp, clean cuts and engravings. Whether you’re using a CO₂, diode, fiber, or UV laser, proper focus ensures the laser beam hits the material at its most powerful point—called the focal point.
Here’s a step-by-step guide on how to focus your laser engraver:
Tools You May Need
- Focus gauge or spacer (often comes with your laser)
- Manual or auto-focus tool (depending on your machine)
- Material to engrave
- Optional: Caliper or ruler for precise measurements
What Does “Focusing” Mean?
Laser focus is the distance between the lens and the material surface where the beam converges into the smallest point. When correctly focused:
- You get cleaner cuts
- Finer engraving details
- Less smoke and charring
Manual Focus (Most Common)
Works for CO₂ and diode lasers without autofocus.
Step 1: Place Your Material
Place your material on the laser bed where you’ll run the job.
Step 2: Use the Focus Spacer/Tool
Most machines come with a focus tool. For example:
- xTool D1 Pro: 5mm acrylic spacer
- Glowforge: Pre-set focal height; adjust material height instead
- K40 (with Z-bed): Manually adjust the bed or lens height
Slide the focus spacer between the nozzle/lens and your material. Adjust the Z-axis height (bed up/down or head up/down) until the spacer fits snugly between the nozzle and the material.
Step 3: Remove the Spacer
Once it’s correctly focused, remove the spacer and you’re ready to engrave or cut.
Tips for Perfect Focus:
- Always re-focus after switching material thickness.
- For engraving: focus on surface
- For cutting thick material: try focusing slightly into the material for better penetration.
- Keep your lens clean—dirty optics reduce power and precision.
2. Wrong Speed and Power Settings

The Mistake:
Using the wrong combination of speed and power can cause poor results—too light, too dark, or even a fire hazard.
The Fix:
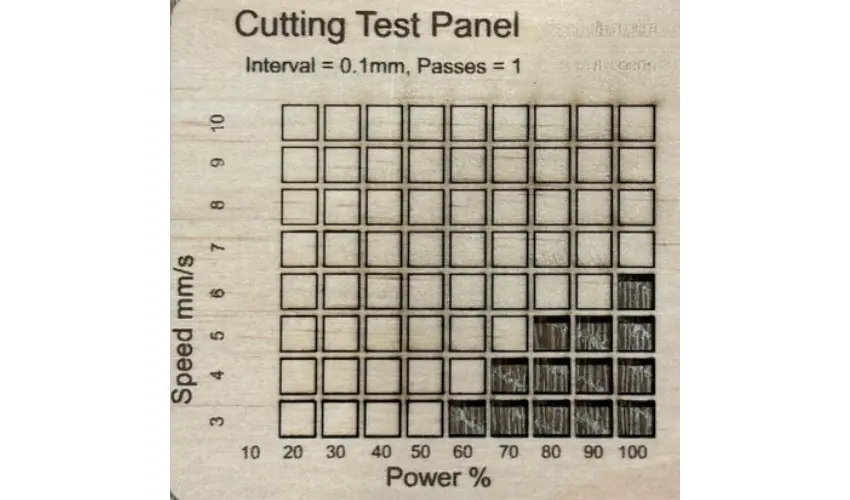
Run a laser test grid on each new material. This helps dial in optimal settings. Always start with manufacturer recommendations, then fine-tune based on results. Save your tested settings for future jobs.
Running a laser test grid is one of the best ways to dial in perfect settings for cutting or engraving new materials. It helps you find the ideal speed and power combination for clean results without overburning or undercutting. Here’s everything you need to know to run one effectively:
What You’ll Need:
- Your laser engraver (CO₂, diode, fiber, or UV)
- The material you want to test
- Laser test grid file
- Design software (e.g., LightBurn, xTool Creative Space, EZCAD)
- A ruler or caliper (optional, for measuring results)
Step-by-Step: How to Run a Laser Test Grid

Download or Create a Test Grid File
Use a premade file or create one manually:
- A grid with rows and columns—each square or rectangle runs at a different speed and power setting.
- Example: Speeds from 3 to 10 mm/s and power levels from 10% to 100%.
Place Your Material on the Laser Bed
- Secure your material using magnets or bed pins.
- Make sure it’s flat and in focus for best results.
Import the Grid into Your Software
- Open your grid file in LightBurn, xTool Creative Space, or another compatible program.
- Adjust the size of the grid to fit your test material.
- Double-check that each block is assigned the correct power/speed setting.
Set the Parameters
- Make sure your focus, air assist, and ventilation are working.
- Set line interval, passes, and laser mode (line/fill) based on the task (cutting or engraving).
- Ensure each block uses different speed and power values to test a full range.
Run the Test
- Hit start and let your machine run the full grid.
- Watch for any issues like flaming, overburning, or skipped spots.
Evaluate the Results
- Look at each square or section:
- Which combo gives you clean edges and legible details?
- For engraving: Which gives strong contrast without burning?
- For cutting: Which cuts clean through without charring or scorching?
Record Your Ideal Settings
- Use a laser journal or spreadsheet to track settings for future use.
- Note material type, thickness, lens type, speed, and power for reference.
Pro Tip: Run New Tests for Each Material
Don’t assume the same settings work on different woods or acrylics. Even the grain, color, and finish can change how a material reacts to your laser.
3. Skipping Masking for Burn-Prone Materials
The Mistake:
Skipping masking on woods and plastics can lead to excessive charring, smoke marks, or melted edges.
The Fix:
Use laser-safe masking tape or transfer tape before engraving or cutting wood, acrylic, and leather. A felt-tipped squeegee can help apply the tape smoothly to avoid bubbles. After engraving, remove the masking to reveal clean results.
The Transfer Tape We Recommend

Step-by-Step Guide to Using Transfer Tape for Laser Engraving on Wood
Using transfer tape like Greenstar TransferRite Ultra 582U helps prevent burn marks during laser engraving. Here’s a simple step-by-step guide to help you apply it properly for the best results.
Step 1: Prepare the Wood Surface

- Make sure the wood is clean and smooth—wipe off any dust or oils.
- Lightly sand the surface if needed so the tape sticks better.
Step 2: Apply the Transfer Tape
- Cut a piece of Greenstar TransferRite Ultra 582U slightly larger than your design area.
- Peel the backing off the tape.
- Carefully place the sticky side onto the wood without letting it wrinkle.
- Use a felt-tipped squeegee to smooth the tape—start in the middle and work outwards to remove bubbles.
Step 3: Start the Laser Engraving
- Load the wood piece into your laser machine.
- Set your laser settings for your wood type (the tape won’t interfere with the beam).
- Run your engraving job as usual.
Step 4: Remove the Transfer Tape
- Let the wood cool down a bit after engraving.
- Gently peel off the transfer tape. It should come off cleanly with no sticky residue.
- Check the design and do any final cleanup if needed.
Tips for Best Results
- Test First: Always test your laser settings on a small piece before engraving your final project.
- Double Protection: For delicate or softwoods, apply two layers of tape to prevent deeper burns.
- Apply Smoothly: Make sure the tape is applied flat and firmly to avoid uneven results.
Using Greenstar TransferRite Ultra 582U is an easy, affordable way to improve your laser projects. It protects the wood from burns and helps you create cleaner, more professional engravings with less mess afterward.
4. Ignoring Ventilation and Air Assist

The Mistake:
Poor smoke extraction or no air assist causes dirty cuts, flare-ups, and material discoloration.
The Fix:
Use a quality fume extractor or vent the machine outdoors. Always run an air assist system to blow away debris and reduce charring. Some budget engravers can be upgraded with external air pumps for better results.
5. Not Cleaning the Optics Regularly

The Mistake:
Dirty mirrors or lenses reduce laser power and can cause inconsistent engraving or cutting.
The Fix:
Clean mirrors and lenses regularly using proper lens wipes or optical cleaner. A simple cleaning routine every 20–40 hours of use will prevent power loss and extend the life of your machine.
Here’s a simple step-by-step guide on how to safely clean these delicate components:
How to Clean Laser Engraver Mirrors and Lenses: Step-by-Step
What You’ll Need:
- Lens cleaning solution (specifically for optics – NOT glass cleaner)
- Optical-grade lens wipes or lint-free lens tissue
- Compressed air (optional but helpful)
- Cotton swabs (with wooden or paper sticks, not plastic)
- Nitrile gloves (to avoid skin oils contaminating optics)
Step 1: Power Off Your Machine
Always turn off and unplug your laser engraver before cleaning. This prevents electrical accidents and allows the mirrors and lenses to cool if the machine was recently used.
Step 2: Access the Optics
Carefully remove any covers protecting the mirrors or lenses. Your machine’s manual can guide you on how to access mirror #1, #2, and #3, and the focus lens.
Tip: Work in a clean, well-lit environment. Avoid touching optics with your bare hands.
Step 3: Blow Away Loose Dust
Use compressed air to gently blow off loose particles and debris. This helps prevent scratching the optical surface during the wiping process.
Step 4: Apply Cleaning Solution
Dampen a lens wipe or a cotton swab with a few drops of lens cleaning solution. Do not pour the liquid directly onto the lens or mirror.
Gently wipe the lens or mirror using a circular motion starting from the center and moving outward. Use a fresh wipe for each optic to avoid cross-contamination.
Step 5: Wipe Carefully
Important: Never scrub. Let the solvent and gentle pressure do the work.
Step 6: Let Dry & Inspect
Let the optics air-dry or gently dry them with a fresh wipe. Inspect the surface under a light. If it still looks smudged or dusty, repeat the process.
How Often Should You Clean?
- High-use machines: Inspect and clean once a week
- Light use: Every 20–40 hours of operation
- Always clean immediately if cutting dirty materials or if you notice a drop in laser performance.
What to Avoid
- Household cleaners like Windex or alcohol (can damage coatings)
- Rough cloths or paper towels
- Scrubbing or applying too much pressure
- Touching lenses/mirrors with fingers
Recommended Products:
6. Not Testing Files Before Running Final Jobs
The Mistake:
Jumping straight into expensive or final materials without testing the file can result in ruined projects.
The Fix:
Run your design on scrap material first to verify scale, alignment, and engraving depth. Use features like “Frame” in LightBurn or “Preview” in xTool Creative Space to avoid positioning mistakes.
7. Using the Wrong File Format or Bad Vectors

The Mistake:
Poorly made vector files or using incompatible formats can cause machine hiccups or bad results.
The Fix:
Use clean, properly prepared vector files in formats like SVG, DXF, or AI for cutting. For engraving, raster images (like BMP or PNG) should be high-resolution and properly dithered or grayscale-converted. Always double-check your design before sending it to the laser.
Laser Engraving Mistakes Final Tip: Keep a Laser Journal
Record your settings, materials, and outcomes. This not only helps you learn faster but also builds a valuable reference for future projects.
Avoiding these common mistakes can elevate your laser engraving game from frustrating to fantastic. Practice, test, and troubleshoot—and you’ll see dramatic improvements in your results.
