Whether you’re brand new to laser engraving or a seasoned crafter upgrading to a new machine, one of the smartest things you can do is learn how to run a laser test file.
It’s the best way to dial in the ideal settings for your specific material and laser model—saving you time, money, and frustration.
Table of Contents
What Is a Laser Test File?
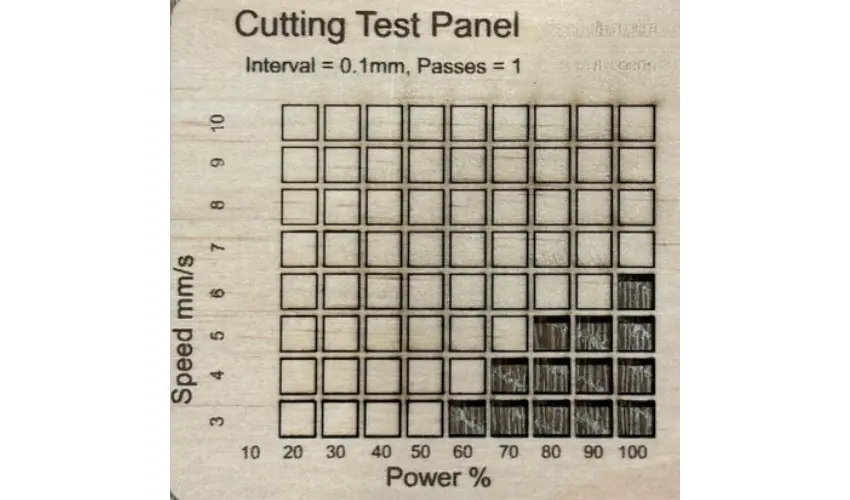
A laser test file is a tool used to determine the ideal settings for cutting or engraving a specific material with your laser machine. It typically consists of a grid or array of shapes—such as squares or circles—where each section uses different combinations of power, speed, and sometimes lines per inch (LPI).
By running this test, you can visually compare how the material reacts under various settings.
Why You Should Use a Laser Test File
Using a laser test file is one of the smartest things you can do before starting a new laser cutting or engraving project—especially if you’re working with a new material or switching to a different machine. Here’s why:
Dial In the Best Settings
Every material—and every laser—responds differently to power, speed, and resolution settings. A laser test file helps you quickly identify:
- The cleanest cut without burning or charring
- The sharpest engrave with optimal depth and clarity
- The best settings for masking or non-masking materials
Avoid Wasting Expensive Materials
Instead of ruining your good materials with guesswork:
- Run a test file on a small scrap or corner piece
- Know exactly what settings work before committing to a full design
Reduce the Risk of Fire or Damage
Some materials—like plywood with glue pockets or foam—can ignite if the settings are too hot or slow. A test file:
- Lets you observe the material’s reaction safely
- Helps you catch problematic materials early
Ensure Consistency in Batch Production
If you’re making products for sale or gifting multiple copies:
- A test file helps you lock in uniform results
- Essential when switching suppliers or material brands, even if they claim the same specs
Build a Personal Reference Library
By saving your test results:
- You create a handy guide for future use
- No need to guess or test repeatedly when revisiting a material
How to Create and Use a Laser Test File
Creating and using a laser test file is an essential part of dialing in your laser cutter or engraver for perfect results. Whether you’re working with a diode laser, such as the xTool M1, or a CO₂ laser, like the xTool P2 or Glowforge Pro, running a test file first can save materials, time, and frustration.
Here’s a complete step-by-step guide on how to create and use a laser test file:
Step 1: Choose or Design Your Test Shape
You’ll start by creating a simple shape to test—commonly a square, circle, or rectangle about ¼” to ½” in size.
Why?
This small shape keeps your test compact while still giving you a clear result for each setting.
You can use free design software like:
- xTool Creative Space (XCS)
- LightBurn
- Glowforge App (for Glowforge users)
Recommended Reading
If you want a structured, step-by-step approach, the
The LightBurn User Guide 2026 by Alex Hartwell is an excellent resource.
It covers:
- Full setup and configuration
- Design and editing tools
- Layer control and advanced settings
- Camera and rotary usage
- Troubleshooting and workflow optimization
It’s especially useful if you prefer learning with clear examples and practical walkthroughs instead of trial and error.
Step 2: Set the Operation Type
Before creating the array:
- Set the operation to Cut, Score, or Engrave, depending on what you want to test.
- For engraving, you’ll also want to test Lines Per Inch (LPI) or DPI settings for quality and contrast.
Step 3: Use a Test Grid or Array Tool
In most software, you can generate a test grid that runs multiple combinations of speed and power.
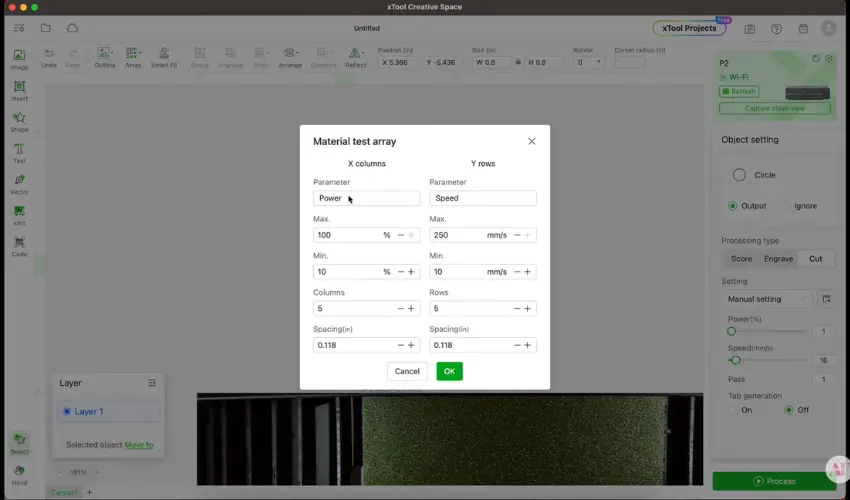
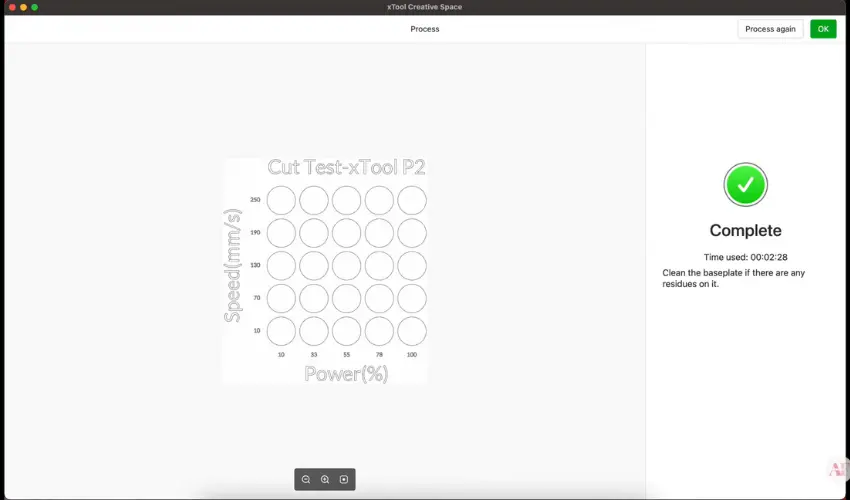
For example, in xTool Creative Space:
- Select your shape.
- Go to Array > Material Test Array.
- Choose how many rows and columns you want (e.g., 10 columns for power, 7 rows for speed).
- Adjust power and speed ranges (e.g., power from 20%–100%, speed from 5–50mm/s).
Each square in the grid will run at a different speed/power combination, so you can see which one works best.
Step 4: Label and Organize the File
Add a title or note to your test file that includes:
- The material name and thickness
- The machine and wattage
- The test type (cut/engrave/score)
Tip: Add a border box around the test grid, and label the rows and columns with speed and power values.
Step 5: Run the Test on Your Material
Place a scrap piece or a corner of your project material into the laser.
Before running:
- Double-check your focus height and alignment.
- Make sure your air assist (if using) is turned on.
- Watch carefully during the test, especially at lower speeds and higher powers, to prevent flare-ups.
Step 6: Analyze the Results
Once the test is done:
- Inspect the results for cut depth, edge quality, burn marks, and engraving detail.
- Circle or mark the square that gives you the best result.
For engraving: Look for a consistent, clean shade with sharp lines.
For cutting: Look for full cuts without scorching or char.
Step 7: Save or Cut Out the Test File
If you added a border around the grid, you can now cut out the card and store it with your material stash or in a reference drawer. This way, you can skip future testing when using the same settings again.
Optional: Create Multiple Tests
You might want to create separate test grids for:
- Engraving with masking tape vs. bare surface
- Different cutting depths
- Variations with air assist on/off
Laser Test File Safety Tips
- Never leave your laser unattended during a test.
- Use proper ventilation or filtration.
- Watch for flare-ups, especially with materials like plywood that may have hidden glue pockets.
- Don’t always use 100% power—this can shorten the lifespan of CO₂ laser tubes.
Materials Worth Testing

Use the code LASERENGRAVINGTIPS for 5% off the best materials for laser engraving & cutting available from Longer Laser Engravers! Click here to check it out!
Here are key materials worth testing with a laser test file:
Wood
Wood types vary significantly in density, grain, and glue content, which affects how they cut and engrave.
Test-worthy wood materials:
- Plywood (especially birch, maple, and basswood)
- MDF (cuts well but produces more smoke)
- Hardwoods (e.g., oak, walnut, cherry)
- Softwoods (e.g., pine, cedar)
Why test: Plywood thickness and glue layers can cause inconsistent burns or flare-ups. Hardwoods need slower speeds and higher power.
Acrylic
Different types of acrylic behave differently—some laser well, others don’t.
Test-worthy acrylic materials:
- Cast acrylic (best for clean cuts and engravings)
- Extruded acrylic (less ideal for engraving)
- Transparent vs. opaque colors
- Acrylic mirror or glitter sheets
Why test: Some colors (like clear or white) don’t absorb diode laser light well. Test to avoid incomplete cuts or melted edges.
Leather
Both genuine and synthetic leather require different settings.
Test-worthy leather types:
- Vegetable-tanned leather
- PU leather / faux leather
- Suede and bonded leather
Why test: Faux leather often contains PVC, which is toxic when lasered. Always verify it’s safe. Genuine leather reacts differently based on tanning and thickness.
Paper & Cardboard
Simple but easy to mess up with incorrect settings.
Test-worthy paper materials:
- Cardstock
- Chipboard
- Corrugated cardboard
- Kraft paper or packaging board
Why test: Paper cuts quickly but can catch fire or scorch. A test grid helps you find a balance between speed and precision.
Anodized Aluminum & Coated Metals
If your laser can mark metal (especially diode or fiber), test different coatings and finishes.
Test-worthy metal surfaces:
- Anodized aluminum business cards
- Powder-coated tumblers
- Painted stainless steel
Why test: Power settings vary by finish. Too high, and you strip the coating. Too low, and the design won’t appear.
Glass & Ceramic
Most lasers can engrave—but not cut—glass and ceramics.
Test-worthy examples:
- Glass coasters or jars
- Ceramic tiles
- Mugs or plates
Why test: You may need to use a coating (like white paint or marking spray) and adjust power to avoid cracking or inconsistent marking.
Fabrics
Fabric types vary wildly in how they burn or cut.
Test-worthy fabrics:
- Felt (wool and acrylic)
- Denim
- Canvas
- Cotton or polyester blends
Why test: Some fabrics melt, curl, or catch fire. Always use scrap pieces and test with low power first.
Painted or Masked Surfaces
Painted wood or masked materials (like tape or paper masking) need unique settings.
Why test: The laser burns through the coating first, so a test helps ensure clean engravings without over-burning or residue.
BONUS TIP: Materials to Avoid
Never laser test:
- PVC/vinyl (toxic fumes)
- Polycarbonate (doesn’t cut well and gives off harmful smoke)
- Foam boards with unknown chemical makeup
Final Tip: Run a Test for Each New Batch
Even if you’re using the same type of material, manufacturing differences between batches (especially with plywood or acrylic) can affect results. Always run a test file when switching suppliers or brands.
Pro Tip: Create a Material Library
Every time you test a new material, save your test cut and label it. Keep it in a drawer, folder, or binder for future reference. It’s a simple system that saves you time later.
Final Thoughts
Running a laser test file might feel like an extra step, but it’s one of the most valuable habits you can develop as a laser crafter. Once you see how much cleaner your cuts are—and how much material you save—you’ll never skip it again.
Perfect settings = perfect results. Every. Single. Time.
Ready to put this into practice? Try running a test on your favorite material today—and see the difference for yourself!
Frequently Asked Questions
What is a laser test file, and why do I need one?
A laser test file is a small, pre-designed grid or array that tests different combinations of speed, power, and line spacing settings on a specific material. It helps you identify the optimal settings for clean cuts or engravings without wasting an entire project piece. Every material reacts differently to laser energy, so using a test file ensures better precision, minimizes errors, and extends the life of your laser.
Do I need to run a laser test file for every material I use?
Yes, especially for new materials or batches. Even if you’ve used “3mm birch plywood” before, differences in glue content, density, or coating can affect results. It’s also a good idea to re-test if you switch to a different laser model or brand, or if your current machine is showing inconsistent results.
What should a laser test file include?
A good test file should include:
A grid of small shapes (e.g., squares or circles)
Speed variations on one axis
Power variations on the other axis
Optional: Lines per inch (LPI) settings for engraving, and tests for cut, score, and engrave modes
This grid allows you to see how each setting combination performs on your material—then pick the best one for your final project.
How do I create or get a laser test file?
You can:
Create your own in design software like LightBurn or xTool Creative Space using the Material Test Array tool
Download free or paid test files from sites like Etsy, GitHub, or laser crafting communities
Modify an existing template to include specific settings that match your machine’s power (like 5W, 10W, 40W, etc.)
Make sure your file matches your laser’s capabilities—diode and CO₂ lasers perform very differently.
How do I read the results of a laser test file?
After the test finishes, check each shape in the grid:
For cutting, look for clean edges, minimal scorching, and whether the material was fully cut through
For engraving, check for even shading, contrast, and sharp detail without overburn
Select the square with the best outcome, and note the corresponding speed and power settings
You can even cut out the grid and label it for future use—creating a material library over time.