Laser engraving works best on flat materials. But real-world projects aren’t always that simple. Mugs, rings, textured wood, curved bottles, and organic shapes all create one problem: the laser can’t stay perfectly focused across the surface.
That’s where the right tools and techniques make the difference.
In this guide, you’ll learn the four best options for laser engraving on uneven surfaces, along with practical tips to get clean, consistent results.
Why Uneven Surfaces Are Challenging
Laser engravers rely on a fixed focal distance. When the surface rises or dips, the laser either loses power or burns inconsistently.
Common issues include:
- Blurry or shallow engraving
- Uneven depth across the design
- Distortion on curved objects
- Missed details on textured materials
To solve this, you either adjust the surface… or adapt the laser.
Options For Laser Engraving On Uneven Surfaces
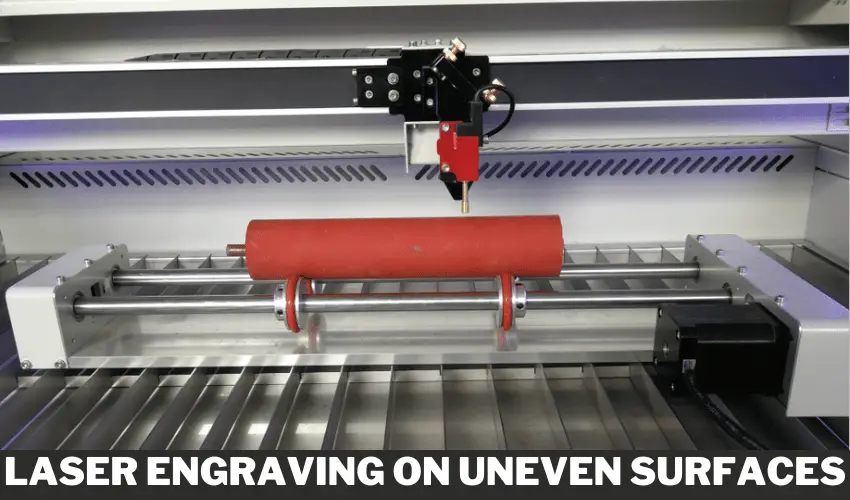
1. Use a Rotary Attachment for Cylindrical and Round Objects
Best for: Cups, tumblers, bottles, rolling pins, and curved wooden or metal objects.
A rotary attachment rotates your workpiece as the laser engraves, keeping the engraving surface consistently aligned with the laser beam. This is essential for round or cylindrical items, such as stainless steel tumblers, glassware, or wooden dowels. Most modern laser engravers—including the xTool S1 and Glowforge Pro—offer compatible rotary tools.
Tips for success:
- Ensure your object is centered and secured properly in the rotary.
- Adjust the laser height so the beam maintains focus on the curved surface.
- Use test runs to confirm alignment and scaling before final engraving.
Our Recommended Rotary Attachment for Cylindrical and Round Objects
Best Overall Rotary: xTool RA2 Pro Rotary Attachment
Compatible With:
- xTool P2S, S1, F1, F1 Ultra, D1 Pro, M1 Ultra, and most laser engravers on the market

Why We Recommend It:
The xTool RA2 Pro is a versatile 4-in-1 rotary attachment designed to handle nearly any cylindrical object. It supports:
- Roller rotary (for cups and bottles)
- Chuck rotary (for rings and curved objects)
- Sphere engraving (for balls and round ornaments)
- Jaw chuck for irregular objects (like mugs with handles)
Whether you’re engraving tumblers, glassware, pens, rings, or even spherical items, the RA2 Pro offers unmatched adaptability.
Key Features:
- 360° precise rotation with minimal slippage
- Quick switch between roller, chuck, and sphere modules
- Supports items up to 100mm in diameter
- Plug-and-play with xTool machines and compatible with other brands using rotary ports
Best For:
- Hobbyists and small businesses
- Anyone using xTool Laser Engravers
- Projects involving mugs, tumblers, bottles, pens, rings, and more
Bonus Tip: If you’re using a CO₂ laser or fiber laser, always check for rotary compatibility in the machine’s software (like LightBurn or EZCAD), and ensure your rotary connector matches the attachment.
2. Utilize Autofocus or Z-Axis Control

- Tips: It's only with automatic sensor, not included laser head or mirrors.
Best for: Slightly uneven wood, stone, leather, or metal surfaces.
Some laser machines (especially CO₂ and fiber lasers) come equipped with autofocus or motorized Z-axis adjustment. These features let the laser head move up and down to maintain focus as the surface height changes.
Tips for success:
- Use a laser with live or dynamic focusing capability.
- Run a surface scan if your software supports it, or manually set focal points at different locations.
- For inconsistent surfaces, reduce engraving speed to allow better compensation.
3. Flexible Fixtures and Jigs (Best for Irregular Shapes)

- Flexible Fixture Parameter : Using Area Size:30x79MM ,Pin Diameter :6MM,Pin Stroke : 21MM
Sometimes the simplest solution is physical stabilization.
Custom jigs, clamps, or molds can hold uneven objects in a more consistent position.
Works best for:
- Rocks
- Handmade items
- Asymmetrical objects
- Small production runs
Why it works:
You reduce movement and control positioning, which improves engraving accuracy.
Tips for success:
Using the Cloudray Flexible Fixture Universal Clamp Tooling Fixture well comes down to setup and small adjustments:
- Start by pressing the pins evenly around your object so it sits stable without wobble
- Keep the engraving area as level as possible, even if the overall shape isn’t
- Don’t overtighten. Too much pressure can shift smaller items or mark soft materials
- Recheck focus after clamping since height often changes slightly
- Run a quick frame preview before engraving to confirm alignment
- Use lower speed and multiple passes for better results on uneven surfaces
A few seconds spent adjusting the fixture usually saves you from inconsistent engraving later.
4. Apply 3D Surface Mapping and Software Compensation
Best for: Engraving complex textures, custom molds, and relief surfaces.
Some advanced laser systems support 3D surface mapping via scanning tools or camera vision. This data is then used to generate a path that adjusts the laser’s focus and intensity based on the topography.
Tips for success:
- Use LightBurn or other advanced laser software that supports 3D engraving.
- Import heightmaps or STL files if working with digital 3D models.
- Enable grayscale engraving modes to adjust laser depth based on elevation.
5. Manually Level or Shim the Surface
Best for: Occasional or budget-conscious users working with wood slices, coasters, stones, or odd-shaped materials.
If you’re working with uneven surfaces and don’t have access to auto-focusing lasers or rotary tools, try manually leveling your piece. Use shims or wedges to stabilize the item and create a flat area for engraving.
Tips for success:
- Measure surface height at different points using calipers or feeler gauges.
- Adjust the laser focus to the average height of the surface.
- Keep engraving areas small and within the laser’s depth of field for better results.
Conclusion
Engraving on uneven surfaces may seem intimidating, but with the right setup, it’s entirely achievable.
Whether you’re working with curved tumblers, natural wood, or sculpted metal, using tools like a rotary attachment or autofocus laser can make a huge difference. Even without fancy tech, thoughtful preparation and positioning can help you achieve clean, professional-looking results.
Master these techniques and open up a whole new world of creative possibilities for your laser projects.
Frequently Asked Questions
Can you laser engrave on curved or uneven surfaces?
Yes, you can laser engrave on curved or uneven surfaces using specialized tools and techniques. Common solutions include using a rotary attachment for cylindrical objects (like mugs or tumblers) or autofocus/3D height-mapping features for irregular surfaces. However, standard lasers without height compensation may struggle with sharp curves or drastic level changes.
What tools help engrave cylindrical or round objects?
A rotary attachment is the best tool for engraving cylindrical or round objects. It rotates the object as the laser engraves, maintaining the correct focal distance throughout the design. Rotary attachments come in roller or chuck-style formats and are compatible with diode, CO₂, and fiber lasers, depending on the model.
What happens if I engrave without adjusting for surface height?
Engraving without compensating for height differences can result in:
Blurry or incomplete engravings
Overburn or underburn in certain areas
Loss of detail or inconsistent depth
To avoid these issues, always calibrate your laser focus point based on the highest and lowest areas of the surface or use dynamic focus features.
Can diode and CO₂ lasers handle uneven surfaces effectively?
Yes, but with limitations. Diode lasers (like xTool D1 Pro) and CO₂ lasers (like Glowforge or xTool P2S) can engrave curved surfaces with a rotary attachment or manual adjustments. However, if the surface is irregular rather than cylindrical, you’ll need a Z-axis adjustable mount, autofocus, or even a 3D mapping feature, which some CO₂ and industrial lasers support.
How do I keep the design from warping on a curved surface?
To avoid warping or distortion:
Use a rotary tool for symmetrical curves like tumblers.
For irregular curves, adjust your design to follow the surface curvature using software like LightBurn’s “Apply Path to Surface” or 3D modeling tools.
Always do a test run on a scrap piece or similar surface to check alignment and depth.
Also Read: