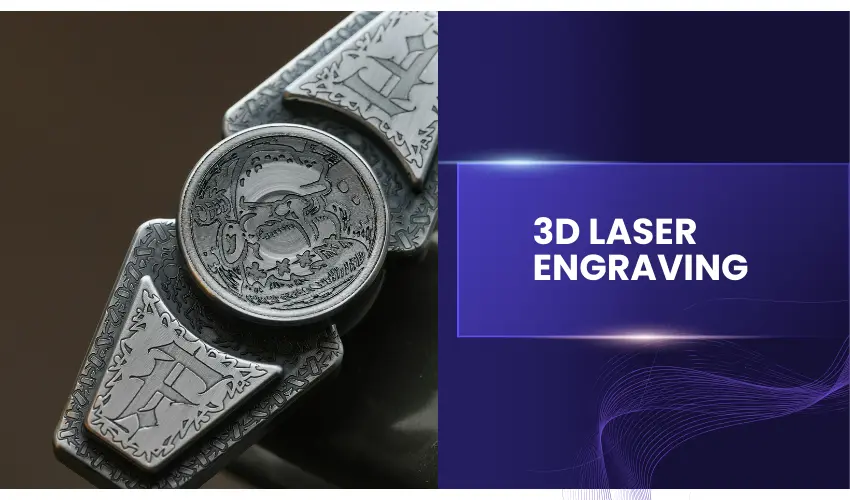
3D laser engraving is an advanced technology that uses lasers to create detailed, three-dimensional designs on various materials.
Unlike traditional engraving, which only etches the surface, 3D laser engraving allows for the creation of intricate depth and texture, giving the engraved design a more lifelike appearance.
Table of Contents
In this article, we’ll explore what 3D laser engraving is, how it works, its applications, the best laser machines for the job, and the benefits of using this innovative technique.
What Is 3D Laser Engraving?
3D laser engraving uses controlled laser power, speed, and multiple passes to remove material at different depths. The result is a design with height variation, shadows, and tactile detail—similar to relief carving.
Instead of engraving one uniform depth, the laser follows a depth map (often based on grayscale images), where darker areas are engraved deeper and lighter areas remain closer to the surface.
Key takeaway:
3D laser engraving adds depth and dimension, not just surface markings
How Does 3D laser engraving work?
3D laser engraving works by combining grayscale design files with precise laser control.
Step-by-Step Process
- Create or import a grayscale image
- White = no engraving
- Black = deepest engraving
- Gray = varying depths
- Laser interprets grayscale values
The software converts grayscale into different laser power or pass counts. - Multiple engraving passes
The laser engraves layer by layer, gradually forming depth. - Final 3D relief appearance
The result is a textured, dimensional surface.
Most modern laser software (LightBurn, xTool Creative Space, EZCAD) supports grayscale depth control
How to Prepare the Perfect Image for 3D Laser Engraving
Creating a stunning 3D laser engraving starts long before you press the Start button.
The final depth, realism, and smoothness of your engraving depend almost entirely on how well your image is prepared. Because 3D laser engraving relies on grayscale depth mapping, the image you use is essentially a set of instructions that tells the laser how deep to engrave at every point.
Here’s a clear, step-by-step guide to preparing the perfect image for 3D laser engraving.
Understand Grayscale = Depth
Before editing anything, it’s crucial to understand how lasers interpret images:
- White = no engraving (highest point)
- Black = deepest engraving (lowest point)
- Gray tones = varying depths in between
Your goal is to create a smooth grayscale depth map where brightness accurately represents height.
Start With the Right Source Image
Not all images work well for 3D engraving. Choose wisely:
Best image types
- High-resolution photos (300 DPI or higher)
- Clear subjects with strong separation from the background
- Portraits with good lighting and minimal shadows
- Simple compositions with defined shapes
Avoid
- Low-resolution images
- Busy or cluttered backgrounds
- Harsh lighting that creates misleading shadows
Convert the Image to Grayscale
Open your image in software such as Adobe Photoshop, GIMP, or Affinity Photo.
- Convert the image to grayscale
- Remove color information completely
- Focus only on brightness and contrast
At this stage, the image will look flat—and that’s normal.

- Existing subscribers must first complete current membership term before linking new subscription term
Manually Define Depth (Critical Step)
Photos show light and shadow, not actual depth. You must repaint depth manually.
How to do it
- Use Dodge (lighten) for raised areas
- Use Burn (darken) for recessed areas
- Think in terms of physical depth, not lighting
Example (portrait engraving):
- Lighten: forehead, nose tip, cheeks
- Darken: eye sockets, nostrils, background, hair gaps
This step is what separates amateur results from professional-quality 3D engravings.
Adjust Contrast and Levels
Once depth is painted:
- Use Levels or Curves
- Increase contrast for deeper, more dramatic relief
- Reduce contrast for softer, shallow engravings
Tip: Avoid pure black or pure white over large areas unless intentional—gradients create realism
Smooth Transitions With Subtle Blur
To prevent visible “steps” or banding:
- Apply a very light Gaussian blur (1–2 px)
- This smooths transitions between gray tones
- Helps create organic, flowing contours
Do not over-blur, or you’ll lose fine details.
Set Proper Image Resolution
Resolution directly affects engraving quality:
- Minimum: 300 DPI
- Recommended: 400–600 DPI for detailed work
Low-resolution images result in visible ridges and uneven depth.
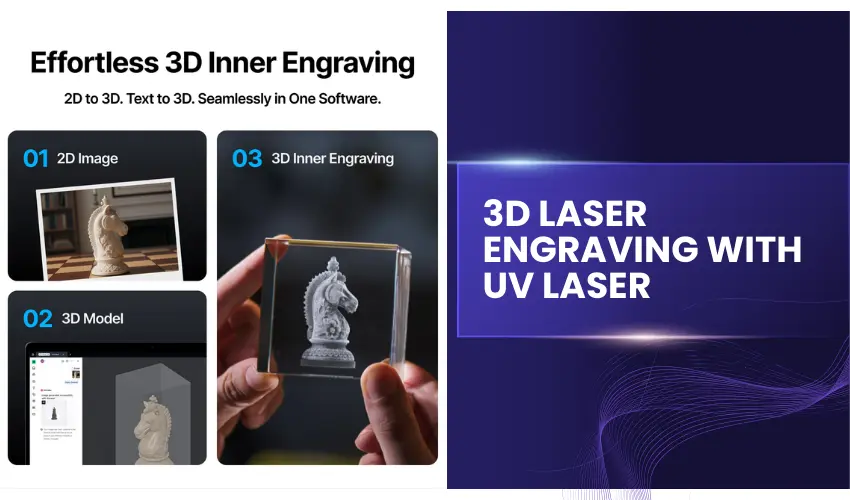
Creating Depth Maps From 3D Models (Best Method)
For the most accurate results, generate a depth map from a 3D model using software like Blender or ZBrush.
Process overview
- Position a camera facing the model
- Render a Z-depth pass
- Export as a grayscale image
- Invert colors if needed (black = deepest)
This method eliminates guesswork and produces professional results every time.
Final Checks Before Engraving
Before sending the file to your laser software:
- Ensure the image is pure grayscale
- Check for smooth gradients
- Zoom in to verify no harsh transitions
- Match image size to final engraving size
- Save in a high-quality format (PNG or TIFF)
Final Tip: Use Proven Files If Needed
If image preparation feels overwhelming, consider using professionally designed 3D laser engraving files. These are pre-tested depth maps that guarantee excellent results and save significant time.
Tips for Better 3D Laser Engraving Results
- Start with high-resolution grayscale images
- Run a depth test grid first
- Use multiple passes instead of high power
- Avoid air assist for deeper engraving
- Clean material surface thoroughly
- Slight defocus can improve depth blending
Key Applications of 3D Laser Engraving
3D laser engraving has a wide range of applications across various industries:
- Personalized Gifts and Awards: 3D laser engraving is popular for creating custom plaques, trophies, and personalized gifts with intricate designs.
- Jewelry: It is used to engrave detailed designs onto metal jewelry, including rings, necklaces, and bracelets.
- Architecture and Model Making: Architects use 3D engraving for creating detailed models and prototypes with accurate depth and texture.
- Signage: Businesses utilize 3D laser engraving to produce high-quality signs with detailed logos, lettering, and graphics.
- Industrial Applications: In industries, 3D engraving is used for creating durable, high-precision parts, serial numbers, and labels.
Benefits of 3D Laser Engraving
- Precision and Detail: The level of accuracy and detail achieved with 3D laser engraving is unparalleled. Even the smallest features of a design can be captured with remarkable clarity.
- Durability: Engravings are long-lasting and resistant to wear, especially when done on tough materials like metal or glass.
- Versatility: 3D laser engraving works on a wide range of materials, offering versatility for various applications.
- Customization: Whether for personal gifts or industrial parts, the ability to customize each design makes 3D laser engraving a valuable tool.
- Non-Contact Process: Since the laser beam does not physically touch the material, there’s minimal risk of damage or deformation, even on delicate materials.
Suitable materials for 3D laser engraving
3D laser engraving doesn’t work for all materials that might support 2D laser engraving. Stone, for instance, is not a good candidate for any 3D engraving project. This is because it is too hard and poses a challenge of burning the material without having the beam travel all the way through the material.
Hardwood
This is undoubtedly the most ideal material for 3D engraving in the industry. Hardwood species such as birch, cherry, walnut, and maple are characterized by a fantastic grain structure that best highlights the engraving details. Sure, the wood will be burnt during the laser engraving but the soot is quite easy to clean up using water.
Also Read: 3D Engraving on Wood - Tips for best results
Acrylic
Acrylic comes at a close second to wood when doing three-dimensional laser engraving. Although harder than wood, acrylic has an impressive melting point that is capable of producing great 3D designs and images.
However, if you are using clear acrylic, you may have to make a second pass with the machine to perfectly gloss or polish the surface of the engraving.
Crystal
Crystal has a clear and reflective quality, making it an excellent medium for 3D engravings that require depth. Commonly used for personalized gifts, such as photo cubes and awards. It is important to use a UV laser with appropriate settings to avoid damaging the crystal.
Medium Density Fiberboard (MDF)
If you are looking for an engraved product that you can paint later, consider using MDF. It is soft, readily available, and quite affordable. Once you are done engraving, you can clean the surface using an air hose and a damp cloth and then proceed to paint it.
Metals
Stainless Steel
- Why it works: Excellent heat response and contrast control
- 3D Result: Smooth depth layers, clean edges, strong grayscale
- Common uses: Logos, portraits, industrial parts, jewelry, plaques
Aluminum (Anodized & Bare)
- Why it works: Reacts well to pulse-width modulation
- 3D Result: Sharp depth definition; anodized aluminum offers higher contrast
- Common uses: Nameplates, tags, electronics housings, signage
Brass
- Why it works: Dense structure allows precise material removal
- 3D Result: Deep, well-defined relief engravings
- Common uses: Decorative plates, awards, premium branding
Copper

- Why it works: High reflectivity but excellent results with higher power MOPA lasers
- 3D Result: Detailed engraving with visible depth
- Common uses: Art pieces, coins, electrical components
Titanium
- Why it works: Strong thermal stability and oxidation control
- 3D Result: Clean depth engraving with optional color effects
- Common uses: Medical tools, aerospace parts, luxury items
Tool Steel / Carbon Steel
- Why it works: Consistent material response under fiber laser energy
- 3D Result: High-contrast and durable engravings
- Common uses: Molds, dies, industrial tooling
Metals Less Suitable for 3D Engraving
- Gold & Silver: Very reflective and soft—better for surface marking
- Coated or Painted Metals: Coatings may burn unevenly and reduce depth clarity
- Highly Polished Metals: Require surface preparation for best results
Considerations When Using 3D Laser Engraving
While 3D laser engraving is highly effective, there are a few factors to consider:
- Material Choice: Not all materials are equally suited for 3D laser engraving. Some may require special preparation or post-processing to achieve the desired results.
- Laser Power and Settings: The laser’s power, speed, and focus must be adjusted based on the material and design. Inappropriate settings may result in poor quality or damage to the material.
- Cost: The equipment and software required for 3D laser engraving can be expensive, especially for commercial use.
What is the difference between 2D and 3D laser engraving?
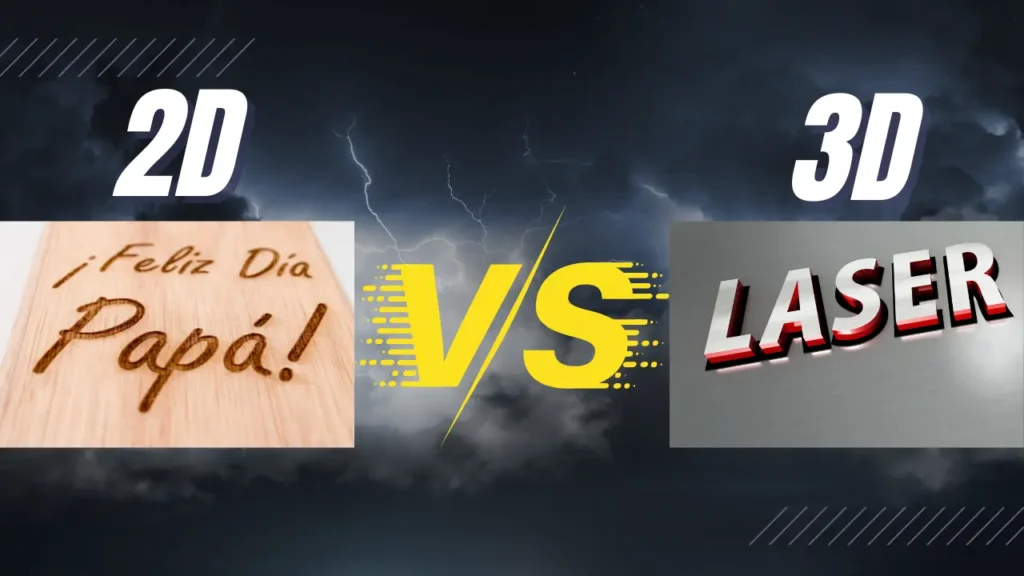
The difference between 2D and 3D laser engraving lies primarily in the depth and complexity of the engravings produced. Here’s a breakdown of each:
2D Laser Engraving
- Definition: 2D laser engraving involves creating flat images or designs on the surface of a material. The engraving is done by removing material from the surface to create a contrast with the background.
- Depth: The engraving is typically shallow, meaning it doesn’t penetrate deeply into the material.
- Applications: Commonly used for logos, text, or simple graphics on materials like wood, glass, metal, and acrylic.
- Visual Effect: The result is a flat, one-dimensional image that can vary in darkness or lightness based on the engraving’s intensity.
- Tools and Techniques: 2D laser engraving machines often use vector images, and the process can be quick and efficient for mass production.

3D Laser Engraving
- Definition: 3D laser engraving creates a three-dimensional image that appears to have depth and texture. This process involves not only the surface but also varying depths within the material to create lifelike images.
- Depth: The engraving penetrates deeper into the material, allowing for more complex designs and shadow effects.
- Applications: Commonly used for creating sculptures, portraits, and intricate designs in glass, crystal, wood, and metals. It’s popular for gifts, awards, and decorative items.
- Visual Effect: The finished product has a three-dimensional appearance, with highlights and shadows that give the image a realistic look and feel.
- Tools and Techniques: 3D laser engravers typically require specialized software to convert images into a format suitable for three-dimensional engraving, and the process can be more time-consuming than 2D engraving.
In essence, the main differences between 2D and 3D laser engraving are the depth of engraving and the complexity of the images produced.
While 2D engraving is more straightforward and efficient for flat designs, 3D engraving allows for more artistic and realistic representations, making it ideal for personalized and decorative items.
Feature | 2D Laser Engraving | 3D Laser Engraving |
|---|---|---|
Depth variation | Single depth | Multiple depths |
Visual effect | Flat | Sculpted / relief |
File type | Vector or bitmap | Grayscale bitmap |
Engraving time | Fast | Slower |
Skill level | Beginner | Intermediate–Advanced |
What Types of Lasers Can Do 3D Laser Engraving?
Fiber Lasers (Best for Metal)
- Ideal for steel, aluminum, brass, titanium
- Extremely precise depth control
- Common in industrial and jewelry engraving
CO₂ Lasers
- Best for wood, acrylic, leather, rubber
- Popular for signage, art, and décor
- Limited on bare metal without marking sprays
Diode Lasers
- Affordable option for wood, leather, coated metals
- Slower and shallower depth compared to CO₂ and fiber
- Great for hobbyists and small businesses
UV Lasers (Ultra-Fine & Heat-Sensitive Materials)
- Use short-wavelength (355nm) laser light
- Excellent for micro 3D engraving with minimal heat impact
- Ideal for glass, plastics, ceramics, PCBs, silicon, and medical components
- Produces extremely clean edges with almost no charring or melting
- Common in electronics, medical device manufacturing, and precision marking
Best Laser Machines For 3D Laser Engraving
1. xTool F2 Ultra 60W MOPA + 40W Diode
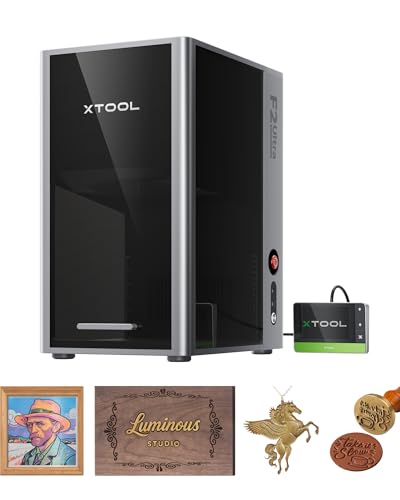
- Ultimate Dual-Laser Powerhouse: Equipped with a 60W MOPA fiber laser and a 40W diode laser, the xTool F2 Ultra masters all materials effortlessly—including all metals, wood, acrylic, leather, glass, rubber, fabric, and more. It delivers vibrant color engraving, precise 3D deep engraving, and cuts up to 2 mm metal, 20 mm acrylic, and 23 mm wood—one machine that does it all.
The xTool F2 Ultra is one of the best laser machines for 3D laser engraving thanks to its powerful dual-laser system and precision-focused design.
Combining a 60W MOPA fiber laser with a 40W diode laser, it delivers exceptional depth control, ultra-fine detail, and broad material compatibility—ideal for both surface and subsurface 3D engraving.
Why the xTool F2 Ultra Excels at 3D Engraving
- True 3D Depth Control (MOPA Technology): The 60W MOPA fiber laser allows precise pulse-width adjustment, enabling smooth grayscale gradients and layered depth—perfect for 3D reliefs, portraits, and textured metal engravings.
- Dual-Laser Versatility: Switch between fiber (metals) and diode (wood, leather, acrylic) to cover nearly all 3D engraving applications with one machine.
- Ultra-Fine Detail: Excellent spot size and stability produce crisp edges and realistic depth transitions, essential for professional 3D results.
- High-Speed Processing: Efficient engraving without sacrificing detail, ideal for small businesses and production workflows.
- Advanced Software Support: Optimized for grayscale and depth-map engraving, simplifying complex 3D projects.
Best Uses
- 3D metal engraving (stainless steel, aluminum, brass)
- Layered 3D reliefs on wood, leather, and acrylic
- Custom products: jewelry, plaques, awards, and branding
If you’re looking for a professional-grade laser engraver capable of true 3D engraving, the xTool F2 Ultra (60W MOPA + 40W Diode) is an excellent choice.
Its unmatched depth control, material flexibility, and precision make it one of the best all-in-one solutions for advanced 3D laser engraving.
2. xTool F2 Ultra UV 5W UV Laser Engraver

- Master of Glass Engraver: xTool F2 Ultra UV laser engraver machine delivers the simplest solution for 3D engraving inside glass and crystal with flawless results. This versatile UV laser engraver excels at surface engraving, embossing, cutting, and rotary engraving with premium results. Perfect for creating custom wine bottles, 3D crystal trophies, and personalized glass gifts for any occasion
The xTool F2 Ultra UV is one of the best UV laser engravers available for 3D crystal engraving, especially for users who need extreme precision and clean results.
Thanks to its short-wavelength UV laser, the F2 Ultra UV engraves crystal internally with minimal heat impact, preventing cracks, frosting, or surface damage.
Unlike CO₂ or diode lasers, the UV laser used in the xTool F2 Ultra UV excels at subsurface and micro-layer engraving, making it ideal for detailed 3D portraits, logos, and internal crystal artwork. Its fine beam spot allows for sharp depth control, enabling true 3D engraving effects inside crystal blocks and glass awards.
Why xTool F2 Ultra UV Is Ideal for 3D Crystal Engraving
- UV laser technology (355nm) for ultra-fine detail
- Minimal heat-affected zone, reducing risk of cracks
- Excellent for crystal, glass, ceramics, and optical materials
- High precision for layered 3D engraving
- Compact desktop design suitable for studios and small businesses
Best for:
- 3D crystal portraits
- Internal glass engraving
- High-detail logos and text
- Awards, trophies, and premium gifts
If your goal is professional-quality 3D crystal engraving with flawless clarity, the xTool F2 Ultra UV is an excellent choice that delivers industrial-level precision in a desktop-friendly machine.
Conclusion
3D laser engraving is a cutting-edge technology that opens up a world of possibilities for creating detailed, durable, and customized designs.
Whether for personal use, business signage, or industrial applications, its ability to precisely engrave materials with depth and texture makes it a valuable tool across multiple industries.
By understanding how it works and the benefits it offers, you can make the most of this powerful technology.
Frequently Asked Questions
What is 3D laser engraving?
3D laser engraving is a technique that creates depth inside or on the surface of a material by engraving multiple layers at different depths. Unlike standard 2D engraving, which only marks the surface, 3D engraving produces realistic, three-dimensional designs such as portraits, logos, and internal crystal images.
What materials can be used for 3D laser engraving?
Common materials include crystal, wood, acrylic, leather, plastics, and some metals. Subsurface 3D engraving is most commonly done in crystal using UV lasers, while surface-based 3D effects are popular on wood and acrylic.
What type of laser is best for 3D laser engraving?
The best laser depends on the material:
UV lasers are ideal for 3D crystal due to their ultra-fine precision and low heat.
Fiber lasers work well for 3D engraving on metals.
CO₂ lasers are suitable for 3D surface engraving on wood, leather, and acrylic.
Diode lasers can create shallow 3D effects on softer materials.
Is 3D laser engraving difficult to learn?
3D laser engraving requires more setup than 2D engraving, but it’s beginner-friendly with the right software and machine. Most difficulty comes from preparing depth maps, grayscale images, and choosing correct laser settings. Modern laser software makes the process much easier with built-in 3D and grayscale tools.
Can I do 3D laser engraving at home?
Yes, many desktop laser engravers support 3D engraving at home. However, proper ventilation, eye protection, and material safety are essential—especially when engraving acrylic or metals. UV, dual (fiber + diode) desktop lasers are popular choices for home studios and small businesses.