If you’ve ever wanted to create clean, professional-looking laser engravings on metal, glass, or ceramic, laser marking paper might be your new best friend.
This simple but powerful tool lets you engrave materials that diode lasers can’t normally mark — like glass, clear acrylic, or glazed ceramics — all without expensive coatings or complex prep work.
Table of Contents
In this guide, you’ll learn exactly how to use laser marking paper for engraving, which materials it works best on, and how to get crisp, high-contrast results every time.
What Is Laser Marking Paper?
Laser marking paper is a special type of heat-reactive transfer sheet that forms a durable, high-contrast mark when hit by a laser beam.
When applied to the surface of an object, the paper absorbs laser energy and fuses pigment into the material, leaving a permanent, detailed design.
It’s ideal for:
- Metal engraving (stainless steel, aluminum, brass)
- Glass and acrylic personalization
- Ceramic mugs, tiles, and tumblers
- Contrast enhancement for faint laser markings
In short, it allows diode lasers — which usually can’t engrave reflective or transparent materials — to mark them cleanly and safely.
Why Use Laser Marking Paper?

Using laser marking paper opens up a range of creative and practical advantages:
- Engraves materials that are otherwise hard to mark
- Improves contrast and visibility on metal surfaces
- Protects delicate materials like ceramics and glass
- Affordable and easy to apply
- Works with most fiber lasers, diode lasers, and CO2 Laser engraving machines
Whether you’re running a craft business or engraving as a hobby, marking paper helps you achieve professional-grade results without high-end industrial equipment.
When to Use Laser Marking Paper
Laser marking paper is incredibly versatile and helps you engrave materials that are otherwise tricky to work with. Here are the most common situations where it comes in handy:
Engraving Bare Metals
Normally, fiber lasers are preferred for metal engraving because diode lasers can reflect off metal surfaces. However, when you apply a layer of laser marking paper, it absorbs the laser energy, allowing you to engrave metals like stainless steel, aluminum, and brass with a diode laser — safely and effectively.
Engraving Transparent Materials
Transparent materials such as glass and acrylic are tough for diode lasers since the beam passes straight through them without interaction. By adding a laser marking sheet on top, the paper absorbs the laser energy and transfers the design, making it possible to personalize glassware, trophies, or acrylic decor — even with budget-friendly diode lasers.
Engraving Ceramics
While ceramics can be engraved directly, doing so can damage the glaze, leading to dull, rough marks and weaker waterproofing. Using laser marking paper acts as a protective barrier. The titanium dioxide in the sheet enhances the mark’s visibility while shielding the glaze, resulting in cleaner, higher-contrast engravings that maintain the ceramic’s glossy finish.
Enhancing Contrast on Metals
Even when direct engraving works, the results on metals like stainless steel often look faint or gray. Laser marking paper helps you achieve deeper color contrast, turning subtle marks into sharp, professional engravings with rich black tones and improved legibility.
Recommended Laser Marking Paper
Frddiud Laser Marking Paper
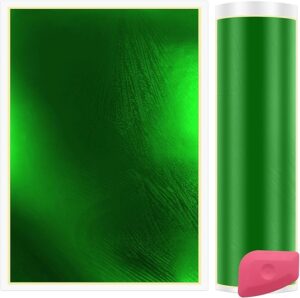
The Frddiud Laser Engraving Marking Color Paper is a solid choice for anyone looking to achieve sharp, high-contrast engravings on tricky materials like metal, glass, and ceramics. Each pack includes 2 large sheets (15.3″ x 10.4″) that can be cut to any size, making it easy to adapt to your projects.
Available in multiple colors — including Green, Black, Blue, Brown, Red, Cyan, Gold, Military Green, and White. This paper works well with fiber, diode, and CO₂ laser machines, delivering consistent, vivid results across surfaces. It’s durable, waterproof, and scratch-resistant, ensuring your engraved designs stay crisp and professional-looking.
Perfect for both DIY creators and small business owners, this marking paper helps personalize mugs, jewelry, signage, or custom decor without the mess of sprays or coatings.
Pros
- Works on a wide range of materials — metal, glass, ceramics, acrylic, and more
- Compatible with fiber, diode, and CO₂ lasers
- Large sheet size — easy to cut and reuse
- High contrast and durable engravings
- Available in multiple color options
Cons
- Only 2 sheets per pack — may not last long for large projects
- Slight learning curve for getting the right power/speed settings
Overall Verdict:
The Frddiud Laser Marking Paper is one of the best laser marking paper for beginners and professionals alike. It’s reliable, easy to use, and produces clean, long-lasting results on a variety of materials — making it a smart buy for creative laser engraving projects.
What You’ll Need
Before starting, gather these essentials:
Tool / Material | Purpose |
|---|---|
Transfers the design to your material | |
Diode laser machine | |
Blank material | Metal, glass, ceramic, or acrylic item |
Design software | LightBurn, xTool Creative Space, or similar |
Tweezers | For removing the color layer |
Cloth + Hairdryer | For drying the laser-marking paper |
Scraper | For removing the remaining paper once engraved (scraper is included with the Frddiud Laser Marking Paper on Amazon) |
Tip: Always start with a small test piece before engraving your main item. Each paper and material reacts differently
Step-by-Step: How to Use Laser Marking Paper
Step 1: Prepare Your Design
Create or import your design in your engraving software.
Simple shapes, logos, or text work best for beginners. Save it as a black-and-white PNG or SVG file — black areas will engrave, white will stay blank.
Resize your design to match your object’s engraving area. For mugs or curved items, keep your design within 2–3 inches tall to prevent distortion.
Step 2: Apply the Marking Paper
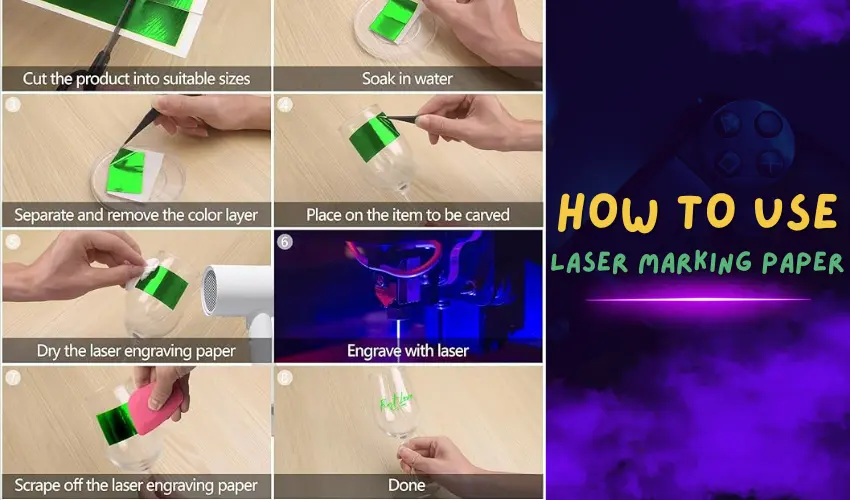
Cut the laser marking paper to fit the surface area you plan to engrave.
- Soak it for 10 – 15 seconds in water before positioning. During this time, remove the backing sheet with tweezers
Smooth it carefully over your material — no wrinkles or air bubbles. Carefully dry the laser marking paper with a clean microfiber cloth or a hairdryer.
Step 4: Set Up Your Laser Engraver
Load your item into the machine and align your design in the software.
Adjust your laser’s settings based on your material and power level.
Setting | Suggested Range |
|---|---|
Power | 40–60% (Diode laser, 10–40W) |
Speed | 250–500 mm/s |
Passes | 1–2 |
Focus | Slightly defocused for smooth shading |
Pro Tip: Always run a small test on a spare piece first
Step 5: Engrave and Reveal
Start the engraving process and watch your design appear in real time.
When engraving finishes, please make sure to soak the item in water for a few minutes, then gently scrape away the remaining paper with the supplied scraper.
You’ll be left with a crisp, permanent design that’s both heat-resistant and dishwasher safe.
Common Mistakes to Avoid
Avoid these beginner errors for flawless results:
- Too much laser power: Can scorch or overburn the paper.
- Improper alignment: Leads to uneven or stretched designs.
- Skipping test runs: Each type of material behaves slightly differently.
- Dust or oil on surface: Can cause patchy engraving. Clean your mug first!
Creative Ideas for Using Laser Marking Paper
Once you’ve learned how to use laser marking paper, it’s easy to see why so many makers love it — it’s versatile, affordable, and ideal for creative projects that look polished and professional.
Whether you’re a hobby crafter, small business owner, or laser engraving enthusiast, there are countless ways to use this clever material. Here are some creative ideas for using laser marking paper to get your imagination going.
Personalized Mugs and Tumblers
One of the most popular uses for laser marking paper is engraving mugs, cups, and tumblers.
You can easily add:
- Custom names or monograms
- Motivational quotes
- Business logos
- Seasonal or holiday designs
Because the paper helps the laser bond cleanly to ceramic and metal, your designs come out sharp, permanent, and dishwasher-safe — perfect for gifts or small shop products.
Custom Metal Tags and Keychains
Metal can be tricky to engrave with CO₂ or diode lasers, but laser marking paper solves that.
Use it to create branded metal tags, dog tags, jewelry pendants, or keychains.
Add initials, dates, or minimalist graphics to stainless steel or aluminum blanks. The result looks professionally etched, even on a small desktop laser.
Engraved Glassware
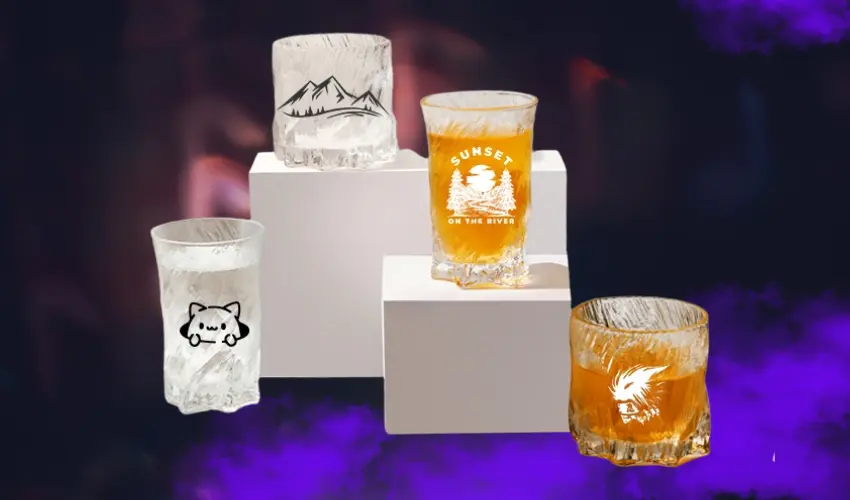
Want to personalize wine glasses, mason jars, or glass ornaments?
Laser marking paper lets you engrave glass using a diode or CO₂ laser without cracking or frosting the surface.
Apply the paper, engrave your design, and wash it off — you’ll get a smooth, frosted mark that looks elegant and custom-made.
Ceramic Tiles and Coasters
Ceramic materials can lose their glossy finish when engraved directly, but marking paper protects the glaze.
You can design engraved tiles, drink coasters, or kitchen decor with patterns, quotes, or artwork that stay bright and durable.
These make great personalized gifts or home items that stand out.
Branded Packaging and Product Labels
Laser marking paper works great for small businesses. Use it to:
- Add your logo or brand name to metal tins or glass jars
- Create custom labels for candle holders or bottles
- Engrave reusable packaging for sustainable product lines
It’s an easy way to make your branding look premium without investing in expensive printing.
Acrylic Awards and Signage
Laser marking sheets can also be used on clear acrylic surfaces to create awards, plaques, or business signage.
By applying the paper first, even a diode laser can mark acrylic with clean, crisp contrast — perfect for professional displays or event trophies.
Decorative Artwork and Home Decor
If you enjoy creative design, you can use marking paper to make:
- Wall art on tiles, metal panels, or wooden backings
- Custom ornaments for holidays
- Personalized photo frames with engraved names or dates
You can combine engraving with painting or resin work for a unique, layered effect that really pops.
Engraved Jewelry and Accessories
For small, detailed designs, laser marking paper allows precise engraving on:
- Bracelets
- Rings
- Watches
- Belt buckles
You can mark initials, short quotes, or intricate symbols — perfect for handmade jewelry or personalized accessories.
Engraving Tools and Equipment
If you run a workshop or create products professionally, you can use laser marking paper to:
- Label tools, parts, or fixtures
- Add serial numbers or identification codes
- Customize equipment with your logo
It’s functional and adds a touch of branding to your workspace.
Unique Gifts and Keepsakes
Laser marking paper makes it easy to turn everyday items into personalized gifts — from engraved water bottles and kitchen utensils to commemorative plaques and photo albums.
The best part? You can create these on a small laser machine right at home.
Bonus Tips for Creative Projects
- Experiment with different paper colors for varying contrast levels.
- Test your engraving power and speed before starting each new material.
- Combine engraving with cutting or painting for multi-layer designs.
- Keep your designs simple and bold — small text or thin lines may fade on curved surfaces.
Frequently Asked Questions
What is laser marking paper and how does it work?
Laser marking paper is a special coating sheet that allows you to engrave designs onto materials that are otherwise difficult to mark — such as metal, glass, or ceramic.
When placed on the surface, the paper reacts to the laser’s heat, bonding the pigment (often titanium dioxide-based) to the material underneath. After engraving, you simply wash off the paper to reveal a clean, high-contrast design.
What materials can I use laser marking paper on?
Laser marking paper works on a variety of materials, including:
Metals: stainless steel, aluminum, brass
Ceramics: mugs, tiles, coasters
Glass: wine glasses, bottles, ornaments
Acrylic and plastics: clear signage, trophies
It’s especially useful for diode lasers, which typically can’t engrave reflective or transparent surfaces without assistance.
Can I use laser marking paper with any laser engraver?
Yes — laser marking paper is compatible with most fiber lasers, diode lasers, and CO2 Laser engraving machines.
The key is to adjust your power and speed settings for the material you’re engraving. A good starting point is low power (10–20%) and high speed, then fine-tune from there based on your test results.
How do I apply and remove laser marking paper?
Cut and apply the paper to your clean material surface.
Smooth out air bubbles to ensure even contact.
Engrave using your laser with adjusted settings.
Soak the item in water for a few minutes after engraving.
Gently wipe off the remaining paper to reveal your finished design.
It’s a simple process that yields professional-quality engravings without expensive marking sprays or coatings.
What are the benefits of using laser marking paper?
Laser marking paper offers several advantages:
Works with more materials, including glass and metal
Protects surfaces like ceramic glaze during engraving
Creates sharper, higher-contrast marks
Easy cleanup — no messy sprays or chemicals
Affordable and beginner-friendly
It’s a must-have accessory for anyone who wants to expand their engraving possibilities with a standard home laser machine.
Final Thoughts
Using laser marking paper unlocks a world of creative possibilities for both beginners and professionals. It bridges the gap between simple engraving and full-scale manufacturing — helping you achieve clean, durable, and high-contrast results on almost any surface.
So whether you’re making gifts, products, or art, laser marking paper is your secret to turning everyday materials into something extraordinary.