Laser marking on glass creates elegant, permanent designs that look stunning for gifts, home décor, signage, or branded products. While CO₂ lasers are often the go-to option for engraving glass, many makers wonder: Can you mark glass with a fiber laser? The short answer is yes—but with some limitations and specific techniques you’ll need to know.
In this guide, we’ll explore how fiber lasers interact with glass, the pros and cons, and the best practices to achieve clean, high-quality markings.
Table of Contents
Fiber lasers are optimized for metals and certain plastics due to their 1064 nm wavelength, which glass generally does not absorb well. This makes fiber lasers less effective for traditional deep engraving on glass. However, they can still mark glass surfaces under specific conditions by creating micro-fractures or frosted textures on the top layer.
So while fiber lasers don’t cut deeply into glass like a CO₂ machine, they can produce high-contrast marks, logos, and patterns—especially when used with special coatings or surface treatments.
Option 1: Mark Glass With Fiber Laser Using Brilliance Laser Inks
Fiber lasers typically struggle to mark glass directly due to its reflectivity and transparency. However, when used in combination with Brilliance Laser Inks, you can achieve crisp, permanent grayscale marks on glass—using a fiber laser—without deep etching or damaging the material.
Here’s how to do it effectively:
What Are Brilliance Laser Inks?
Brilliance Laser Inks are specialized coatings specially formulated for fiber lasers to mark surfaces that don’t absorb the laser’s 1064 nm wavelength—like glass. They bond perfectly to the surface without burning, allowing permanent marks even on materials that would otherwise not take a fiber laser mark.
Once applied and laser-marked, they produce clean, durable graphics on glass and similar materials.
Brilliance Laser Inks Ceramic and Glass Black Marking Spray

Why It’s a Good Option
- Technically Simple: No need for deep engraving or glass erosion—just apply the ink and laser it.
- High Contrast: Creates clear marks not possible via direct fiber marking.
- Preserves Glass Integrity: Minimal heat damage or microchipping since the laser only interacts with the ink layer.
- Versatile Uses: Great for logos, serial numbers, artwork on glassware, awards, or decorative glass.
Step-by-Step: How to Use Brilliance Laser Inks To Mark Glass With Fiber Laser
Clean the Glass Surface
Wipe the glass with isopropyl alcohol to remove dust, grease, or fingerprints. A contaminant-free surface ensures even ink adhesion.
Apply the Brilliance Laser Ink
Hold the bottle at a 45° angle, about 6–8 inches from the surface. Spray in a steady left-to-right motion, applying a thin, even coat until the surface is fully covered but not transparent.
Let it dry, usually a few minutes to an hour depending on layer thickness.
Load the Design
Import your design into your fiber laser software (e.g., EZCAD, LightBurn). Position and size the artwork as needed.
Laser Mark the Inked Area
Set up your laser parameters (example below), then focus the beam accurately:
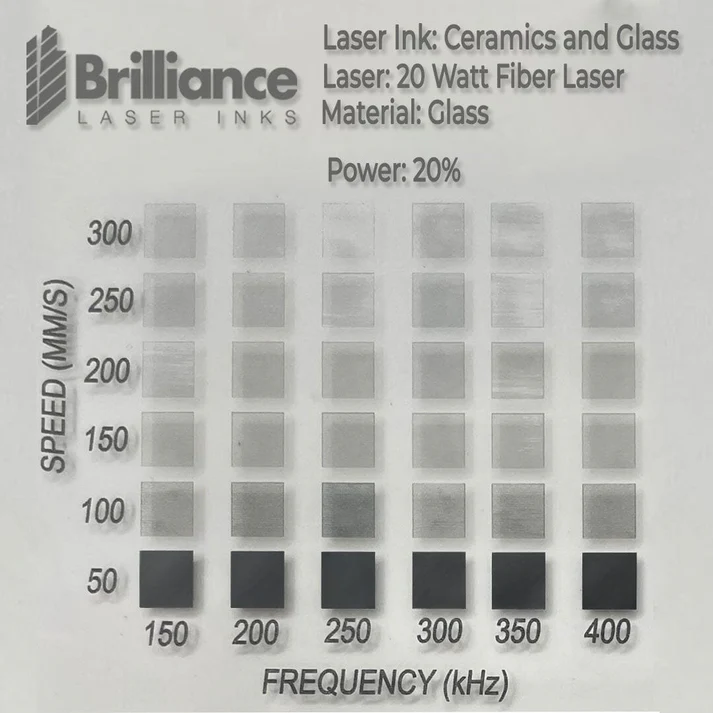
- Speed: Slow (e.g., 50 mm/s)
- Power: Low (20%)
- Frequency: High (300–400 kHz) for finer marking
These are the starting laser settings for a 20W fiber laser. Keep in mind that fiber lasers differ in Q-Frequency, maximum speed, power output, and even how speed is displayed (IPS, mm/s, mm/min, or percentage). If your laser’s maximum frequency is below 400 kHz, start by setting it to the highest available value, then fine-tune the power and speed to match.
Check the advanced frequency settings—on some machines, you may be able to override the limit and set it to around 200 kHz for better results. Also note that on many fiber lasers, “Q-Frequency” and “Frequency” refer to the same parameter, and for best accuracy, always make sure the frequency is shown in kilohertz (kHz).
Make a quick test on a scrap piece before marking the final piece.
Rinse or Wipe Away Excess Ink

After engraving, gently clean off any residual ink using a soft cloth or mild cleaning solution. The laser-marked portions will remain permanently adhered.
Dry and Inspect
Ensure the glass is clean and dry. Evaluate the sharpness and contrast—adjust settings if needed for future runs.
Pros & Cons Overview
Pros | Why It Matters |
|---|---|
High Contrast | Stands out more than typical engraving |
Non-Destructive | Preserves glass clarity without chipping |
Durable Finish | Ink absorbs into micro pits to stay long-term |
Cons | What to Be Aware Of |
|---|---|
Additional Consumable | Requires purchasing and handling the ink |
Surface-Sensitive | Scratches or oils can affect ink adhesion |
Set-Up Required | Must dry correctly and test settings for each batch |
If your goal is to mark glass with fiber laser technology, Brilliance Laser Inks offer a reliable solution—without compromising glass integrity. The result is perfect for small-batch production.
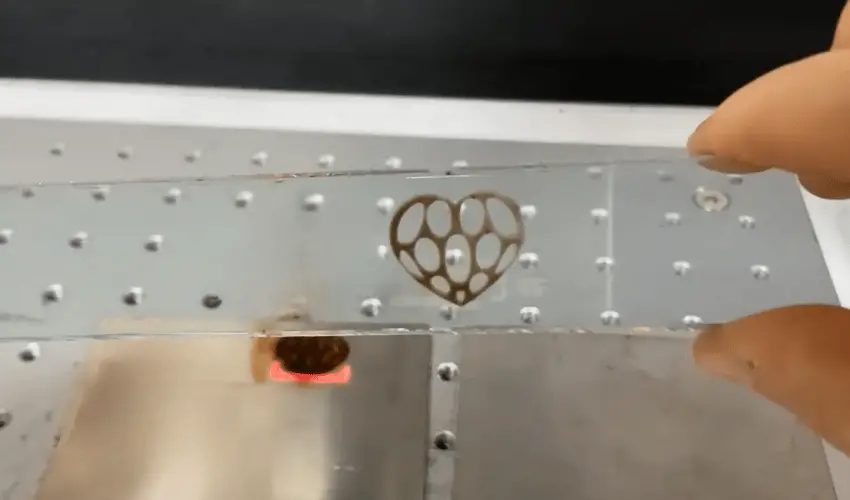
Option 2: Mark Glass With Fiber Laser Using Stainless Steel Backing Plate
- Step 1: Find the focus on the stainless steel plate
Most Fiber Laser Engravers have visible laser pointers which aid in rapid and easy focussing. The built-in red laser locator synchronizes with the laser’s scanner to enable precise work on the machine’s workbed.

Manually lower the Z Axis from the top until you see the strongest and loudest laser. This will indicate the correct focus. If you pass the correct focus point the laser and sound will become weaker so stop at the strongest and loudest point.
Step 2: Place a piece of clear glass over the stainless steel plate

Soda-lime Glass is the most prevalent type of glass, accounting for over 90% of all made Glass. Soda-lime glass is used for bottles, drinking glasses, and windows.
Because soda-lime glass has a low melting temperature, it is an excellent choice for laser marking and produces little chipping and flaking.
We would not advise trying to mark Lead Crystal Glass with a Fiber Laser Engraver. Glass made of lead crystal is more inconsistent during marking. Lead-filled glass tends to produce more heat when it is marked, increasing the risk of excessive chipping, flaking, and even shattering.
- Step 3: The Correct Settings
Sample starting settings: 20W Fiber Laser Marker – 110mm Field Lens.
20W Fiber Laser Settings
Speed | Power | Hatch |
50 mm/s | 100% | 0.05 |
- Step 4: Engrave and Clean
Proceed to mark your design. Once the marking is complete, clean up the metal residue left on the surface of the glass with a damp soft cloth.
Option 3: Mark Glass With Fiber Laser Using Aluminum Backing Plate
Follow the same process and settings as for Stainless Steel.
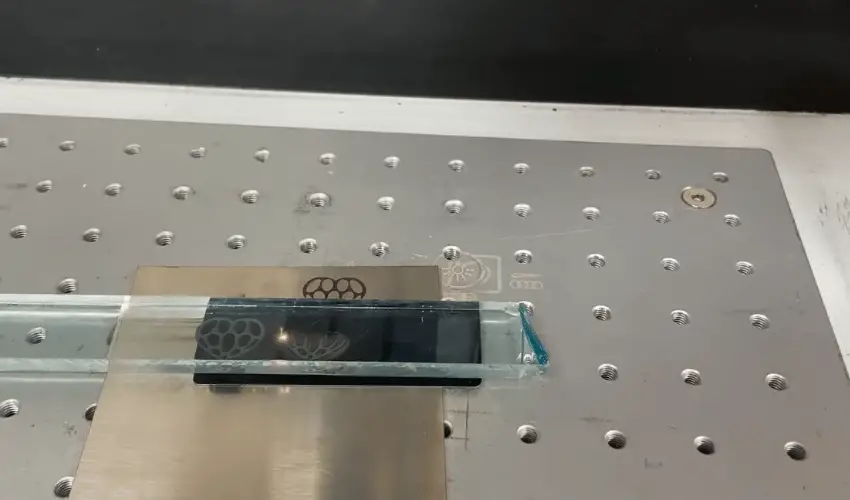
Mark Glass With Fiber Laser Using Backing Materials: The Results

You will get a darker, more pronounced mark using the stainless steel backing plate as compared to the aluminum backing plate. The color of the marking with the black anodized aluminum will be a lighter grey.
Limitations of Fiber Laser on Glass
- Limited penetration depth compared to CO₂ lasers
- Risk of cracking or chipping without proper settings
- Will require sprays, coatings, or backing materials for best results
Frequently Asked Questions
Can you mark glass with a fiber laser?
Yes, but fiber lasers don’t naturally mark glass directly like CO₂ lasers do. To achieve clear, high-contrast marks, you need a laser marking compound or ink (such as Brilliance Laser Inks) that bonds to the glass surface when heated by the fiber laser.
Do you need special coatings or sprays to laser mark glass with a fiber laser?
Yes. Applying a marking spray, ink, or paste is necessary because glass is transparent to the wavelength of a fiber laser (1064nm). The coating absorbs the laser energy, creating a durable mark on the glass.
Will fiber laser marking on glass cause cracking or breakage?
If used without a coating, fiber lasers can cause thermal stress, leading to cracks or micro-fractures in the glass. By using marking compounds and lower power with higher frequency settings, you minimize stress and avoid damaging the glass.
How durable are fiber laser markings on glass?
When applied with a marking compound, the marks are permanent, scratch-resistant, and dishwasher-safe. However, without a compound, fiber lasers generally don’t leave a lasting or high-quality mark on glass.
Final Thoughts
While fiber lasers are not the primary choice for glass marking, they can still achieve acceptable results with the right techniques, coatings, and settings. For deeper etching, a CO₂ laser may be more efficient—but if you already own a fiber laser, you can certainly mark glass for both functional and creative applications.
By experimenting with coatings, and using backing materials you can unlock a new range of design possibilities for your laser marking projects.