Mirror acrylic is a stunning material that combines the durability and flexibility of acrylic with the reflective beauty of a mirror.
Whether you’re making custom signage, decorative art, jewelry, or personalized gifts, laser cutting mirror acrylic allows you to create intricate shapes and designs with precision.
Table of Contents
However, this material has unique properties that require a slightly different approach compared to standard acrylic. In this guide, we’ll cover everything from what mirror acrylic is, the best tools for the job, machine settings, safety tips, and troubleshooting techniques.
What Is Mirror Acrylic?

Mirror acrylic is a sheet of acrylic plastic with a reflective mirror-like finish on one side. This is achieved by applying a thin reflective coating—usually metallic—on the back of the acrylic sheet. The result is a lightweight, shatter-resistant alternative to glass mirrors that is easy to cut, engrave, and shape.
Mirror acrylic is available in a variety of colors, such as silver, gold, rose gold, blue, and more, making it popular for:
- Event signage
- Awards and trophies
- Jewelry and charms
- Decorative wall art
- Point-of-sale displays
Why Laser Cutting Is Ideal for Mirror Acrylic
Laser cutting offers high precision and smooth, polished edges, eliminating the need for post-processing. Other cutting methods can cause chipping, cracking, or rough edges, while lasers deliver a flawless finish.
Advantages of laser cutting mirror acrylic:
- Intricate designs – Perfect for detailed shapes and lettering.
- Clean edges – No sanding or polishing required.
- Consistency – Ideal for batch production.
- Customization – Easily incorporate engraving for personalization.
Choosing the Right Laser Machine To Laser Cut Mirror Acrylic
The type of laser you use affects the quality and efficiency of your cuts.
Laser Type | Best For | Cut Quality on Mirror Acrylic |
|---|---|---|
CO₂ Laser | Cutting and engraving all acrylic types | Excellent – smooth, polished edges |
Diode Laser | Opaque and some colored cast acrylics | Not recommended for Mirror Arcylic |
Fiber Laser | Engineering plastics like ABS and Polycarbonate | Not recommended for Mirror Acrylic |
Mirrored acrylic is made with a clear acrylic base, which means diode lasers and fiber lasers cannot cut through any mirrored acrylic options.
Recommendation: A CO₂ laser (40W or higher) is the best choice for cutting mirror acrylic efficiently and cleanly.
We recommend the xTool P2S CO2 Laser for cutting mirror acrylic because its 55W CO2 laser power easily cuts through the clear acrylic base and mirror coating with clean, smooth edges, something diode and fiber lasers cannot achieve.
The Best Mirror Acrylic For Laser Cutting
Here are some top-rated mirror acrylic sheets available on Amazon, perfect for laser cutting projects:
1. Kinlink Acrylic Mirror Sheets 1/8″ Thick
- SUPERIOR MATERIAL -- High quality acrylic material coupled with superior thermoforming process make our acrylic sheets durable, light and non-toxic. This 3mm acrylic sheet has an ultra-clear surface without impurity or scratches. In addition, a protective paper on the surface of the acrylic board protects the surface from scratches, stains and fingerprints.The installation of plexi glass Installation is quick and easy, simply peel off the protective paper before use.
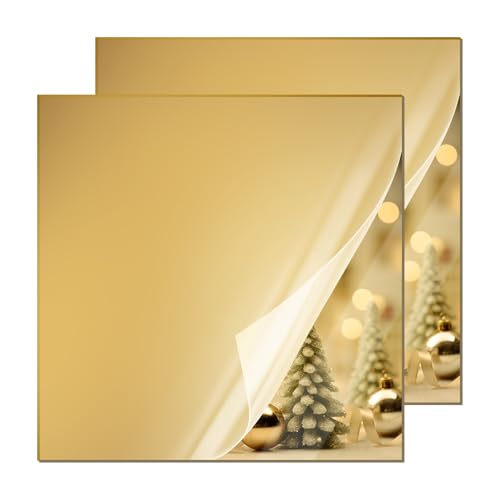
The Kinlink 12×12 Plexiglass Sheets Gold Mirror 2 Pack is an excellent choice if you need affordable acrylic for DIY or laser projects.
The gold mirror finish looks clean and reflective right out of the package, and the protective film does a good job of preventing scratches during shipping. At 3mm (1/8″) thick, the sheets feel sturdy but still easy to cut, whether you’re using a laser cutter or basic tools like a jigsaw or drill.
For crafting, they’re very versatile. They work well for signs, wedding decor, and small decorative pieces. The mirror effect adds a nice premium look without the fragility of glass.
There are a couple of trade-offs. Like most acrylic mirrors, it can scratch if you’re not careful, and the reflection isn’t quite as sharp as real glass. Still, for the price, it performs well.
Overall, it’s a reliable option for hobbyists and small projects, especially if you want something lightweight, easy to work with, and visually appealing.
2. Adrattnay Acrylic Mirror Sheets 1/8″ Thick

- ACRYLIC MIRROR SHEETS: Contains 8 colorful acrylic mirror sheets, red, gold, silver, rose gold, purple, sky blue, dark blue, green, 1 of each color, mirror sheet size is 8 x 8 x 1/8 in (20.2cm x 20.2cm x 3mm). Edge lengths may vary by 2mm
The Adrattnay Acrylic Mirror Sheets 8 Pack 8×8 inch is a great pick if you want variety and excellent performance for laser cutting projects.
You get eight different mirror colors in one pack, which is perfect for testing ideas or adding contrast to your designs. The sheets are 1/8 inch (3mm) thick, so they feel sturdy without being hard to cut. They work especially well with CO₂, producing clean edges without excessive melting or strong odors.
The reflective finish looks vibrant, and the protective film is a nice touch. You can leave it on during cutting to avoid scratches, then peel it off for a clean result.
A couple of small downsides: the mirror is single-sided, and like most acrylic mirrors, it can scratch if handled roughly. Also, minor size variations can happen, though it usually won’t affect most projects.
Overall, it’s a reliable and versatile option for crafters, especially if you want multiple colors in one set for signs, decor, or creative laser work.
3. Sakrnic Silver Mirror Acrylic Sheets 1/8″ Thick
- High-Quality Material: Our silver mirror acrylic sheets are made from premium materials and undergo strict quality control to ensure the highest standards in durability and reflective performance. Each Acrylic Mirror sheet is thoroughly inspected to ensure you receive a flawless product.
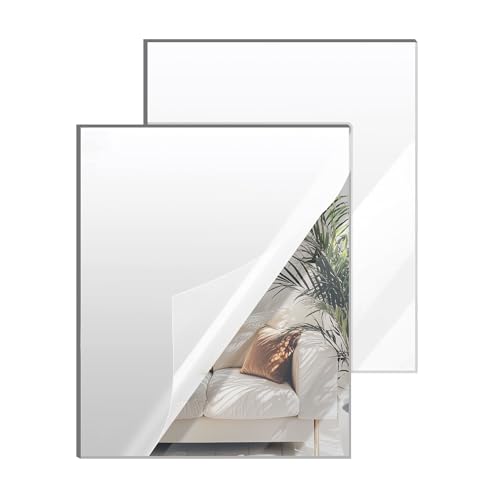
The Sakrnic Silver Mirror Acrylic Sheets, 12×16 Inch (304x406mm), 2 Pack, is another great choice if you want larger mirror panels for laser cutting and display projects.
The first thing you notice is the size. At 12×16 inches, these sheets give you more room to work compared to smaller packs, which is great for signs, wall decor, or batch cutting. The 1/8-inch (3mm) thickness strikes a good balance between durability and ease of cutting, especially with a CO₂.
The mirror finish is clean and reflective, good enough for decorative use like wedding signage or home accents. It’s not quite glass-level clarity, but that’s expected with acrylic and still looks sharp in most projects.
Packaging is another plus. The sheets arrive well-protected with film and padding, which helps avoid scratches during shipping.
On the downside, like most mirror acrylic, the surface can scratch if handled carelessly, and it’s single-sided. Still, for the price and size, it’s a dependable option for both beginners and regular makers working on larger designs.
Protective Masking Is Extremely Important
Most mirror acrylic ships with protective masking film on both sides. Leave this masking on during cutting whenever possible.
The masking helps:
- Prevent scratches
- Reduce smoke stains
- Protect the mirrored surface
- Minimize burn marks
Only remove the masking after the project is fully finished and cleaned.
Which Side Should You Cut From?
This is one of the most important parts of working with mirror acrylic.
For Cutting
It’s best to cut from the front acrylic side while leaving the mirrored backing protected underneath.
For Engraving
Mirror acrylic is usually engraved from the back side. This removes portions of the mirror coating and creates a clean frosted effect visible from the front.
Back engraving also protects the glossy front surface from damage.
How To Laser Cut Mirror Acrylic
Cutting mirror acrylic with a CO₂ laser gives you glossy, reflective pieces with crisp edges — perfect for signs, decor, cake toppers, and jewelry.
Mirror acrylic is made by applying a reflective coating to one side of clear acrylic, so you need to treat it a little differently than standard cast/acrylic. Follow this step-by-step guide for safe, clean cuts and predictable results.
- Cut the front acrylic side while leaving the mirrored backing protected underneath.
- Leave protective film on during cutting/engraving to reduce scratching and soot. Peel it off only after finishing.
- Use plenty of air assist + good exhaust/ventilation. This clears melt and prevents fires and edge clouding.
- Do a test cut first. Materials and machines vary — always run a small test grid and measure kerf.
Step-by-step

1) Safety & workspace prep
- Ensure your CO₂ laser is properly vented (exhaust to outside or a high-quality purifier).
- Have a working fire extinguisher nearby and never leave the machine unattended while cutting.
- Wear appropriate PPE (if your machine is open-bed or you’ll be monitoring closely). Enclosed systems usually protect your eyes from CO₂ wavelength.
- Keep a clean workspace free of flammable clutter.
Quick overview — the most important rules
2) Pick your material and inspect it
- Confirm it’s truly mirror acrylic (single-side mirrored surface applied to acrylic substrate).
- Common available thicknesses: 3 mm (1/8″) and 6 mm (1/4″).
- Check for flatness — warped sheets produce poor cuts. Make sure protective film is intact.
3) Orientation & fixturing
- Place the front acrylic side up while leaving the mirrored backing protected underneath.
- Keep the protective film on both sides while cutting. If the back has film, that helps too.
- Use low-profile clamps or hold corners with masking tape so the sheet sits flat but the laser path is clear.
4) Focus & lens choice
- Use your normal cutting lens for acrylic (most CO₂ cutters use a 1.5″ or 2.5″ focal length lens — shorter focal length = smaller spot / finer detail).
- Focus at the top surface of the acrylic (or very slightly into the surface) for the cleanest edge on mirror acrylic. If your machine has a recommended focus method, follow it.
- Double-check focus over the cutting area (use frame function to confirm placement).
5) Software setup & vector prep
- For cutting, set the cut lines as a single stroke (hairline) and use a consistent stroke color (e.g., red = cut).
- Arrange parts to minimize travel and reduce warping; put small islands together or secure them with tabs.
- If you’ll be engraving the mirror coating (removing mirror layer), use raster settings and test on scrap first.
6) Air assist & exhaust
- Air assist ON and strong — this blows away molten plastic and prevents edge melting and flameups.
- Ensure exhaust is drawing away fumes; mirror acrylic coating can produce smell and deposits, so strong extraction is important.
7) Start with test cuts (do this every time)
- Cut a small square or sample job to verify cut quality and to measure kerf (material removed by the laser).
- Use that test to adjust speed/power and to decide if you need multiple passes.
8) Cut settings — how to pick them
- General rule: higher power + faster speed = cleaner edges; if edges melt, increase speed or air assist. If cut doesn’t go through, reduce speed or increase power or add a pass.
- See the Example Starting Settings table below (use as starting points only, test & adjust).
9) Cutting: monitor and adjust
- Watch the first few seconds of the cut for flare or excessive melting. Pause and adjust focus, speed, or air assist if needed.
- For intricate parts, consider adding small tabs (0.5–1.5 mm, 0.02–0.06 inches wide) to keep pieces in place until you remove them manually.
10) Post-cut finishing
- Allow parts to cool slightly before removing protective film.
- Peel film carefully — mirror side should be pristine underneath.
- Clean edges: CO₂ laser cuts often leave polished edges; if you want extra polish, use flame polishing (risky with mirror finish) or fine sanding on the edge only (avoid touching the mirror face). Mild soap and water will remove any soot or residue.
Kerf measurement & compensation
- Cut a small 10×10 mm (0.39 x 0.39″) square at intended settings.
- Measure the actual piece width with calipers — the difference from 10 mm is your kerf.
- Adjust your vector spacing by adding/subtracting half the kerf to each side when making assemblies or tight fits.
Extra tips & best practices
- Keep a cut log: record material brand, thickness, wattage, lens, power %, speed, air assist, passes, and outcome — this saves hours of testing later.
- Use tabs for small parts and remove them manually with a hobby knife or deburr tool.
- Store mirror acrylic flat and away from sunlight and heat to prevent warping.
- If making signs, consider cutting the backsides and mounting the mirror pieces to a backing for rigidity.
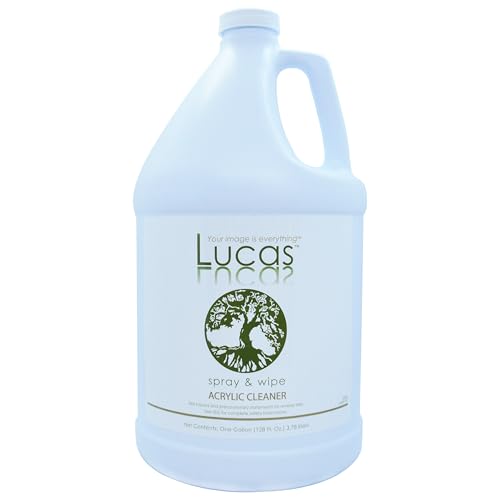
How to Clean Mirror Acrylic After Cutting
Mirror acrylic scratches easily, so avoid aggressive cleaning methods.
Use:
- Microfiber cloths
- Mild soap and water
- Acrylic-safe cleaners
We recommend the following products:

Avoid:
- Paper towels
- Acetone
- Alcohol-based cleaners
- Abrasive pads
Recommended Settings for Laser Cut Mirror Acrylic
(Starting Points – Always Run a Test Cut First)
For CO₂ Laser Engravers
Acrylic Thickness | Laser Wattage | Power | Speed | Passes | Air Assist | Notes |
|---|---|---|---|---|---|---|
1/16″ (1.5 mm) | 40W–60W | 25–35% | 20–25 mm/s 0.79–0.98 in/s | 1 | ON | Great for small decorations and thin inlays. |
1/8″ (3 mm) | 40W–60W | 40–50% | 15–20 mm/s 0.59–0.79 in/s | 1 | ON | Most common thickness for signs and ornaments. |
1/4″ (6 mm) | 60W–100W | 60–70% | 8–12 mm/s 0.31–0.47 in/s | 1–2 | ON | Use slower speed for clean edges. |
3/8″ (9 mm) | 80W–100W | 70–85% | 5–8 mm/s 0.20-0.31 in/s | 2 | ON | Multiple passes may be needed; keep sheet cool between passes. |
Engraving Settings (Back Side of Mirror Acrylic)
Laser Wattage | Power | Speed | Resolution (DPI) | Notes |
|---|---|---|---|---|
40W–60W | 15–25% | 250–300 mm/s 9.84-11/81 in/s | 300–500 DPI | Creates a frosted effect when viewed from front. |
80W–100W | 10–20% | 300–400 mm/s 11.81–15.75 in/s | 300–500 DPI | Lower power prevents burning through mirror coating. |
Laser Cut Mirror Acrylic Safety Precautions
- Ventilation is essential – Cutting acrylic releases fumes that should be extracted with a proper exhaust system.
- Avoid flame-ups – Keep air assist on to minimize flare-ups.
- Secure the sheet – Prevent shifting by using hold-down pins or weights.
- Wear safety glasses – Protect your eyes from stray reflections and debris.
Preventing Common Problems
Problem | Cause | Solution |
|---|---|---|
Melting edges | Too much power or slow speed | Increase speed or lower power |
Chipped mirror coating | Removing the protective masking film | Leave the protective masking film on |
Burn marks | Dirty optics or incorrect focus | Clean lens/mirrors and refocus |
Inconsistent cuts | Uneven material or bed leveling issues | Check bed level before cutting |
Engraving Mirror Acrylic
While most mirror acrylic projects focus on cutting, you can also engrave designs into the back side of the sheet. This creates a frosted look when viewed from the front.
How to Get Cleaner Engraving Results
For cleaner mirror acrylic engraving:
- Defocus slightly if needed
- Engrave from the back
- Keep masking on
- Use vector fills carefully
Fine-tuning engraving settings often makes a massive difference in final appearance.
Pro Tip: Use low power and higher speed when engraving to avoid damaging the mirror coating
Project Ideas with Laser Cut Mirror Acrylic
- Wedding table numbers and place cards
- Personalized keychains and ornaments
- Branded retail displays
- Custom mirrors with engraved logos
- Decorative wall panels
Final Thoughts
Laser cutting mirror acrylic opens up a world of creative possibilities for makers, crafters, and small business owners. By cutting from the front acrylic side, using proper settings, and ensuring adequate ventilation, you can achieve professional-quality results every time.
With the right laser machine—preferably a CO₂ laser—and a bit of practice, you’ll be producing beautiful, polished mirror acrylic projects that truly shine.
Frequently Asked Questions
Can you cut mirror acrylic with a laser?
Yes. CO₂ lasers can cut mirror acrylic effectively. The key is to cut from the front to achieve a clean edge. Mirrored acrylic is made with a clear acrylic base, which means diode and fiber lasers cannot cut through any mirrored acrylic options.
Do you need to reverse the design when laser cutting mirror acrylic?
Yes, if you are engraving or cutting from the back, you should mirror (flip) your design in your software. This ensures that when viewed from the front, text and graphics appear the correct way.
How do I prevent burn marks when cutting mirror acrylic?
Apply painter’s tape or transfer tape to the cutting surface to protect against burn residue and scorching. Use air assist to blow away debris and heat, and avoid excessive dwell time on the same spot.
Is laser cutting mirror acrylic safe?
Yes, if proper precautions are taken. Always work in a well-ventilated area or use an exhaust system to remove fumes, as cutting acrylic releases unpleasant gases. Wear appropriate eye protection for your laser type, and never leave the machine unattended during operation.