There are two types of images that your laser engraver will work with – raster images or vector images and the question is raster or vector better. The two are just different types of computer graphics. So, what is the difference between the two? And which one is better?
Is raster or vector better for laser engraving?
Vector images are typically more versatile and flexible than raster images. Working with vector images is a lot easier, e.g., you can resize them to any size you wish without pixelating them – there is no upper or lower limit. Vector images are, therefore, a more popular option.
Table of Contents
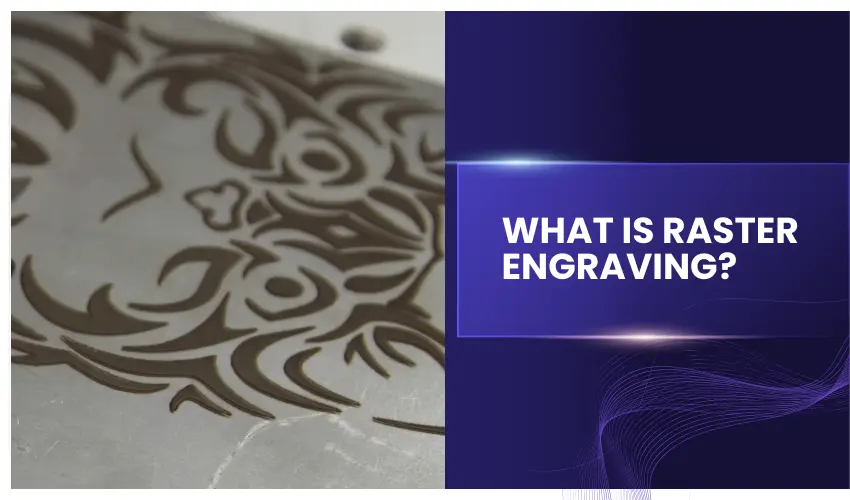
What Is Raster Engraving?
Raster engraving works much like an inkjet printer. The laser head moves back and forth across the material line by line, engraving dots to form an image.
Best Uses for Raster Engraving
- Photos and portraits
- Shaded artwork
- Detailed textures and gradients
- Large filled areas
- Complex illustrations
Pros of Raster Engraving
- Excellent for photo-realistic images
- Allows grayscale shading and depth variation
- Ideal for detailed artwork and logos with fills
Cons of Raster Engraving
- Slower than vector engraving
- Can cause more heat buildup and charring
- Not ideal for cutting or fine outlines
Using raster images for laser engraving
Raster images, also known as bitmap images, are made up of pixels and are widely used for laser engraving projects that require detailed artwork, photos, or complex designs.
Unlike vector images, which consist of paths, raster images work by engraving tiny dots, creating intricate patterns. Here’s a step-by-step guide on how to effectively use raster images for laser engraving.
Choose the Right Raster Image Format
Raster images come in a variety of formats, and each serves different purposes. The most common raster file formats for laser engraving include:
- JPEG (JPG): Best for photographs and complex images with gradients.
- PNG: Good for images with transparent backgrounds and high-quality details.
- BMP: Offers high-quality and uncompressed files, making it ideal for laser engraving.
- TIFF: Provides high resolution but creates larger file sizes.
When choosing a format, it’s essential to balance file size and image quality. BMP is often the preferred format for laser engraving due to its uncompressed nature.
Optimize the Image Resolution
Laser engraving works by interpreting pixels, so higher resolution images (300 DPI or higher) usually produce better results. A low-resolution image can result in a pixelated or blurry engraving. Ensure the image has enough detail to avoid distortion during the engraving process.
- Tip: If you’re working with a photo, use an editing program like Photoshop or GIMP to increase the resolution and sharpen the image for better engraving quality.
Convert to Grayscale
For laser engraving, it’s important to convert your raster image to grayscale. Laser engravers read images in shades of black and white to determine how deep or light the engraving should be. A darker area in your image will be engraved deeper, while lighter areas will be engraved more shallowly.
- Steps to Convert to Grayscale:
- Open the image in an editing program (e.g., Photoshop).
- Convert the image to grayscale by using the “Mode” option.
- Adjust the contrast and brightness to improve clarity and definition.
Prepare the Image in a Design Software
Once your raster image is ready, you’ll need to import it into laser engraving software, such as LightBurn, RDWorks, or CorelDRAW, that supports raster files.
- Adjust Settings: In the software, adjust the engraving speed and power settings based on the material you’re using. Lower speeds and higher power settings usually result in deeper engravings, while higher speeds and lower power are better for more delicate work.
Test on a Sample Material
Before engraving the final piece, test your raster image on a scrap piece of the same material. This allows you to fine-tune your settings and ensure the image comes out as intended.
- Adjust Accordingly: If the image appears too light, increase the power or slow down the speed. If it’s too dark or burns the material, reduce the power or increase the speed.
Start the Engraving Process
Once everything is set up, you can start the engraving process. The laser will move in horizontal passes, burning each pixel to create the image. For detailed and complex designs, raster engraving takes longer than vector engraving, but the results can be stunning, especially for photos or intricate art.
Post-Engraving Clean-Up
After the engraving is complete, clean the surface of your material to remove any residue or burn marks. A soft cloth or gentle brush should do the trick.
Tips for Better Raster Engraving Results
- Choose High-Contrast Images: Images with a strong difference between light and dark areas will produce more defined engravings.
- Use Transfer Tape for Wood: To reduce burn marks on wood, apply masking tape to the engraving area, then peel it off after the engraving is done. We recommend TapeManBlue Wide Painters Tape, which yields excellent results.
- Pay Attention to Material Choice: Different materials react differently to laser engraving. Always ensure that the material you’re using is compatible with raster engraving.
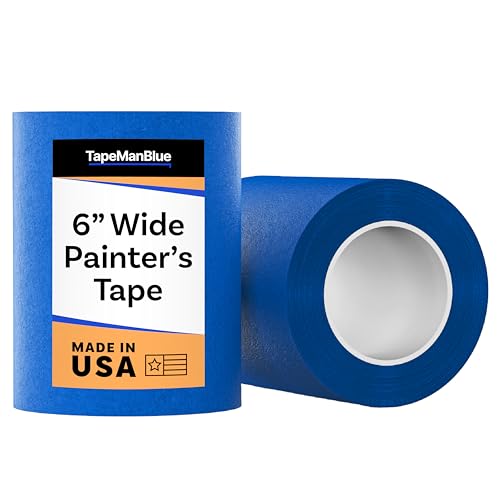
- SUPERIOR ADHESION & CLEAN REMOVAL: Our wide blue painters tape, perfect as 3D printer tape or laser masking tape, removes cleanly without residue, streaks, or stains for up to 21 days. Unlike other painting tape or masking tape that peels prematurely, TapeManBlue's extra wide painters tape stays put on your surfaces. Whether you're using it as 3D printing tape, for laser engraving, or general painting projects, our thick painters tape delivers reliable performance every time.
Raster images offer a high level of detail and depth for laser engraving, making them ideal for photos, intricate patterns, and art.
By choosing the right file format, optimizing image resolution, converting to grayscale, and testing on materials, you can achieve stunning results. Mastering the use of raster images will open up creative possibilities and enhance your laser engraving projects.
What Is Vector Engraving?

Vector engraving follows precise paths created by vector lines. The laser traces these paths continuously instead of scanning line by line.
Best Uses for Vector Engraving
- Text and lettering
- Line art and outlines
- Logos with clean edges
- Technical drawings
- Cutting materials
Pros of Vector Engraving
- Faster engraving speeds
- Extremely clean, sharp lines
- Ideal for cutting and scoring
- Less heat exposure to the material
Cons of Vector Engraving
- Not suitable for photo engraving
- No shading or grayscale capability
- Limited to line-based designs
Using vector images in laser engraving
Vector images are widely used in laser engraving due to their scalability and precision. Unlike raster images, which are made up of pixels, vector images consist of mathematical paths, making them ideal for sharp and detailed engravings.
Whether you’re engraving logos, text, or simple designs, vectors allow for high accuracy without loss of quality. Here’s a step-by-step guide on how to effectively use vector images for laser engraving.
Understanding Vector Images
Vector images are created using paths, which are defined by points, lines, curves, and shapes. This makes them scalable to any size without losing quality or resolution. Common file formats for vector images include:
- SVG (Scalable Vector Graphics)
- AI (Adobe Illustrator)
- EPS (Encapsulated PostScript)
- PDF (Portable Document Format)
- DXF (Drawing Exchange Format) – specifically for CAD drawings
These formats are perfect for laser engraving because they allow the laser to follow exact paths when cutting or engraving designs.
Choosing a Design Software
To create and edit vector files, you need vector-based design software. Some popular programs for laser engraving include:
- Adobe Illustrator: Ideal for professional vector designs.
- CorelDRAW: Commonly used for laser engraving, offering an array of design tools.
- Inkscape: A free, open-source alternative that supports vector formats like SVG.
- LightBurn: Designed specifically for laser engraving, allowing direct vector design import.
These programs let you create paths that the laser engraver can follow with precision, ensuring clean lines and sharp engravings.
![CorelDRAW Graphics Suite 2025 | Graphic Design Software for Professionals | Vector Illustration, Layout, and Image Editing [PC/Mac Download] (Old Version)](https://m.media-amazon.com/images/I/51Ijqj3HrpL.jpg)
- New: Advanced Print to PDF, Enhanced Painterly brush tool, quality and security improvements, additional Google Fonts
Create or Import a Vector Design
Start by either creating your vector design or importing an existing file. Here’s how:
- Create: If you’re designing from scratch, use the pen, shape, or line tools to create your design. Focus on simple shapes and clean lines, which translate well in laser engraving.
- Import: You can import vector files such as SVG, AI, or DXF into your design software. If you’re using a pre-made design, ensure that it is fully vectorized and doesn’t contain any raster elements. We recommend Vecteezy for thousands of pre-made free or paid vector designs.

Optimize the Vector Design for Laser Engraving
To get the best results, your vector design must be prepared specifically for laser engraving. Some key steps include:
- Set Stroke Width: Since vector images are based on paths, the stroke width of lines determines how the laser cuts or engraves. Thinner strokes will engrave finer details, while thicker strokes can be used for deeper cuts.
- Combine Paths: Ensure that your design consists of unified paths. Separate paths might cause the laser to overlap or cut undesired areas.
- Simplify the Design: Overly complex designs with too many paths or details may not engrave as expected. Clean and simple designs work best.
Determine Engraving vs. Cutting
Laser engravers typically offer two main functions: engraving and cutting. When working with vector files, you need to decide which parts of the design should be engraved and which should be cut:
- Engraving: For engraving, the laser will follow the vector paths, creating detailed lines or fills. This is typically done at a lower power setting and higher speed.
- Cutting: If you want the laser to cut through the material, you’ll use a higher power setting and slower speed. The laser will follow the outline of the vector paths and cut through the material.
In your design software, set up different layers to indicate which paths are for cutting and which are for engraving.
Adjust the Laser Engraver Settings
Once your vector file is prepared, it’s time to upload it to the laser engraving machine. Most laser engravers allow you to import vector files directly into the machine’s software, such as LightBurn or RDWorks. Before starting, adjust the following settings:
- Power: Set the power level based on the material you are engraving. Higher power is typically used for cutting, while lower power is used for engraving.
- Speed: The speed of the laser affects how long it spends on each area. Slower speeds result in deeper cuts, while faster speeds create lighter engravings.
- Line Interval: For engraving detailed vector designs, you may need to adjust the line interval or resolution settings. This affects how closely the laser beams are spaced when engraving, impacting the quality of the final result.
Test Your Design on Scrap Material
It’s important to test your vector design on a scrap piece of material before proceeding with the final project. This allows you to:
- Confirm the accuracy of your paths.
- Ensure the power and speed settings are correct.
- Avoid any mistakes that could waste material.
Start Engraving
Once the settings are fine-tuned, you can proceed with engraving. The laser will follow the paths of your vector design, either cutting or engraving based on your specifications.
Unlike raster engraving, vector engraving can be faster because the laser only traces along the defined lines, rather than filling in an entire area with tiny dots.
Post-Engraving Clean-Up
After the engraving process, clean up the material by wiping off any residue or debris. If you’re cutting through the material, ensure the edges are smooth and free of burn marks.
Tips for Better Vector Engraving
- Use Closed Paths: Ensure your vector design consists of closed paths, especially for shapes. Open paths may cause the laser to miss certain areas.
- Focus on Simplicity: Complex and intricate designs can overwhelm the laser, especially on materials like wood or acrylic. Simpler designs with clean lines produce the best results.
- Layering for Depth: If you want to create depth in your engraving, you can layer your vector designs and adjust the power settings for each layer to achieve different engraving depths.
Using vector images for laser engraving ensures precision, scalability, and efficiency. By choosing the right design software, optimizing the vector paths, adjusting the engraver settings, and testing on materials, you can create detailed and professional-looking engravings.
Whether you’re cutting shapes or engraving intricate designs, mastering vector images opens up endless possibilities in laser engraving.
Raster vs Vector Engraving: Key Differences
Feature | Raster Engraving | Vector Engraving |
|---|---|---|
Laser Movement | Back-and-forth scanning | Follows paths |
Best For | Photos, shading, filled areas | Text, outlines, cutting |
Speed | Slower | Faster |
Detail Type | Grayscale & depth | Crisp lines |
Cutting Capability | No | Yes |
Is Raster or vector better – which one should you use?
Use Raster Engraving When:
- Engraving photos or portraits
- Creating shaded artwork
- Working with complex images
- Filling large engraved areas
Use Vector Engraving When:
- Engraving text or logos
- Creating clean outlines
- Cutting or scoring materials
- Prioritizing speed and precision
Pro Tip: Many professional laser projects use both raster and vector engraving in the same design. For example, raster engraving for filled artwork and vector engraving for crisp outlines or cut lines.
Raster vs Vector for Different Materials
- Wood: Raster for images, vector for text and cutting
- Acrylic: Vector for cutting, raster for frosting effects
- Leather: Raster for artwork, vector for text
- Glass: Raster engraving works best
- Metal (coated/anodized): Raster for fills, vector for marking lines
Common Mistakes to Avoid
- Using raster engraving for text that should be vector (leads to blurry edges)
- Vector engraving photos (results in poor detail)
- Overpowering raster engraves causing burn marks
- Forgetting to test speed and power settings
Final Thoughts
Choosing between raster and vector engraving depends on your design and project requirements. Raster engraving is ideal for detailed designs, photographs, and projects that need filled areas or shading.
Vector engraving works best for simpler, cleaner designs such as outlines, logos, and text. Often, the best results come from a combination of both techniques, allowing you to achieve the perfect balance of detail, speed, and precision in your laser engraving projects.
Frequently Asked Questions
What is the main difference between raster and vector engraving?
Raster engraving works like an inkjet printer, engraving an image line by line using dots. It’s best for photos, shaded images, and filled graphics.
Vector engraving follows precise paths and lines, making it ideal for text, outlines, line art, and cutting. Vector engraving is faster and produces cleaner edges.
Which is better for engraving photos: raster or vector?
Raster engraving is always better for photos.
Photos rely on shading and gradients, which raster engraving can reproduce using DPI and power variations. Vector engraving cannot display smooth shading and will result in harsh outlines instead of detailed images.
Is vector engraving faster than raster engraving?
Yes. Vector engraving is significantly faster because the laser only follows the design paths instead of scanning the entire area. This makes vector ideal for text, serial numbers, outlines, and production work.
Can I use raster and vector engraving in the same project?
Absolutely—and this is actually best practice.
A common workflow is:
Raster engrave photos or filled areas first
Vector engrave text or outlines second
Vector cut last
This approach produces cleaner results and avoids burn marks on finished areas.
Does raster or vector engraving produce deeper engravings?
Vector engraving usually engraves deeper because the laser concentrates energy along a single line. Raster engraving spreads energy over a wider area, making it better for surface detail rather than depth.
If depth is important—such as for bold text or scoring lines—vector engraving is the better choice.