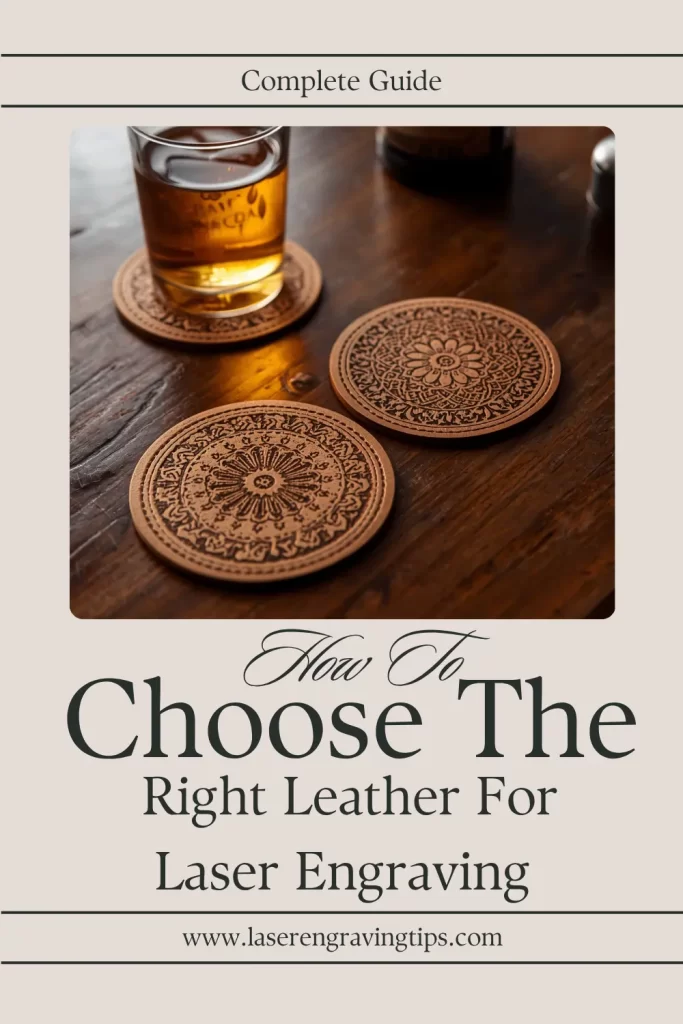
Laser engraving on leather opens up a world of creative possibilities, allowing for intricate designs, personalized details, and unique textures.
However, the success of any leather project greatly depends on selecting the right type of leather for laser engraving.
Table of Contents
In this comprehensive guide, we’ll explore the various factors to consider when choosing the right leather for laser engraving.
Why Choosing the Right Leather For Laser Engraving Matters
Laser engraving involves intense heat, and leather reacts differently depending on how it’s treated. The wrong leather can:
- Release toxic fumes
- Burn unevenly or leave messy marks
- Damage your machine’s optics
The right leather, on the other hand, will engrave cleanly with sharp contrast and minimal odor.
Factors to Consider When Choosing Leather For Laser Engraving
1. Type of Leather:
Vegetable-Tanned Leather
- Why it’s great: Natural, chemical-free, and engraves beautifully with deep, dark contrast.
- Best for: Wallets, belts, notebooks, patches, and premium handmade goods.
- Tip: Works well for both engraving and cutting.
Full-Grain Leather
- Why it’s great: High-quality, durable, and produces a natural, rustic look when engraved.
- Best for: Luxury items, personalized gifts, and long-lasting accessories.
- Tip: Use lower power settings to preserve the surface finish.
Top-Grain Leather
- Why it’s great: Smooth, consistent surface that engraves with sharp detail.
- Best for: Clean logos, monograms, and fine text.
- Tip: Apply masking tape before engraving to reduce smoke stains.
Suede & Nubuck
- Why it’s great: Softer texture creates a unique, subtle engraving effect.
- Best for: Decorative projects and artistic designs.
- Tip: Use light engraving settings to avoid burning the fibers.
Leathers to Avoid for Laser Engraving
Chrome-Tanned Leather
- Contains chromium salts that release toxic fumes when lasered.
- Dangerous for your health and your laser machine.
Synthetic Leather
- Made with plastics like PVC, which emit chlorine gas when cut or engraved.
- Can damage the machine and pose serious health risks.
Rule of thumb: If you’re not sure whether a leather is vegetable-tanned or chrome-tanned, don’t engrave it until confirmed by the supplier
2. Thickness:
Leather comes in various thicknesses, measured in ounces (oz). Consider:
- Thin Leather (2-4 oz): Suitable for detailed engravings, often used in projects like wallets.
- Medium to Thick Leather (5-8 oz): Ideal for items like belts, allowing for deeper and more substantial engravings.
3. Texture:
The texture of the leather affects the engraving’s final appearance:
- Smooth Leather: Offers a consistent surface for detailed engravings, perfect for intricate designs and text.
- Textured or Distressed Leather: Adds character but may result in a more rustic appearance after engraving.
4. Surface Finish:
Consider the finish applied to the leather:
- Aniline-Finished Leather: Known for a natural look and feel, it may engrave well, but the finish can impact engraving contrast.
- Pigmented Leather: Requires higher laser power due to its protective topcoat.
5. Color and Dye:
The color of the leather influences engraving visibility:
- Natural or Light-Colored Leather: Shows details prominently, providing a high-contrast look.
- Dark-Colored Leather: Engravings may be subtle, requiring careful design considerations and laser settings.
6. Quality of Leather:
Choose high-quality, full-grain leather for better engraving results. Full-grain leather tends to engrave more consistently and beautifully than lower-quality or corrected-grain leather.
7. Testing and Experimentation:
Before starting a significant project, conduct test engravings on small leather scraps. This allows you to fine-tune laser settings and ensure optimal results on your chosen leather type.
8. Masking:
Laser engraving on leather is a delicate process that requires precision and attention to detail. One crucial step to ensure clean and professional results is masking the leather before engraving.
Masking protects the surface from smoke, residue, and potential damage during the engraving process.
Tips for Successful Masking:
- Use Low-Residue Tape: Choose masking tape with minimal adhesive residue to simplify the post-engraving cleanup process.
- Avoid High-Adhesive Tapes: Steer clear of tapes with excessive adhesion, as they may damage the leather surface upon removal.
- Test on Scrap Pieces: Before masking your main project, conduct tests on small leather scraps to ensure compatibility with your chosen tape.
By following these steps and selecting the right masking tape, you can achieve clean and precise laser engravings on leather, enhancing the overall quality of your projects.
We recommend using this low-residue GTSE Wide Masking Tape, which yields great results on leather.
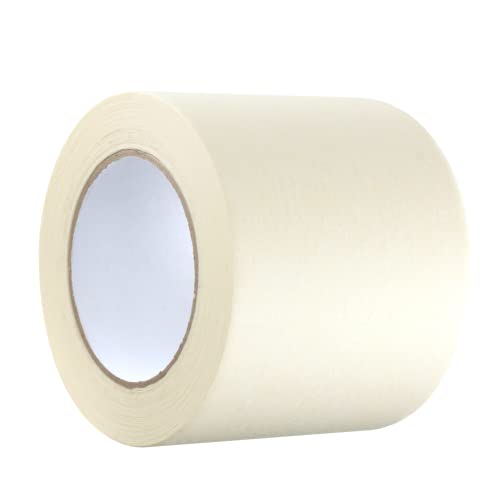
- PACKAGE CONTAINS: 1 roll of general purpose masking tape by GTSE
9. Cleanliness:
Ensure the leather surface is clean and free from oils or residues before engraving to achieve a crisp and detailed result.
10. Adjustable Laser Settings:
Laser engraving on leather is a versatile and intricate process that demands precise control over various settings to achieve optimal results.
Adjusting laser settings for leather involves finding the right balance between power, speed, and resolution.
Because CO2 lasers can cut through leather with minimal edge burns in a single pass, it is advised to use one with a power rating of at least 40W when cutting leather.
On the other hand, thin leather pieces can also be cut in several passes using a diode laser.
Below, we’ll discuss the essential laser settings for successful, high-quality laser engraving on leather.
Power Settings: Low to Medium Power:
- Reasoning: Leather is a relatively delicate material, and using too much power can lead to burning or scorching.
- Recommended Range: Start with low to medium power settings (20% to 40%) and adjust based on the type and thickness of the leather.
Speed Settings: Moderate to High Speed:
- Reasoning: Faster engraving speeds help prevent excessive heat buildup, reducing the risk of burning and ensuring cleaner lines.
- Recommended Range: Begin with moderate to high speeds (500 to 1000 mm/s) and refine based on the desired engraving depth and detail.
Resolution Settings: Higher DPI for Detail:
- Reasoning: Leather engraving often involves intricate designs and fine details. Higher dots per inch (DPI) settings enhance precision.
- Recommended Range: Use a resolution of 500 to 1000 DPI for intricate and detailed engravings.
Test Engravings: Always Conduct Test Runs:
- Reasoning: The characteristics of leather can vary, so it’s crucial to perform test engravings on scrap pieces before working on the final project.
- Procedure: Test different combinations of power, speed, and resolution settings to identify the optimal configuration.
Focus Adjustment: Ensure Proper Focusing:
- Reasoning: A well-focused laser beam contributes to sharper and clearer engravings.
- Procedure: Adjust the focus of the laser to match the thickness of the leather. Conduct tests to find the ideal focal point for your specific leather type.
Ventilation and Air Assist: Utilize Ventilation:
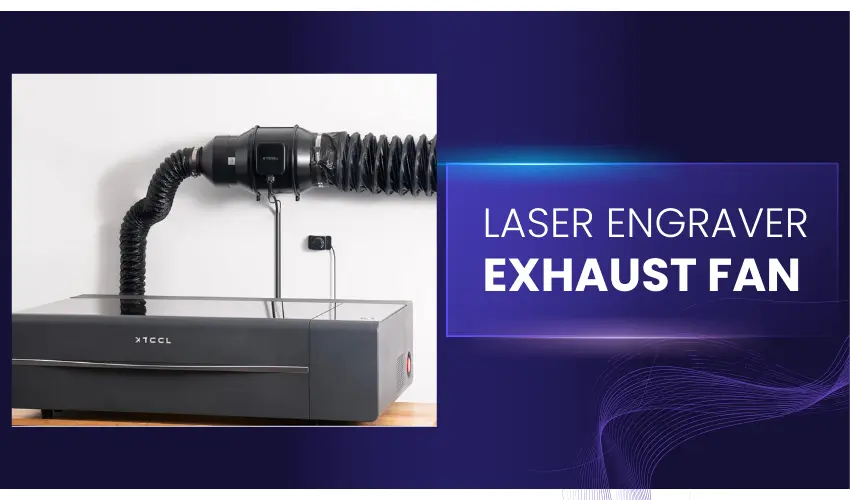
- Reasoning: Engraving on leather can produce smoke and fumes. Adequate ventilation helps dissipate these byproducts, preventing them from settling on the material.
- Procedure: Ensure your workspace has proper ventilation, and consider using air assist to blow away debris during engraving.
Consider Material Coating: Pre-Coated or Treated Leather:
- Reasoning: Some leather comes pre-coated or treated, altering its engraving properties.
- Procedure: Adjust laser settings accordingly for pre-coated leather, and be aware that treatments may affect the appearance of engravings.
Cleanup and Post-Processing: Post-Engraving Cleanup:
- Reasoning: After engraving, clean the leather surface to remove any residue or leftover masking tape.
- Procedure: Gently wipe the engraved leather with a soft, lint-free cloth or use a mild cleaning solution if necessary.
- Optional Sealing: To protect the burned-in design, consider sealing it with Acrylic Resolene, which is readily available on Amazon. This water-based solution can be applied to the leather by wiping or spraying.
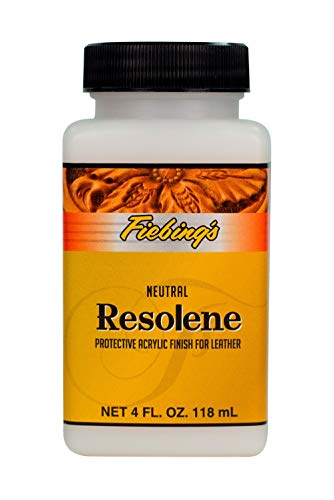
- VERSATILE: Fiebing's Acrylic Resolene is a flexible and durable top coat designed to protect dyed, antiqued, or polished leathers, providing a versatile solution for various leathercraft projects.
- Procedure: Use an airbrush to apply a 50/50 mixture of water and Resolene. This creates a waterproof finish while allowing the leather to be oiled without compromising the design. For conditioning, extra virgin olive oil is an excellent choice. It nourishes the leather and helps preserve and protect engraved designs effectively.
By understanding and fine-tuning these laser settings, you can achieve exceptional results when engraving on leather.
Remember that each project may require unique adjustments, so continuous testing and refinement are key to mastering the art of laser engraving on leather.
The Right Leather For Laser Engraving Recommendations
Springfield Round Vegetable Tan Leather Coasters
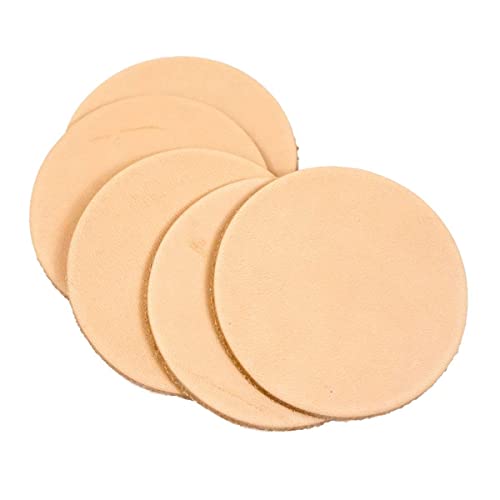
- Premium Import Veg‑Tanned Leather – Made from genuine vegetable‑tanned import leather. Each piece is selected for a smooth, clean surface with minimal imperfections, ideal for tooling, stamping, carving, and engraving.
If you’re looking for high-quality leather blanks for laser engraving, tooling, stamping, or carving, this 25-pack of round vegetable-tanned coasters from Springfield Leather Company is an excellent choice.
Made from genuine vegetable-tanned leather, these blanks are non-toxic, smooth, and consistent in thickness (3.2–3.6mm, 8–9 oz weight). That makes them perfect for both hobby projects and small business engraving.
Each blank is 3-1/4″ in diameter, which is ideal for coasters, ornaments, patches, and custom craft projects. The natural veg-tan finish ensures engravings come out sharp, dark, and professional-looking.
Pros
- Genuine vegetable-tanned leather (safe and non-toxic)
- Consistent thickness (3.2–3.6mm / 8–9 oz) for reliable engraving results
- Smooth, pre-cut surfaces with minimal imperfections
- Multi-purpose (engraving, tooling, stamping, carving, painting)
- Bulk pack of 25 blanks—great value for craft fairs, classes, or business production
Cons
- Only available in one size (3-1/4″)—not ideal for larger projects
- Slight natural variations in color/texture (typical of real leather)
- Edges may require light sanding if you want a polished finish
The Springfield Leather Company Round Vegetable Tan Leather Blanks are among the best leather blanks for laser engraving available.
They engrave beautifully, are safe to use, and come in a versatile coaster size perfect for crafts and small businesses.
If you want consistent, ready-to-use leather blanks that deliver professional engraving results, this 25-pack is a smart investment.
xTool Leather RFID Blocking Bifold Wallet
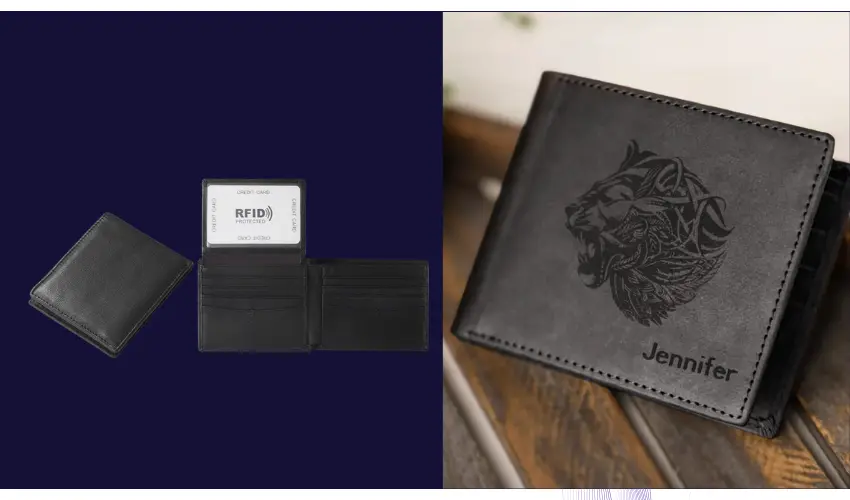
The xTool Leather RFID Blocking Bifold Wallet is a great choice for laser engraving projects because it combines a practical everyday item with a smooth surface that is ready for personalization.
Made from durable leather, the wallet has a soft texture, a waterproof finish, and a clean engraving area that works well with laser engraving machines.
Compatible with CO2, diode, infrared, fiber, MOPA, and UV lasers, this wallet gives makers plenty of options for creating custom gifts, branded products, or personalized accessories.
The black and coffee color options provide a nice contrast for engraved designs, making logos, names, and artwork stand out.
The wallet is designed for daily use and features RFID-blocking technology to help protect cards from unauthorized scans.
It includes multiple card slots, cash storage, and a slim bifold design that holds over 10 cards without feeling bulky.
Pros:
- The smooth leather surface is easy to engrave
- Compatible with most laser systems
- RFID protection for added security
- Great blank product for personalized gifts or small businesses
- Compact design with plenty of storage
Cons:
- Engraving results may vary depending on laser type and settings
- Limited color options
Overall, the xTool Leather RFID Blocking Bifold Wallet is an affordable and practical engraving blank for beginners, hobbyists, and small businesses.
It is a simple way to turn a standard wallet into a personalized product with professional-looking results.
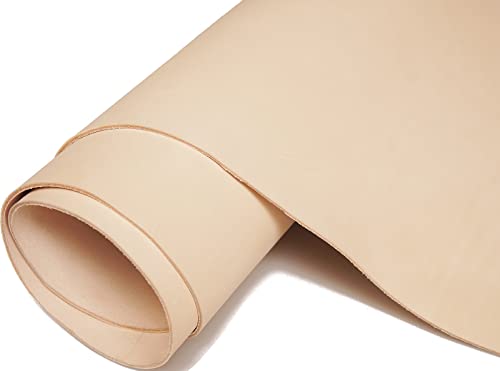
Muse Craft Flawless 5-6oz Vegetable Tanned Leather

- 📌 PROFESSIONAL-GRADE THICKNESS FOR ALL YOUR PROJECTS: 5-6 oz (1.9-2.3mm) This is the perfect thickness for durable leather craft. It's stiff enough to hold its shape for tooling and stamping, yet still flexible for clean folding and molding.
The Muse Craft 12″x24″ full-grain vegetable-tanned leather sheet is a premium option for anyone serious about leatherwork.
At 5–6 oz thickness (1.9–2.3mm), it’s sturdy enough for durable projects like holsters, belts, and sheaths, while still workable for engraving, tooling, and dyeing.
Imported from European bull hides and tanned with Italian methods, this leather is advertised as flawless—free from holes, scratches, or stains.
Its natural veg-tan composition means it engraves beautifully, absorbs dye evenly, and is safe to use.
Pros
- Genuine full-grain vegetable-tanned leather (safe and non-toxic)
- Flawless, smooth surface with no defects
- Consistent thickness (5–6 oz / 1.9–2.3mm)
- Works well for engraving, tooling, dyeing, stamping, and carving
- Large precut size (12″x24″)—ready to use for multiple projects
- Stronger than cowhide; sourced from bull hides
Cons
- Higher cost compared to PU or scrap leather packs
- Stiffer than lighter-weight leathers, may require more effort to cut/shape
- Limited to one size (12″x24″), so bigger projects may need multiple sheets
The Muse Craft Flawless Veg-Tan Leather Precut is an excellent choice for crafters and small businesses who want high-quality, natural leather for engraving and tooling.
Its flawless finish, durability, and engravability make it one of the best leathers for laser cutting and engraving—well worth the investment if you value premium results.
xTool Brown Genuine Leather Slim Keychain
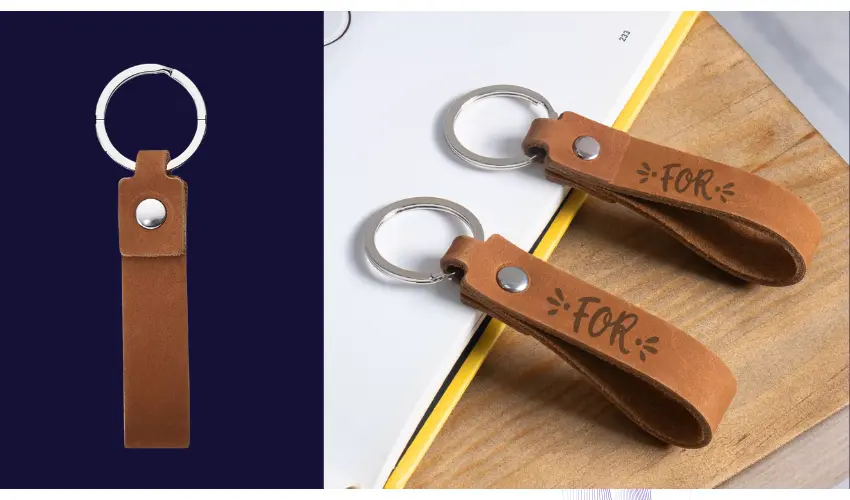
The xTool Brown Genuine Leather Slim Keychain is a simple and affordable engraving blank that works well for personalized gifts, small business products, and everyday accessories.
Its slim leather design provides a smooth engraving surface for adding names, logos, initials, or custom artwork.
Made with a soft leather material and a fine-textured finish, the keychains have a premium look while remaining lightweight and comfortable for daily use.
The brown color creates a classic appearance and provides good contrast for laser engraving results.
Each pack includes 10 keychains, making it a practical option for batch projects such as wedding gifts, corporate branding, event giveaways, or personalized key sets.
The keychains are compatible with diode, CO2, infrared, fiber, MOPA, and UV lasers.
Pros:
- 10-pack is great for batch engraving projects
- Smooth surface for names, logos, and designs
- Compatible with most laser systems
- Lightweight and practical for everyday use
- Great option for gifts and small business products
Cons:
- Small engraving area limits larger designs
- Color options are limited
Overall, the xTool Brown Slim Keychain is a useful laser engraving blank for beginners and makers who want an easy project with a professional finish.
It is especially suitable for personalized gifts, branded merchandise, and small-batch production.
Vegetable Tanned Leather Sheets (3.5-4.0oz)
- Full Grain Tooling Leather:This is Top-Grade full grain cowhide leather,the surface of the leather is more delicate, the pores are finer and more even, and the texture is better. This is vintage style PULL-UP oil tanned leather, feel tight and firm. Smells good too. All our products meet the requirements of environmental protection, the materials used are all environmentally friendly materials, Can be used with confidence.
The Jeereal full-grain vegetable-tanned leather sheet is a versatile and eco-friendly option for crafters and laser engraving enthusiasts.
At 3.5–4 oz (1.5mm thick), it strikes a balance between flexibility and durability, making it suitable for engraving, tooling, sewing, and stamping.
Made from top-grade full-grain cowhide, it has a smooth, soft feel with fine pores and a natural vintage pull-up finish that develops character over time.
It engraves cleanly, cuts easily with lasers, and works well for wallets, belts, holsters, and hobby projects.
Pros
- Genuine full-grain vegetable-tanned cowhide (eco-friendly and safe)
- Smooth, consistent texture with vintage pull-up style
- Perfect thickness (3.5–4 oz / 1.5mm) for engraving and cutting
- Multiple size options available (custom sizes on request)
- Durable yet workable for a wide range of leather crafts
- Ages beautifully with use and develops a natural shine
Cons
- Surface scratches easily (though restorable with wax/cleaner)
- Not as water-resistant as treated leathers
- Premium material—cost may be higher than PU or scrap leather
- Must be properly maintained to prevent drying or staining
The Jeereal Vegetable Tanned Leather Sheet is one of the best leathers for laser cutting and engraving in its price range.
With its smooth surface, manageable thickness, and eco-friendly full-grain quality, it’s a solid choice for serious leatherworkers and small businesses looking for professional engraving results.
Conclusion
Choosing the right leather for laser engraving involves a thoughtful consideration of various factors, from leather type and thickness to texture and color.
By understanding the characteristics of different leathers and experimenting with laser settings, enthusiasts and artisans can embark on leather engraving projects with confidence, creating unique and personalized items that showcase the beauty of this versatile material.
Frequently Asked Questions
What type of leather is best for laser engraving?
The best leather for laser engraving is vegetable-tanned leather. It’s natural, non-toxic, and engraves with sharp contrast. Full-grain and top-grain vegetable-tanned leathers are also excellent choices because they provide clean, detailed results without releasing harmful fumes.
Can you laser engrave chrome-tanned leather?
No. Chrome-tanned leather contains chromium salts that release toxic fumes when exposed to a laser. It’s unsafe for both your health and your laser machine. Always avoid chrome-tanned leather for engraving or cutting.
Is synthetic leather safe for laser engraving?
Most Synthetic leather is made with plastics that emit chlorine gas and other harmful chemicals when lasered. This can damage your machine and pose serious health risks. Confirm that the leather is laser safe with the supplier before purchasing.
What thickness of leather works best for laser engraving?
Most crafters prefer 2mm–3mm (5–7 oz) vegetable-tanned leather sheets. This thickness is sturdy enough for items like wallets, coasters, and patches, but still engraves and cuts cleanly. Thicker leather (4mm+) works for belts and holsters but may require multiple passes.
How can I tell if leather is safe for engraving?
Check with the supplier to confirm if it’s laser safe. If the listing says “chrome-tanned” or “vinyl,” avoid it. Genuine veg-tan leather is usually pale beige when untreated, and it darkens beautifully with engraving.