Laser engraving on paper is more versatile than most people realize. It’s precise, permanent, and adds texture that traditional printing can’t match.
Whether you’re creating custom stationery, eco-friendly packaging, or artistic prints, laser engraving on paper delivers a professional finish with personality.
Table of Contents
In this complete guide, you’ll learn how laser engraving works, what paper types to use, recommended settings, and key safety tips to ensure clean, beautiful results every time.
What Is Laser Engraving on Paper?
Laser engraving on paper uses a focused laser beam to vaporize thin layers of the paper surface. Instead of cutting through, the laser gently burns the top fibers, leaving a precise, high-contrast mark.
The result is a permanent design that doesn’t fade or smear — perfect for detailed text, logos, and fine graphics. Unlike printing, engraving doesn’t require ink or toner, making it both eco-friendly and cost-efficient.
Why Use Laser Engraving on Paper?
Paper might seem like a fragile material for laser engraving, but it can produce stunning results. Here are some reasons why you might want to use laser engraving on paper:
- Precision: Laser engraving and cutting can create highly detailed and intricate designs that are difficult to achieve with traditional printing or cutting methods.
- Customization: Each piece can be personalized with unique designs, text, or images.
- Versatility: It works on various types of paper, from thin sheets to thicker cardstock.
- Aesthetic Appeal: The engraved effect adds a unique, elegant touch to invitations, business cards, art prints, and more.
What kind of laser is used for paper engraving and cutting?
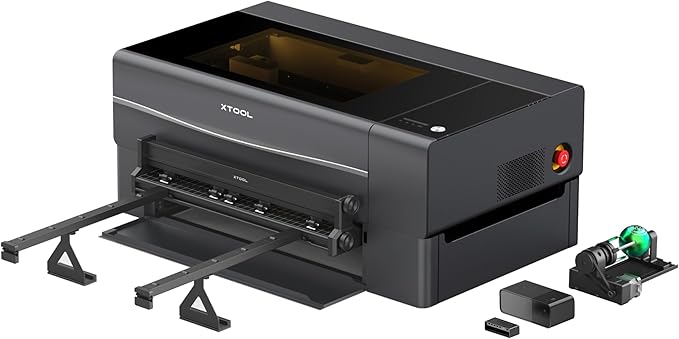
A CO₂ laser engraver like the xTool P2S is ideal for paper. It works efficiently with organic materials like paper, wood, and leather. Diode lasers can also work, but CO₂ systems offer better precision and smoother shading on paper surfaces.
Best Paper Types for Laser Engraving & Cutting
The choice of paper plays a crucial role in the quality and outcome of the engraving. Here’s a guide to the types of paper most suitable for laser engraving and cutting, along with their characteristics and ideal uses.
Cardstock
Description: Cardstock is a thick, sturdy type of paper that is more durable than regular paper but still flexible. It is often used for greeting cards, business cards, and covers.
Characteristics:
- Thickness: Usually ranges from 50 lb (135 gsm) to 110 lb (300 gsm) or more.
- Durability: Strong and resistant to tearing.
- Surface: Smooth, but available in various textures.
Ideal Uses:
- Greeting Cards: Perfect for creating personalized, high-quality cards.
- Business Cards: Durable enough to withstand frequent handling.
- Art Projects: Suitable for detailed designs and cutouts.
Laser Engraving Tips:
- Settings: Medium power and speed settings work best to prevent burning.
- Testing: Always run a test engraving to adjust settings.
Vellum
Description: Vellum is a translucent, delicate paper that adds an elegant touch to projects. It is often used for overlays in invitations and special documents.
Characteristics:
- Transparency: Semi-transparent, allowing light to pass through.
- Texture: Smooth and slightly glossy surface.
- Thickness: Typically thinner than cardstock but still sturdy.
Ideal Uses:
- Wedding Invitations: Adds a sophisticated, layered effect.
- Art Prints: Great for creating light, airy designs.
- Overlays: Used as an overlay on darker papers for contrast.
Laser Engraving Tips:
- Settings: Use low power and high speed to avoid scorching.
- Securing: Ensure the paper is flat and secure to prevent movement.
Construction Paper
Description: Construction paper is a heavyweight paper available in various colors, commonly used in crafts and school projects.
Characteristics:
- Thickness: Thicker than standard paper, around 80 lb (216 gsm).
- Color: Available in a wide range of vibrant colors.
- Texture: Slightly rough and fibrous surface.
Ideal Uses:
- Crafts: Ideal for bold, colorful projects.
- Educational Projects: Common in school art projects.
- Posters: Suitable for making decorative posters and signs.
Laser Engraving Tips:
- Settings: Medium power and speed; adjust based on color and thickness.
- Color Consideration: Darker colors may require different settings than lighter ones.
Specialty Papers
Description: Specialty papers include a wide variety of textures, finishes, and coatings that can add unique effects to your engravings.
Types:
- Textured Paper: Includes linen, felt, and other textures that add depth.
- Metallic Paper: Shiny, metallic finishes that create a striking appearance.
- Coated Paper: Glossy or matte coatings that enhance the engraved design.
Ideal Uses:
- Invitations: Adds a luxurious feel to special invitations.
- Art Prints: Perfect for creating unique, high-end art pieces.
- Product Packaging: Enhances the appearance of packaging materials.
Laser Engraving Tips:
- Settings: Adjust settings based on the specific type of specialty paper; test thoroughly.
- Handling: Be aware of the coating and texture to avoid smudging or damage.
If you’re looking for paper types suitable for laser engraving on Amazon, here are some strong picks plus tips on what to look for.
What to look for in laser-engraving-friendly paper
- Heavyweight stock (e.g., 180 gsm or more) to avoid burning through.
- Matte finish or minimal coating (so the laser mark shows clearly).
- Good consistency (flat sheets, little warping).
- Pre-tested by users for engraving if possible.
- Compatible dimensions for your machine.
Recommended paper types/products
Translucent Vellum Paper

- TRANSLUCENT VELLUM SHEETS - Set includes 50 sheets of translucent vellum paper for arts and crafts. Each sheet measures 8.5 x 11 inches.
The Dowsabel 68LB Translucent Vellum Paper 8.5 x 11 inch 50 Sheets is an excellent choice for anyone working with laser cutting or detailed paper crafts.
This vellum hits a nice balance between durability and softness. At 68LB (100 GSM), it’s strong enough to handle precise laser cuts without tearing or warping, yet still keeps that light, translucent look that makes designs pop. Cuts come out clean and crisp, especially with CO2 lasers, making it ideal for intricate patterns and fine details.
The smooth surface is another plus. It works well for printing, laser cutting, and engraving, and it feeds easily through most printers. For projects like wedding invitations, overlays, or layered artwork, the semi-transparent finish adds a subtle, elegant effect that’s hard to get with regular paper.
On the downside, it still needs careful handling. Like most vellum, it can crease if you’re not gentle, and it’s not meant for designs that need a fully opaque background.
Overall, it’s a reliable, high-quality material that performs consistently for laser work and adds a refined look to creative projects.
Antique Gold Cardstock Paper
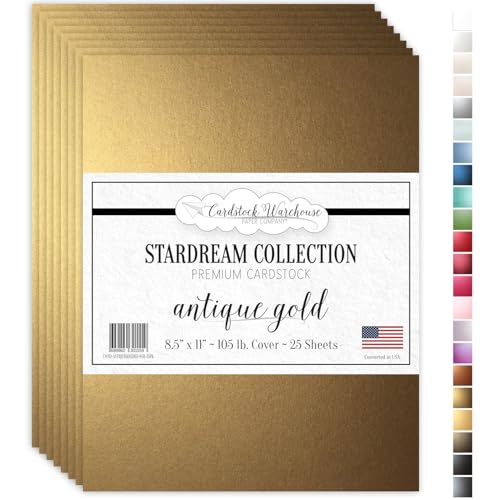
- 𝗜𝗻𝘁𝗿𝗼𝗱𝘂𝗰𝗶𝗻𝗴 𝗦𝘁𝗮𝗿𝗱𝗿𝗲𝗮𝗺 𝗔𝗻𝘁𝗶𝗾𝘂𝗲 𝗚𝗼𝗹𝗱 𝗖𝗮𝗿𝗱 S𝘁𝗼𝗰𝗸 𝗣𝗮𝗽𝗲𝗿: Take your printing, crafting, and DIY card-making projects to the next level with Stardream Antique Gold pearlescent paper. Perfectly sized at 8.5 x 11" this high-end dark burnished gold shimmer cardstock ensures your creations make a lasting impression. Stardream cardstock papers are available in a stunning range of beautiful hues.
The Cardstock Warehouse Stardream Antique Gold Cardstock 105 lb 8.5 x 11 is a premium option if you want a more polished, high-end look for your projects.
The best feature is the finish. It has a subtle metallic shimmer that looks rich without being overly flashy. The antique gold tone feels warm and professional, making it a great fit for wedding invitations, signage, or luxury packaging.
At 105 lb (284 GSM), this cardstock is thick and sturdy. It handles laser cutting and engraving well, especially for clean shapes and bold designs. The solid-core color is a big plus too, since there’s no white edge showing after cutting.
It’s also versatile across different techniques like die-cutting, embossing, and foil work. Just keep in mind that the thickness means you’ll need proper settings or even multiple passes for precise cuts, and it’s not suitable for inkjet printers.
The only real drawback is that it requires a bit more effort to work with due to its weight, especially when folding.
Overall, it’s a high-quality cardstock that delivers a refined, professional finish, ideal for projects where presentation really matters.
Preparing Your Design For Laser Engraving On Paper

Laser engraving on paper is a beautiful way to create intricate designs, personalized cards, detailed art prints, and more. The key to successful laser engraving is proper preparation of your design.
Whether you’re a beginner or an experienced engraver, this guide will help you prepare your designs to achieve the best results.
Choose the Right Software
To start, you need the right software to create or modify your design. Popular graphic design programs include:
- LightBurn: Layout, editing, and control software for your laser engraver.
- Adobe Illustrator: Industry-standard for vector graphics and detailed designs.
- CorelDRAW: Another powerful tool for vector design, widely used in laser engraving.
Decide Between Vector and Raster
Understanding the difference between vector and raster images is crucial:
- Vector Graphics: Composed of paths defined by mathematical formulas. They are scalable without loss of quality, making them ideal for line art, logos, and text.
- Raster Images: Made up of pixels. They are best for photographs and images with complex color gradients. However, they can lose quality when resized.
For laser engraving on paper, vector graphics are generally preferred due to their precision and scalability. However, raster images can be used for detailed engravings if prepared correctly.
Create or Import Your Design
Start by creating your design or importing an existing one into your chosen software. Here are some tips for both methods:
- Creating a Design: Use the drawing tools to create shapes, lines, and text. Keep your design simple and clear for the best engraving results.
- Importing a Design: If you’re importing a design, make sure it’s high-resolution (300 DPI or higher) to avoid pixelation. Convert it to black and white if necessary.
Convert Your Design to Black and White
Laser engravers interpret designs in shades of black and white. Black areas are engraved (burned away), while white areas remain untouched. Here’s how to prepare your design:
- For Vector Designs: Ensure all lines and shapes are in black. You can adjust the stroke thickness and fill color to refine your design.
- For Raster Images: Convert your image to grayscale first, then to black and white using threshold adjustments. This helps in defining which parts of the image will be engraved.
Adjust Design Size and Resolution
Make sure your design fits within the dimensions of your paper and the working area of your laser engraver. Here’s how to adjust:
- Size: Use your software’s scaling tools to adjust the size of your design. Ensure it fits well within your paper size (e.g., A4, letter, etc.).
- Resolution: Set a high resolution (at least 300 DPI) for raster images to ensure fine details are captured accurately.
Fine-Tune the Design
Refine your design by making small adjustments:
- Simplify Details: Reduce overly intricate details that might not translate well onto paper.
- Line Weight: Ensure that lines are thick enough to be clearly engraved but not so thick that they merge together.
- Spacing: Maintain adequate spacing between design elements to prevent them from blending during engraving.
Set Up Layers (Optional)
Using layers can help you organize different elements of your design, especially if you’re combining vector and raster elements. You can:
- Separate Elements: Place text, shapes, and images on different layers for easier editing and adjustments.
- Engraving Order: Control the order in which elements are engraved by arranging layers accordingly.
Export Your Design
Once your design is ready, you need to export it in a format compatible with your laser engraver. Common formats include:
- SVG (Scalable Vector Graphics): Ideal for vector designs.
- PDF: Widely supported and preserves design quality.
- DXF (Drawing Exchange Format): Often used for CAD designs.
- PNG or BMP: For raster images, ensure they are high-resolution and in black and white.
Test Your Design
Before engraving your final piece, it’s a good idea to run a test:
- Test Material: Use a scrap piece of the same type of paper you’ll be engraving on.
- Settings: Use the same laser power, speed, and resolution settings you plan to use for the final project.
- Adjustments: Make any necessary adjustments based on the test results. This could include tweaking the design or modifying the laser settings.
Finalize Laser Settings
Set your laser engraver to the appropriate settings for paper. These typically include:
- Power: Low to medium power to avoid burning through the paper.
- Speed: High speed to ensure quick and clean engraving.
- Resolution: High resolution for detailed designs (500 DPI or more).
Refer to your laser engraver’s manual for specific settings recommendations, as they can vary between models.
Step-by-Step: Laser Engraving or Cutting Paper
1. Prepare your design
Create or import your design into software like LightBurn and convert it to vector format if needed. Resize it to fit your paper.
2. Set up your machine
Make sure your laser is calibrated. Adjust speed and power settings for paper, and place a honeycomb or waste board underneath for safety.
3. Position the paper
Lay the paper flat on the bed. Use a honeycomb table so heat and smoke can escape underneath. Use magnets or pins to hold it in place so it doesn’t shift. We recommend using these xTool Honeycomb Material Pins:
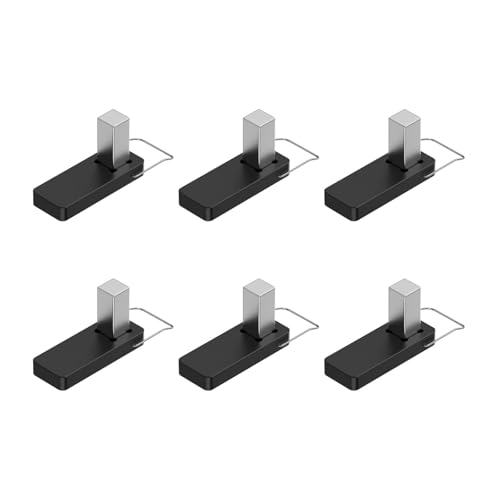
- It is made of strong plastic and magnets that press down on the wood for a clean and consistent cut on warped boards
4. Start cutting
Run the job and monitor it closely. Paper can ignite if settings are off, so don’t leave it unattended.
5. Remove the design
Once finished, carefully lift the paper to avoid tearing delicate sections.
6. Clean up
Brush off any residue and make small touch-ups if needed.
Extra Tips for Better Results
- Keep your lens and mirrors clean to avoid burn spots
- Use multiple light passes instead of one strong pass
- Test settings for every new paper type
Recommended Laser Settings for Paper
Start with these baseline parameters and fine-tune for your specific machine:
Setting | Recommended Range |
|---|---|
Laser Type | CO₂ Laser (30–60W) |
Power | 5–20% |
Speed | 300–600 mm/s 11.81–23.62 in/s |
Frequency (Hz) | 500–1000 |
Focus | Slightly defocused for softer shading |
Pro Tip: Always test first. Each paper type reacts differently, so start with lower power and higher speed
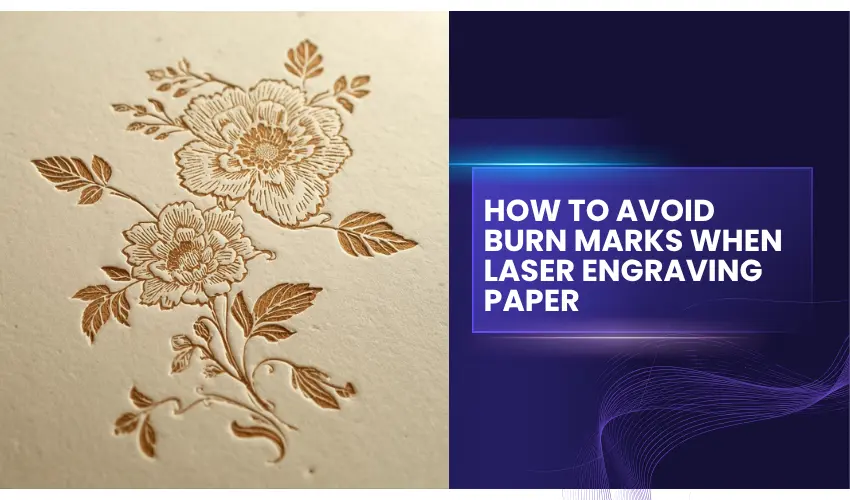
How to avoid Burn Marks When Laser Engraving Paper
Burn marks happen because paper heats up fast. The trick is controlling heat, airflow, and settings so the laser cuts cleanly without charring.
Here’s how to avoid it:
1. Use Lower Power and Higher Speed
Too much power is the main cause of burns.
Run your laser at low power and high speed, then increase power slightly only if it doesn’t cut through.
2. Turn On Air Assist
Air assist is one of the most effective fixes.
It blows air at the cutting point to:
- Cool the paper
- Remove smoke and debris
- Prevent scorching on edges
Even a small airflow makes a noticeable difference.
3. Raise the Paper Slightly
If your paper sits flat on a solid surface, heat reflects back and causes burn marks.
Use a honeycomb bed so heat and smoke can escape underneath.
4. Choose the Right Paper
Some papers burn more than others.
Better options:
- Cardstock
- Vellum
- Craft paper
- Fine art paper
Avoid overly thin or heavily coated paper unless you dial in settings carefully.
5. Keep Your Machine Clean
Dirty lenses or mirrors can scatter the laser and cause uneven burning.
Clean optics regularly to keep cuts sharp and controlled.
We recommend using the Eclipse Optic Cleaning Solution with Wellgler’s Lint-Free Cleaning Swabs for excellent results.


6. Do Test Cuts First
Every paper type behaves differently.
Run small test cuts to find the best balance of:
- Speed
- Power
- Pass count
7. Use Multiple Light Passes
Instead of one strong pass, try 2–3 lighter passes.
This reduces heat buildup and gives cleaner edges.
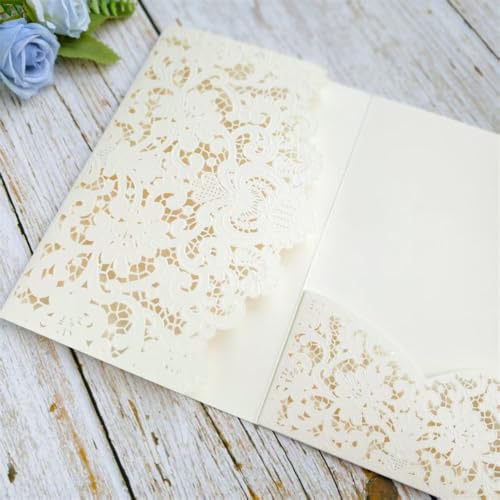
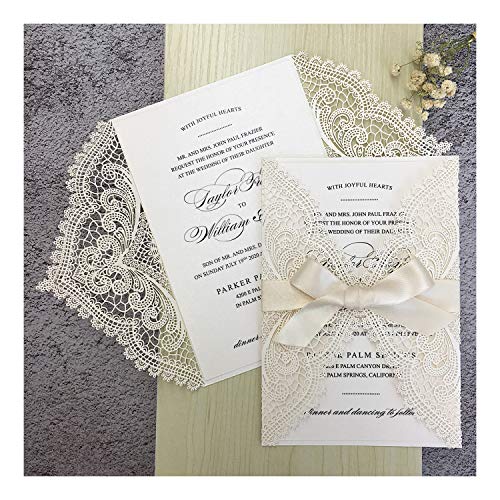
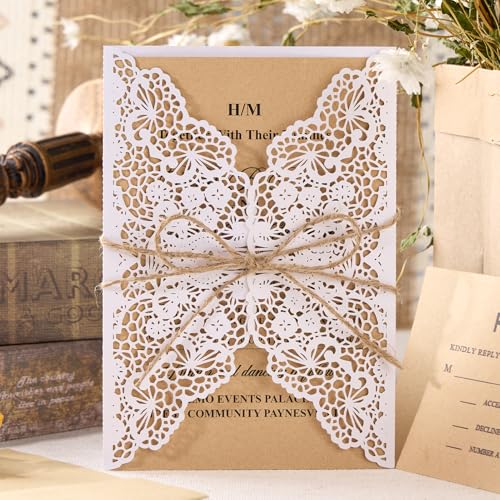
Creative Uses for Laser Engraving on Paper

Laser engraving can turn ordinary paper into a custom design element. Popular uses include:
- Wedding Invitations – Intricate details, monograms, and lace-like cuts.
- Business Cards – Textured logos that stand out.
- Custom Packaging – Add branded elements without using ink.
- Certificates & Diplomas – Permanent, elegant typography.
- Art Prints – Unique tones and patterns from light burns.
If you sell handmade or printed goods online, laser engraving adds a premium, artisanal touch that sets your brand apart.
Safety Tips for Laser Engraving Paper
Because paper burns easily, safety is critical:
- Use low power and high speed settings.
- Never leave the laser unattended.
- Keep a CO₂ extinguisher nearby.
- Use proper ventilation to remove smoke.
A little caution keeps your projects and equipment safe.
Conclusion
Laser engraving on paper is a versatile and exciting technique that allows you to create beautiful, detailed designs with precision and ease. Whether you’re making personalized greeting cards, unique business cards, or elegant invitations, understanding the basics of laser engraving on paper can help you achieve stunning results.
By selecting the right paper, preparing your design properly, setting up your laser engraver correctly, and following safety guidelines, you can unlock a world of creative possibilities. Experiment with different settings and designs to discover what works best for your projects, and enjoy the art of laser engraving on paper.
Frequently Asked Questions
Can you laser engrave on paper without burning it?
Yes — if you use the right settings. The key is low laser power and high engraving speed. For most CO₂ lasers (30W–60W), start at 5–15% power and 300–600 mm/s speed. Always test first on scrap paper. Using thicker paper (like 180–230 GSM cardstock) also helps prevent burn-through and warping.
Can you combine laser engraving and cutting on the same paper project?
Absolutely. Many creators combine engraving for detail and cutting for shape in a single design. For example, you can engrave a logo or pattern, then cut around it to make custom cards, packaging, or decorative art.
Just remember: use separate power settings — low for engraving, high for cutting — and always engrave first, then cut.
Is laser cutting paper safe?
It can be, as long as you monitor the process closely. Paper is flammable, so never leave your laser unattended and keep your machine clean to avoid fire risks.